pCOWeb
+030220966 – rel. 1.1 – 12.12.2017
17
4
FUNCTIONS
This chapter provides a guide to the use of the functions on the
pCOWeb
.
When parameters need to be set, references are made to chapter 9 on page 41.
4.1
WEB SERVER: CUSTOM PAGES
The “WEB server” function of the
pCOWeb
allows a PC running Mozilla Firefox to display the web pages saved on the
pCOWeb
.
The web pages can be divided into:
•
configuration pages (chapter 9 on page 41);
•
custom pages that can be added by the user.
In the custom pages, as well as the typical commands of the HTML standard, other commands (“tags”) can be added as per the CAREL standard; this allows
read or write access to the supervisor variables of the
pCO
controller.
ACCESS RESTRICTIONS
Access restrictions can be defined for all or some custom pages. Whenever a protected page with access restriction is called,
pCOWeb
displays a login
dialogue box requiring the Username / Password for the specific restriction (see 9.8.1 on page 49).
CGI SCRIPTS
CGI scripts can be developed in bash language or compiled languages. These must have the .cgi extension and must reside in the usr-cgi directory
(usr/local/root/flash/usr-cgi), otherwise they will not work. Whenever one or more CGI scripts is modified, click the “Fix permissions of HTML pages and CGI
scripts” link (see 9.3 on page 44).For a guide to CGI script for the
pCOWeb
see the documents available at
http://ksa.carel.com
.
4.1.1
Creating HTML pages
To create pages for the
pCOWeb
, a PC and knowledge of HTML are required. The area dedicated to
pCOWeb
on KSA,
http://ksa.carel.com
, features simple
web pages for the standard CAREL applications, which can be used as the starting point for creating custom web pages. The description of HTML is outside
of the scope of this document. Countless guides are available on the web, for example:
•
http://www.w3schools.com/
•
http://www.w3.org/MarkUp/
•
http://www.htmlgoodies.com/
•
http://www.htmlhelp.com/
Also refer to the documentation available at
http://ksa.carel.com
.
APPENDIX G on page 68 lists the CAREL tags and describes an example of the default demo page resident on the
pCOWeb
. Other pages are shown in
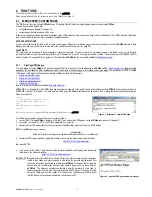
APPENDIX I on page 79 (“Plugins”). To create a simple HTML page, the Notepad application can be used on the PC, typing the following lines and saving the
file as “example.html”:
<html>
<!--tagparser="/pcotagfilt"-->
<h1>pCOWeb Demo Page</h1>
<br>
MAC address: <%macaddress%>
</html>
(the
<%macaddress%>
string is a CAREL tag that returns the MAC address of the
pCOWeb).
Figure 4.a - Example of a simple HTML page
To load the page created to the user memory, proceed as follows:
1.
connect the PC to the
pCOWeb
, making sure that the PC can access the HTML pages on the
pCOWeb
(see chapter 3 a pagina 11);
2.
access the user memory via FTP or SCP (see paragraph 0 on page 18);
3.
transfer the file of the page created to the area (/usr/local/root/flash/http/) reserved for custom HTML pages.
NOTE:
The
pCOWeb
web server considers:
/usr/local/root/
as the root directory; each page must be located inside this directory (or subdirectory).
4.
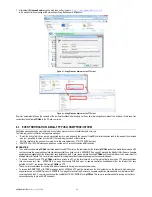
Display the HTML page loaded by typing the location and name in the web browser’s address field:
http://10.0.0.145/http/example.html
then press ENTER.
5.
If a directory called “newdir” were created inside /usr/local/root/flash and the page was loaded into
this directory, the address would be:
http://10.0.0.145/newdir/example.html
IMPORTANT: Browsers such as Mozilla Firefox, Google Chrome and others create a copy of the pages
visited in their cache, and when the page is next called the contents may be loaded from
the cache, rather than requesting an update from
pCOWeb
. This means that at times the
desired result is not displayed, above all with dynamic pages such as those used on
pCOWeb
. The browsers, nonetheless, feature a specific command to force them to
update the pages from the web server (for example Ctrl+F5 requests the page from the
server, F5 could load from the cache). Ctrl+F5 should be used whenever there is doubt
that the result may haven been loaded from the cache on the PC.
Figure 4.b - How the HTML page created is displayed

