pCOWeb
+030220966 – rel. 1.1 – 12.12.2017
11
3
STARTING FOR THE FIRST TIME – ACCESSING
pCOWeb
FROM A COMPUTER
This chapter guides the user, even non-experts, in establishing a connection between the
pCOWeb
and a personal computer. The first part of the chapter
describes the
pCOWeb
– cable – personal computer (PC) connection, without involving an Ethernet network.
Nonetheless, a
pCOWeb
can be accessed from
a PC even if these are not connected together directly, but via a network (paragraph 3.2 on page 12); the latter procedure is more complex, as it also requires
the settings of the network devices that are normally managed by the administrator. Consequently, it is recommended to first try the direct connection. In any
case, once having accessed the device, the basic configurations can be completed (chapter 9 on page 41) and
pCOWeb
prepared for connection to the
network.
3.1
CONNECTING
pCOWeb
DIRECTLY TO A PC
This connection is used to access
pCOWeb
from a computer connected by cable. Normally this type of connection is used to test operation on the bench or to
initially configure
pCOWeb
for an installation that does not use “DHCP” automatic address setting (see 9.4.1 on page 45).Paragraph 3.2 on page 12, on the
other hand, describes the network connection procedure.
Equipment required:
A computer running, for example, Mozilla Firefox and fitted with an Ethernet network interface; if
pCOWeb
is already installed in the final destination and
cannot be removed, a portable computer is handier.
A shielded network cable.
Starting situation:
pCOWeb
installed on the
pCO
controller (see paragraph 2.1 on page 9);
pCO
controller NOT powered.
IMPORTANT: if the
pCO
controller is connected in the final installation, before powering up contact the installation manager.
The steps to be completed are as follows:
1
Configuration of the PC for direct connection to
pCOWeb
.
2
Connection and start-up of
pCOWeb
to check correct installation.
3
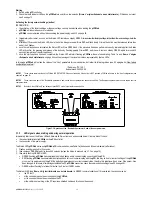
Activation of the factory network settings (button).
4
Access to the
pCOWeb
from the PC.
3.1.1
PC configuration
INFORMATION: the PC can communicate with
pCOWeb
if the settings on both devices are correctly aligned. As the
pCOWeb
default settings can only be changed once
the connection has been established with the PC, when first accessing the device the personal computer will need to be configured to adapt it to the
pCOWeb
default
settings.
A
– disconnect the personal computer from the data network (if connected), and connect it directly to the
pCOWeb
using the cable.
B
– IP ADDRESS AND SUBNET MASK
INFORMATION:
The personal computer must be set not to use the DHCP, but rather the following IP address: 172.16.0.2. The Subnet mask field also needs
to be set; the Gateway is not required.
For further information on the meaning of these parameters, see APPENDIX A on page 58 and APPENDIX B on page 59.
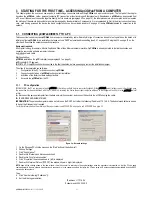
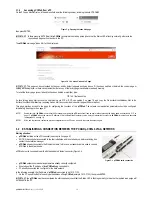
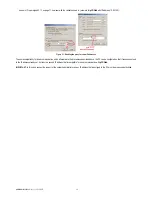
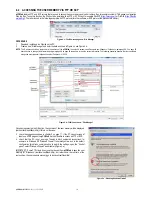
Figure 3.a - Network settings
1
On the Windows PC click the mouse on the “Start” button at the bottom left
2
Choose “Settings”
3
Click “Control panel”
4
Double click “Network and dial-up connections”
5
Double click “Local area connection”
6
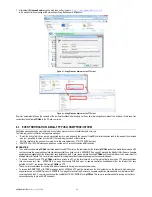
Click “Properties”: the window shown in (left) is displayed
7
Double click “Internet Protocol (TCP/IP)”: the window shown in (right) is displayed.
NOTE
down all the settings shown in the new window: this will be useful for returning to the original settings when the procedure is terminated, so that the PC can again
communicate with the data network it was previously connected to. In the example shown in the figure, the PC was using an IP address obtained automatically from the DHCP
server in the data network.
Then:
8
Click “Use the following IP address” ();
9
Set the following parameters:
IP address = 172.16.0.2
Subnet mask = 255.255.0.0


