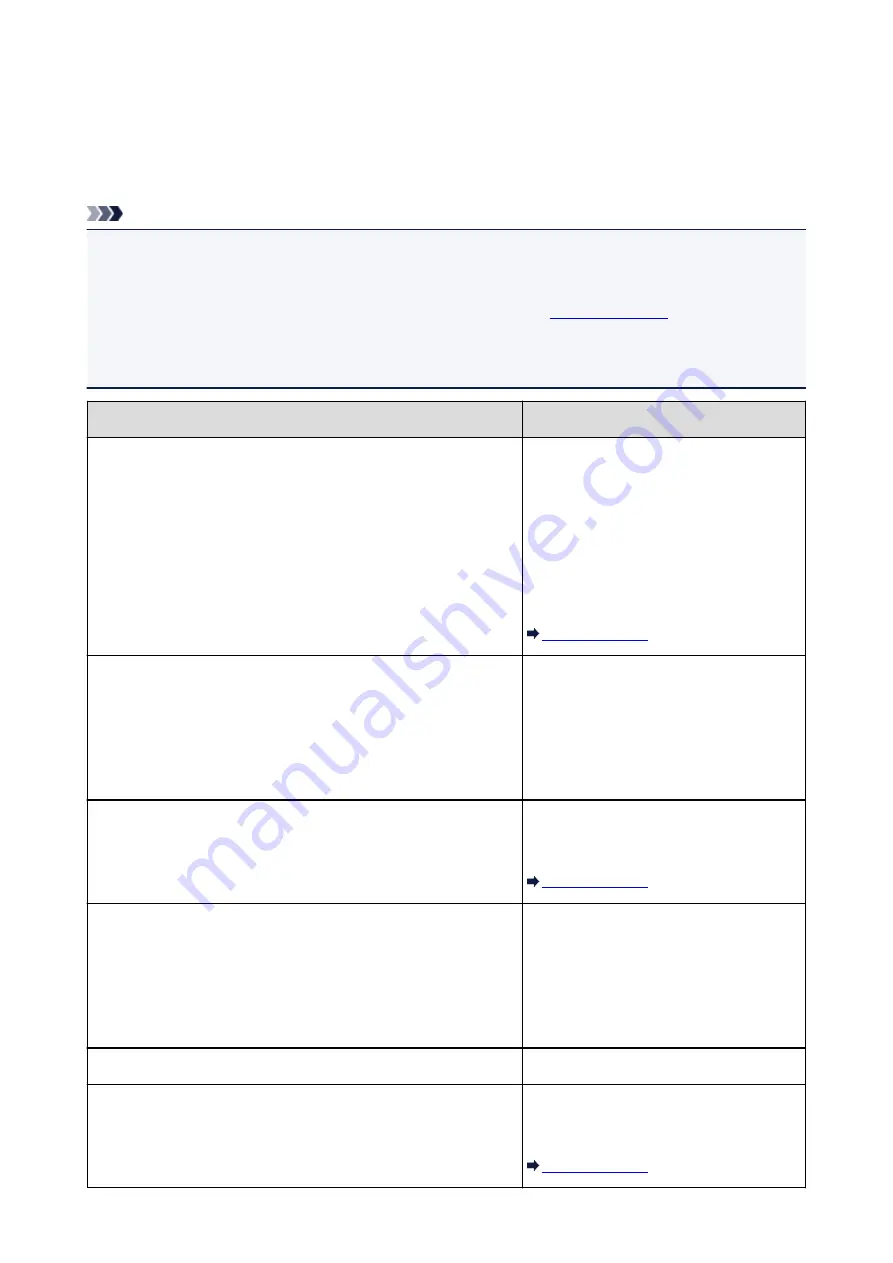
Error Message Appears on a PictBridge (Wireless LAN) Compliant
Device
The following are the possible errors that may occur when printing directly from a PictBridge (Wireless LAN)
compliant device and the countermeasures to clear them.
Note
• This section describes errors that are indicated on Canon-brand PictBridge (Wireless LAN) compliant
devices. The error messages and operations may vary depending on the device you are using. For
errors on non-Canon PictBridge (Wireless LAN) compliant devices, check the status of the
Alarm
lamp
and take the appropriate action to clear the error. For details, see
.
• For the errors indicated on the PictBridge (Wireless LAN) compliant device and their solution, also refer
to the instruction manual of the device. For other troubles on the device, contact the manufacturer.
Error Message on the PictBridge (Wireless LAN) Compliant Device Action
"Printer in use"
If the printer is printing from the computer or
warming up, wait until the job ends.
When it is ready, the printer starts printing
automatically.
If the printer is not printing from the computer
or warming up, check the number of how
many the
Alarm
lamp flashes and take the
appropriate action to resolve the error.
"No paper"
Load paper, and select
Continue
* in the
display on your PictBridge (Wireless LAN)
compliant device.
* To resume printing, you can also press the
RESUME/CANCEL
button on the printer
instead of selecting
Continue
on the device.
"Paper Error"
Check the number of how many the
Alarm
lamp flashes and take the appropriate action
to resolve the error.
"Paper jam"
Select
Stop
in the display on your PictBridge
(Wireless LAN) compliant device to stop
printing.
Remove the jammed paper, load new paper,
press the
RESUME/CANCEL
button on the
printer, then try printing again.
"Printer cover open"
Close the print head cover on the printer.
"No print head"
Check the number of how many the
Alarm
lamp flashes and take the appropriate action
to resolve the error.
362
Summary of Contents for iP110B
Page 10: ...6946 420 6A00 421 A000 422 A100 423 B201 424 B202 425 B203 426 B204 427 ...
Page 57: ... 8 Display area The display changes based on the menu you select 57 ...
Page 86: ...Safety Guide Safety Precautions Regulatory and Safety Information 86 ...
Page 93: ...Main Components and Basic Operations Main Components About the Power Supply of the Printer 93 ...
Page 94: ...Main Components Front View Rear View Side View Inside View 94 ...
Page 100: ...Note For details on replacing an ink tank see Replacing an Ink Tank 100 ...
Page 107: ...Loading Paper Loading Paper 107 ...
Page 124: ...Replacing an Ink Tank Replacing an Ink Tank Checking the Ink Status 124 ...
Page 176: ...Information about Network Connection Useful Information about Network Connection 176 ...
Page 233: ...Printing Printing from a Computer Printing from a Digital Camera 233 ...
Page 264: ...Adjusting Color Balance Adjusting Brightness Adjusting Intensity Adjusting Contrast 264 ...
Page 333: ...Problems with Printing Quality Print Results Not Satisfactory Ink Is Not Ejected 333 ...
Page 376: ...1403 Cause The print head may be damaged Action Contact the service center 376 ...
Page 377: ...1405 Cause The print head may be damaged Action Contact the service center 377 ...
Page 381: ...1660 Cause The ink tank is not installed Action Install the ink tank 381 ...
Page 398: ...5B00 Cause Printer error has occurred Action Contact the service center 398 ...
Page 399: ...5B01 Cause Printer error has occurred Action Contact the service center 399 ...


