Monitoring Wireless Network Status
Note
• This screen is not available depending on the printer you are using.
• When using the machine over the wired LAN, you cannot monitor network status.
1.
2. Select the printer in
Printers:
.
3. Select
Status
from the
View
menu.
The
Status
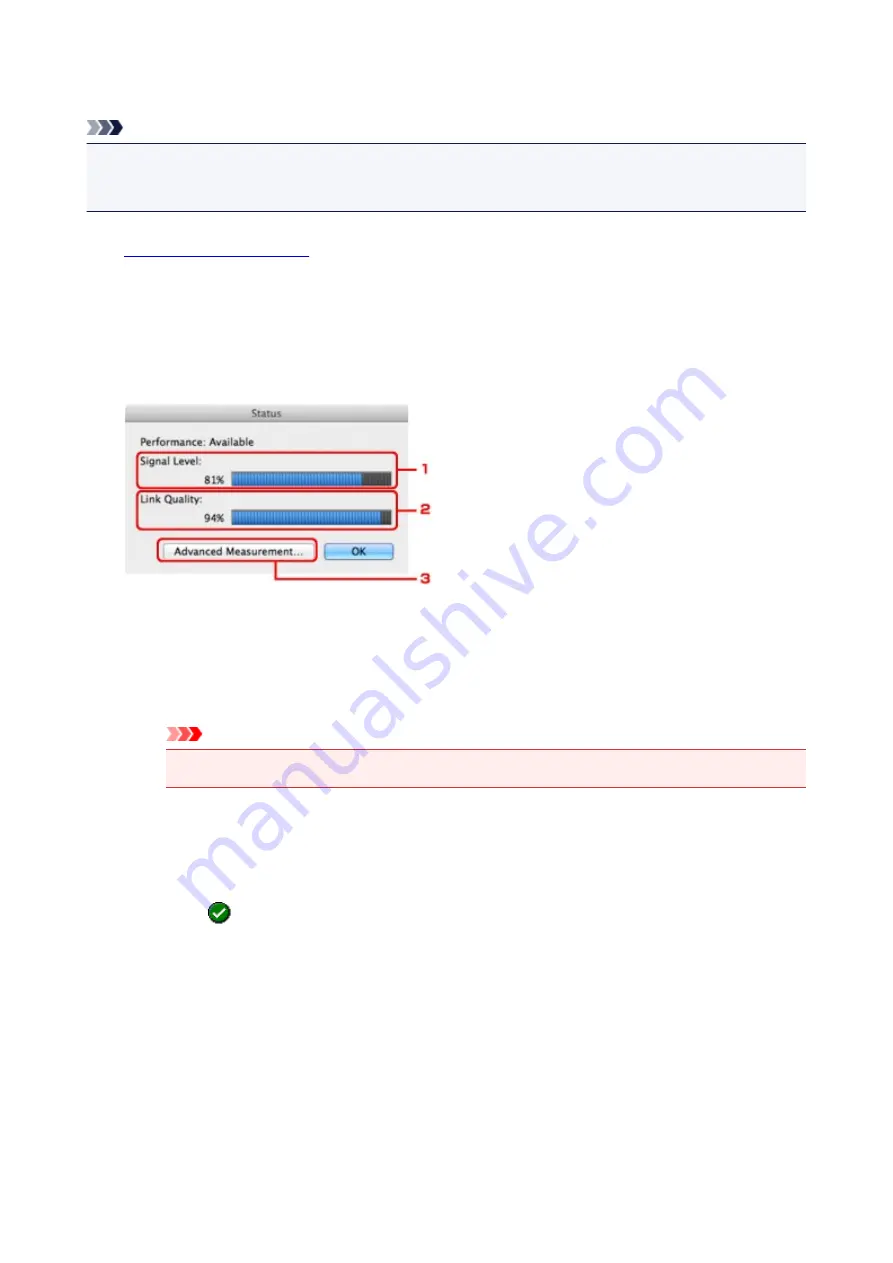
screen is displayed and you can check the printer status and connection performance.
1.
Signal Level:
Indicates the strength of the signal received by the printer, ranging from 0% to 100%.
2.
Link Quality:
Indicates the signal quality excluding the noise while communicating, ranging from 0% to 100%.
Important
• If the indicated value is low, move your printer closer to the wireless network device.
3.
Advanced Measurement...
Click to examine the connection performance between the printer and the access point. Follow the
instructions on the screen to start measuring and display the status. Measurement takes a few
minutes.
When
is displayed in
Connection performance between the printer and the access point:
,
the printer can communicate with the access point. Otherwise, refer to displayed comments and
Help for improving the status of communication link, and click
Remeasurement
.
• Check that the printer and the access point are located within the wireless connectivity range
with no obstacles between them.
• Check if the distance between the printer and the access point is not too far.
If they are too far, move them closer together (within 164 ft./50 m).
• Check that there is no barrier or obstacle between the printer and the access point.
In general, connection performance decreases for communications through walls or between
different floors. Adjust the locations to avoid such situations.
• Check that there are no sources of radio interference near the printer and the access point.
202
Summary of Contents for iP110B
Page 10: ...6946 420 6A00 421 A000 422 A100 423 B201 424 B202 425 B203 426 B204 427 ...
Page 57: ... 8 Display area The display changes based on the menu you select 57 ...
Page 86: ...Safety Guide Safety Precautions Regulatory and Safety Information 86 ...
Page 93: ...Main Components and Basic Operations Main Components About the Power Supply of the Printer 93 ...
Page 94: ...Main Components Front View Rear View Side View Inside View 94 ...
Page 100: ...Note For details on replacing an ink tank see Replacing an Ink Tank 100 ...
Page 107: ...Loading Paper Loading Paper 107 ...
Page 124: ...Replacing an Ink Tank Replacing an Ink Tank Checking the Ink Status 124 ...
Page 176: ...Information about Network Connection Useful Information about Network Connection 176 ...
Page 233: ...Printing Printing from a Computer Printing from a Digital Camera 233 ...
Page 264: ...Adjusting Color Balance Adjusting Brightness Adjusting Intensity Adjusting Contrast 264 ...
Page 333: ...Problems with Printing Quality Print Results Not Satisfactory Ink Is Not Ejected 333 ...
Page 376: ...1403 Cause The print head may be damaged Action Contact the service center 376 ...
Page 377: ...1405 Cause The print head may be damaged Action Contact the service center 377 ...
Page 381: ...1660 Cause The ink tank is not installed Action Install the ink tank 381 ...
Page 398: ...5B00 Cause Printer error has occurred Action Contact the service center 398 ...
Page 399: ...5B01 Cause Printer error has occurred Action Contact the service center 399 ...


