Changing the WPA/WPA2 Detailed Settings
Note
• This screen is not available depending on the printer you are using.
To change the wireless network settings of the printer, connect the printer and the computer with a USB
cable temporarily. If you modify the wireless network settings of the computer over wireless connection
without USB connection, your computer may not be able to communicate with the machine after modifying
the settings.
The example screenshots in this section refer to the WPA detailed settings.
1.
2. Select the printer in
Printers:
.
When the printer is connected to the computer with a USB cable temporarily, select the printer with
USB
appearing in the
Connected to
column.
3. Click the
Configuration...
button.
4. Click the
Wireless LAN
button.
5. Select
Use WPA/WPA2
in
Encryption Method:
and click
Configuration...
.
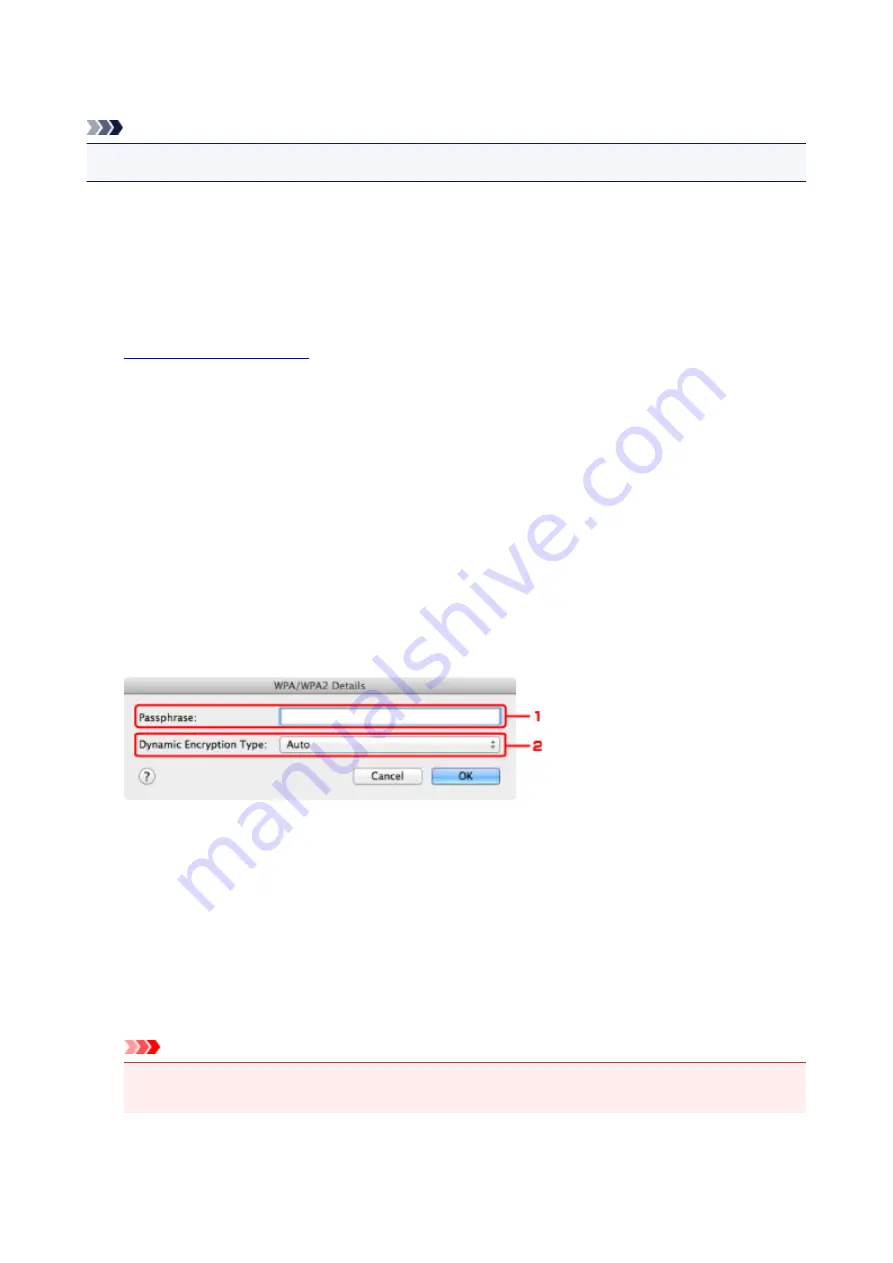
6. Enter the passphrase, then click
OK
.
1.
Passphrase:
Enter the passphrase set to the access point. The passphrase should be a string of 8 to 63
alphanumeric characters or a 64-digit hexadecimal value.
If you do not know the access point passphrase, refer to the instruction manual provided with the
access point or contact its manufacturer.
2.
Dynamic Encryption Type:
The dynamic encryption method is selected from either TKIP (basic encryption) or AES (secure
encryption) automatically.
Important
• If
Auto
is not displayed on
Dynamic Encryption Type:
, select either
TKIP(Basic Encryption)
or
AES(Secure Encryption)
.
197
Summary of Contents for iP110B
Page 10: ...6946 420 6A00 421 A000 422 A100 423 B201 424 B202 425 B203 426 B204 427 ...
Page 57: ... 8 Display area The display changes based on the menu you select 57 ...
Page 86: ...Safety Guide Safety Precautions Regulatory and Safety Information 86 ...
Page 93: ...Main Components and Basic Operations Main Components About the Power Supply of the Printer 93 ...
Page 94: ...Main Components Front View Rear View Side View Inside View 94 ...
Page 100: ...Note For details on replacing an ink tank see Replacing an Ink Tank 100 ...
Page 107: ...Loading Paper Loading Paper 107 ...
Page 124: ...Replacing an Ink Tank Replacing an Ink Tank Checking the Ink Status 124 ...
Page 176: ...Information about Network Connection Useful Information about Network Connection 176 ...
Page 233: ...Printing Printing from a Computer Printing from a Digital Camera 233 ...
Page 264: ...Adjusting Color Balance Adjusting Brightness Adjusting Intensity Adjusting Contrast 264 ...
Page 333: ...Problems with Printing Quality Print Results Not Satisfactory Ink Is Not Ejected 333 ...
Page 376: ...1403 Cause The print head may be damaged Action Contact the service center 376 ...
Page 377: ...1405 Cause The print head may be damaged Action Contact the service center 377 ...
Page 381: ...1660 Cause The ink tank is not installed Action Install the ink tank 381 ...
Page 398: ...5B00 Cause Printer error has occurred Action Contact the service center 398 ...
Page 399: ...5B01 Cause Printer error has occurred Action Contact the service center 399 ...


