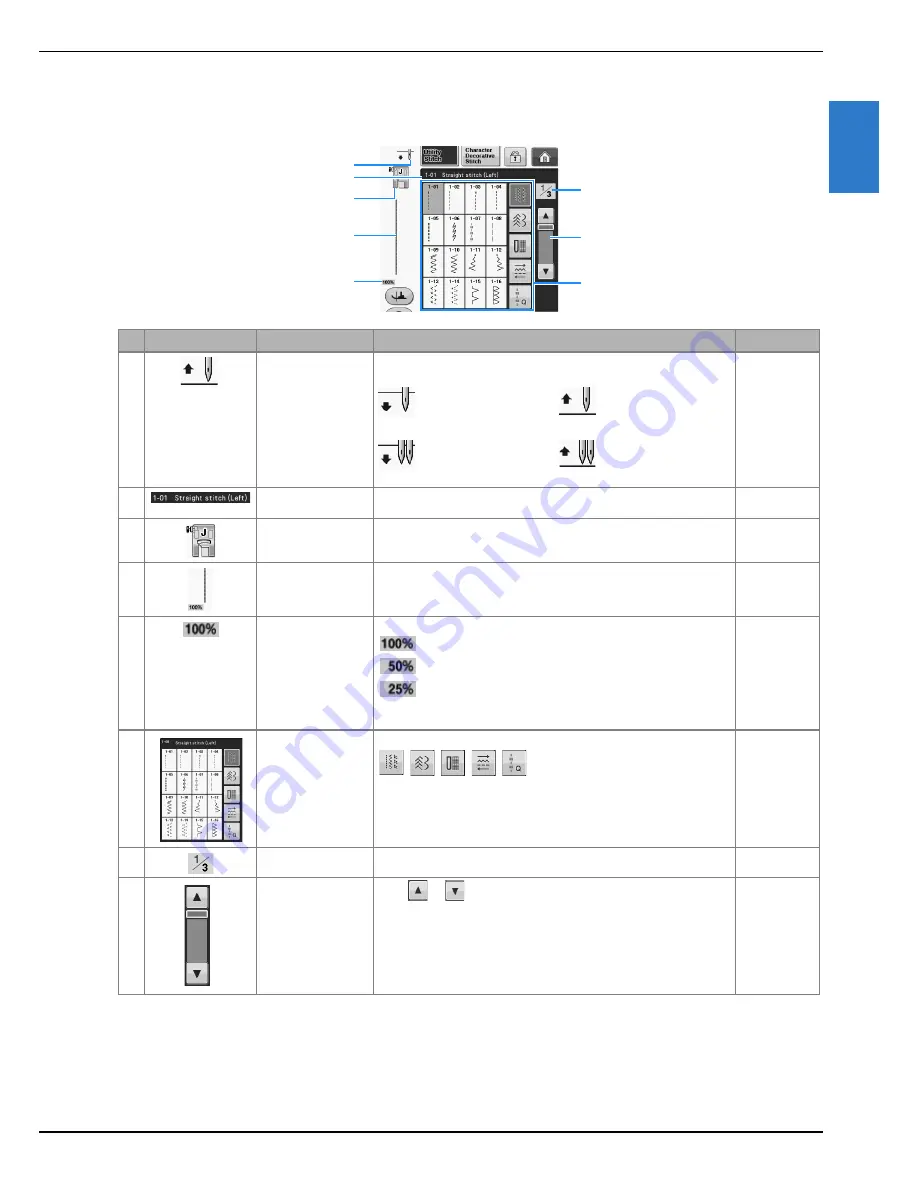
LCD SCREEN
G
ettin
g R
ea
d
y
Basic operations
B-25
B
1
■
Utility Stitch Screen
Press a key with your finger to select the stitch pattern, to select a machine function, or to select an
operation indicated on the key. When the key display is light gray, the function is not currently available.
*
All key functions of the LCD are explained in the “Key Functions” table on the following page.
No.
Display
Key Name
Explanation
Page
a
Needle position
setting display
Shows single or twin needle mode setting, and the needle stop
position.
–
Single needle/down
position
Single needle/up position
Twin needle/down
position
Twin needle/up position
b
Selected stitch
display
Shows the name and code number of the selected stitch.
S-3
c
Presser foot display
Shows the presser foot code. Attach the presser foot indicated in this
display before sewing.
B-55
d
Stitch preview
Shows a preview of the selected stitch. When shown at 100%, the
stitch appears in the screen at nearly its actual size.
S-21
e
Pattern display size
Shows the approximate size of the pattern selected.
: Nearly the same size as the sewn pattern
: 1/2 the size of the sewn pattern
: 1/4 the size of the sewn pattern
* The actual size of the sewn pattern may differ depending on the type
of fabric and thread that is used.
S-21
f
Stitch selection
screen
Press the key for the pattern you want to sew. Use
to change to different stitch groups.
S-21
g
Page display
Shows additional pages that can be displayed.
–
h
Scroll key
Press
or
, to move one page at a time, or touch anywhere on
the bar to jump ahead for additional pages of stitches.
–
a
b
d
e
g
c
h
f
Summary of Contents for DreamWeaver XE VM6200D
Page 107: ...USEFUL FUNCTIONS Sewing Basics Sewing S 19 S 1 ...
Page 194: ...USING STORED CUSTOM STITCHES S 106 ...
Page 212: ...ATTACHING THE EMBROIDERY FRAME E 18 b Pull the embroidery frame toward you ...
Page 249: ...EMBROIDERY APPLICATIONS Embroidery Embroidering E 55 E 1 ...
Page 280: ...USING THE MEMORY FUNCTION E 86 ...
Page 323: ......


