


3-59
Confidential
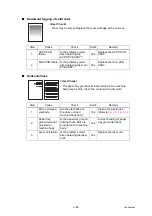
■
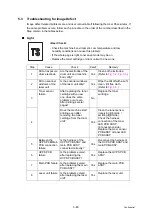
Black spots
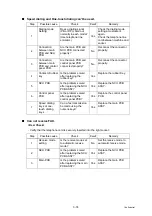
■
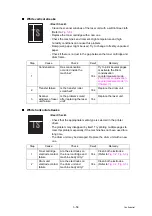
Black band
<User Check>
- Damp (wet) paper might be used. Try to change to freshly unpacked
paper.
- Toner may be empty. Replace the toner cartridge with a new one.
- If the problem is not solved after printing a few pages, the drum unit
may have glue from label stock on the exposure drum surface.
Refer to the
, and wipe it off gently with a cotton swab.
- The drum unit may be damaged. Replace the drum unit with a new
one.
Step
Cause
Check
Result
Remedy
1
Toner attached
on the develop
roller
Are the black spots at
42.5 mm (develop roller
circumference)
intervals?
Yes
This problem will
disappear by printing
approximate 10 pages. If
the same problem occurs,
replace the toner cartridge.
2
Dirt on the
exposure drum
Are the black spots at
94.2 mm (exposure
drum circumference)
intervals?
Yes
Clean the exposure drum
with the drum cleaning kit.
3
Drum unit
connection
failure
Are the electrodes on
the drum unit and
machine body dirty?
Yes
Clean both electrodes
4
Scratch and Dirt
on the exposure
drum
Does not the black spots
disappear by cleaning
(procedure 2)?
No
Replace the drum unit.
5
Scratch and Dirt
on the heat roller
Are the black spots at
78.5 mm (heat roller
circumference)
intervals?
Yes
Replace the fuser unit.
6
HVPS PCB
failure
Is the problem solved
after replacing the
HVPS PCB ASSY?
Yes
Replace the HVPS PCB
ASSY.
7
Main PCB failure Is the problem solved
after replacing the main
PCB ASSY?
Yes
Replace the main PCB
ASSY.
<User Check>
- Clean the inside of the machine and the corona wire in the drum
unit. If the same problem occurs after cleaning, replace the drum
unit with a new one.
- The paper tray ground terminal provided in the machine body may
be dirty. Clean the contact with a dry cloth.
Summary of Contents for DCP 8085DN
Page 13: ...CHAPTER 1 SPECIFICATIONS ...
Page 52: ...Confidential CHAPTER 2 THEORY OF OPERATION ...
Page 69: ...2 16 Confidential 3 3 Paper Feeding Fig 2 18 LT path DX path MP path Paper tray path ...
Page 89: ...CHAPTER 3 ERROR INDICATION AND TROUBLESHOOTING ...
Page 178: ...Confidential CHAPTER 4 PERIODICAL MAINTENANCE ...
Page 248: ...CHAPTER 5 DISASSEMBLY REASSEMBLY ...
Page 265: ...5 12 Confidential Fig 5 7 EM2 4 places Separation pad ASSY ...
Page 501: ...Confidential CHAPTER 6 ADJUSTMENTS AND UPDATING OF SETTINGS REQUIRED AFTER PARTS REPLACEMENT ...
Page 507: ...6 5 Confidential 8 Alert warning message of WHQL appears Click Continue Anyway to proceed ...
Page 516: ...CHAPTER 7 SERVICE MODE ...
Page 525: ...7 7 Confidential For color scanning Fig 7 2 ...
Page 527: ...7 9 Confidential For white and black scanning Fig 7 3 ...
Page 528: ...7 10 Confidential For color scanning Fig 7 4 ...
Page 567: ...Confidential CHAPTER 8 CIRCUIT DIAGRAMS WIRING DIAGRAM ...
Page 569: ...8 1 Confidential 1 CIRCUIT DIAGRAMS High voltage Power Supply PCB Circuit Diagram Fig 8 1 ...
Page 570: ...8 2 Confidential LVPS PCB Circuit Diagram 230V Fig 8 2 ...
Page 571: ...8 3 Confidential LVPS PCB Circuit Diagram 115V Fig 8 3 ...


