background image

7. Advanced

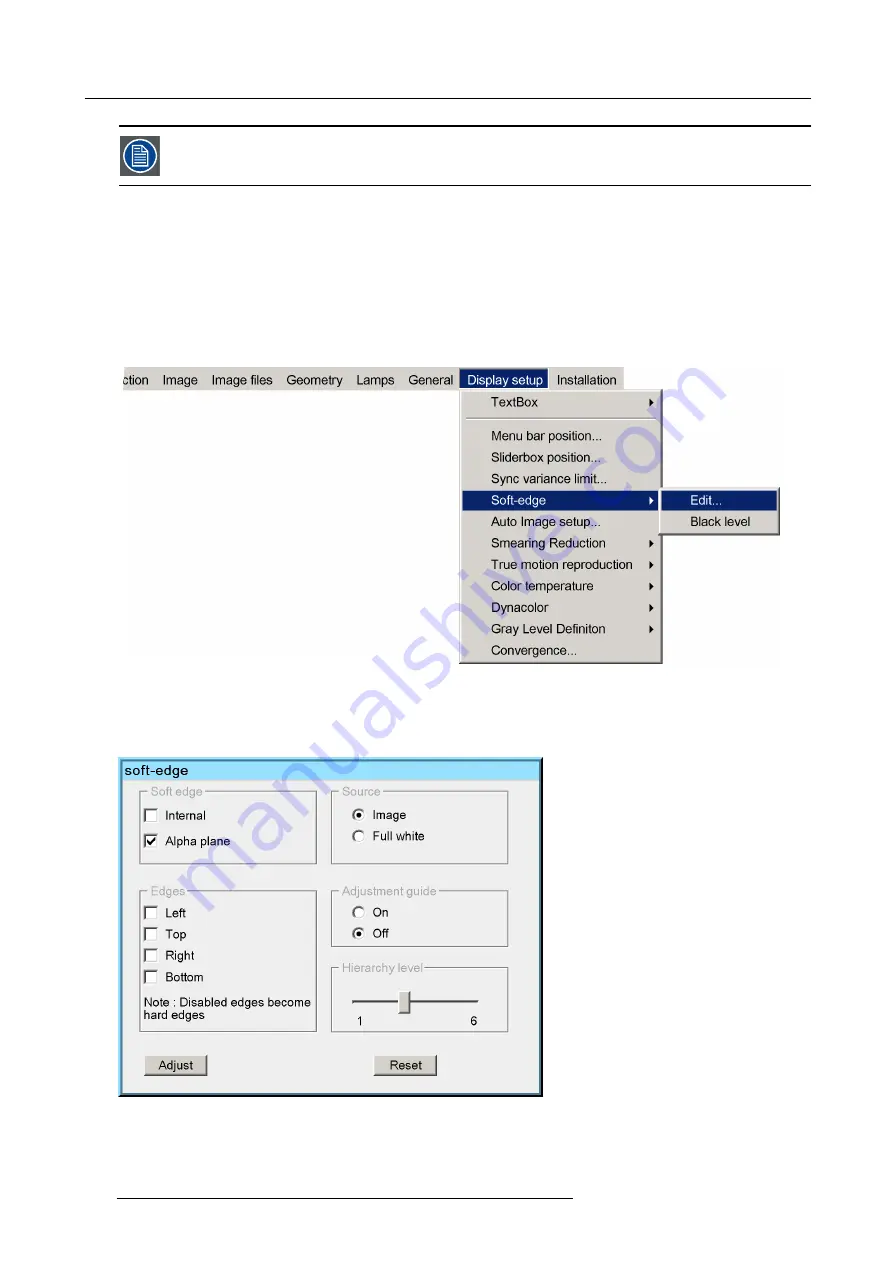
The alpha plane will only be applied if it has been activated in the

Edit...

menu’s dialog box (see procedure

above)

How to activate an alpha plane ?

1. Press the

MENU

key to activate the Tool bar.

2. Push the cursor key

or

to highlight

Display setup

3. Push the

key to pull down the menu.

4. Push

or

to select

Soft edge

5. Push the

key to pull down the menu.

6. Push the cursor key

or

to highlight

Edit...

Image 7-135

7. Press

ENTER

A dialog box will be displayed.

8. Use the arrows to select the

Alpha planes

check box and press

ENTER

Image 7-136

Note:

It takes some time for the alpha plane to be applied

122

R59770066 SIM 7Q SERIES 08/12/2014

Summary of Contents for R92112011

Page 1: ...SIM 7Q series User Guide R92112011 R92112012 R92112013 R92112021 R92112022 R92112023 R92112161 R92112162 R92112163 R9211222 R9211224 R59770066 12 08 12 2014...

Page 2: ...Factory Barco nv Advanced Visualization Systems Noordlaan 5 B 8520 Kuurne Phone 32 56 36 82 11 Fax 32 56 36 84 86 Support www barco com esupport Visit us at the web www barco com Printed in Belgium...

Page 3: ...arantee On receipt the purchaser must immediately inspect all delivered goods for damage incurred during transport as well as for material and manufacturing faults Barco must be informed immediately i...

Page 4: ...it under the terms of the GNU General Public License as published by the Free Software Foundation either version 2 or at your option any later version eCos is distributed in the hope that it will be u...

Page 5: ...ranty continuous mode automatic shutdown mode 35 5 2 Powering the SIM 7 projector 35 5 3 Setting the RCU address 36 5 4 Starting the projector 37 5 5 Setting the projector address only if necessary 38...

Page 6: ...7 7 3 Identification 107 7 8 Display setup 108 7 8 1 Textbox 108 7 8 2 Menu bar position 109 7 8 3 Slider box position 109 7 8 4 Sync variance limit 110 7 8 5 Soft edge 112 7 8 5 1 Introduction 112 7...

Page 7: ...cube filter 167 8 3 2 Installing the x cube filter 168 8 3 3 Removing the electronics filter 169 8 3 4 Installing the electronics filter 170 8 4 Lamp replacement 172 8 4 1 Lamp removal 172 8 4 2 Lamp...

Page 8: ...Table of contents 4 R59770066 SIM 7Q SERIES 08 12 2014...

Page 9: ...ries used in this document When referring in this document to the term SIM 7Q series it is meant that the content is applicable for the following Barco products SIM 7Q SIM 7Q HB SIM 7Q HC SIM 7Q HB C...

Page 10: ...Caution Warning Info term definition General info about the term Note gives extra information about the described subject Tip gives extra advice about the described subject Font overview Buttons are...

Page 11: ...dded to the packaging to keep it dry Do not open these disposable bags Image 2 1 Silicagel Foam The projector is packed in a cardboard box To provide protection during transportation the projector is...

Page 12: ...lacement of the projection lens How to unpack the projector 1 Release the cord straps PULL TO OPEN Image 2 2 2 Remove the assembly from the pallet 3 Open the outer cardboard box 4 Remove the two small...

Page 13: ...s small box Image 2 3 Unpacking the cardboard box exploded view Retain the original shipping cardboard boxes and packing material It will be needed if you ever have to ship the projector For maximum p...

Page 14: ...2 Packaging 10 R59770066 SIM 7Q SERIES 08 12 2014...

Page 15: ...size ambient light level projector placement and type of screen to use are critical to the optimum use of the projection system Temperature conditions Temperature range during operation Min ambient t...

Page 16: ...unwanted light or reflection Some rules can be useful switch off any light source during projection reflection should be avoided e g by using dark wall ceiling and floor color windows must be fully da...

Page 17: ...he projector Projector tilt RCU battery installation Lens installation Projector configuration Connections 4 1 Dimensions Projector dimensions and weight Dimensions are given in mm and inch 1inch 25 4...

Page 18: ...ation points To fix the projector to its support three bolts can be screwed into the threaded holes at the bottom of the projector The bolts must meet the following specifications bolt type M8x1 25 st...

Page 19: ...ojector tilt range will cause lamp flicker or even lamp explosion Tilt range The tilt range of the projector is restricted by the tilt range of the lamp The drawings below show the maximal tilt range...

Page 20: ...trol unit Before using your remote control install the batteries first How to install the batteries in the remote control 1 Push the battery cover tab with the fingernail a little backwards 1 and pull...

Page 21: ...llation Overview Lens range Lens formulas Shift capabilities Installing the lens and adjusting the Scheimpflug Connecting the lens Lens Data 4 5 1 Lens range Overview table Lens QSD 0 8 1 QSD 1 0 1 4...

Page 22: ...1 TP Telephoto PDmax 0 0341 1 434 x SW 0 0030 SW PDmax 1 34252 1 434 x SW 4 650009 SW WA Wide Angle PDmin 0 0858 1 471 x SW 0 0077 SW PDmin 3 37795 1 471 x SW 11 93502 SW QSD 1 4 2 0 1 TP Telephoto PD...

Page 23: ...0 20 20 70 Image 4 11 Lens shift range The best image quality is obtained in nominal lens position i e 0 shift Shifting the image to the limit of its range starts introducing some falloff The exact ra...

Page 24: ...e lens and adjusting the Scheimpflug WARNING In case of a projector with NVG option do not insert your fingers in the lens holder if the lens is removed They could get hit by the smearing reduction wh...

Page 25: ...the lens flange See image 4 15 and image 4 16 Tip Make sure the bolts do not completely go through the flange 2 Fix a nut M4 to the Allen bolts Do not tighten yet Image 4 15 Screws to lock the lens sc...

Page 26: ...ock nuts and washers from the lens holder studs but leave the springs on the lens holder studs Image 4 19 Lens scheimpflug springs 4 Slide the lens over the 3 studs Image 4 20 Lens positioned 5 Put a...

Page 27: ...and nuts 9 Secure the smaller Allen bolts M4 by tightening the nuts see 2 on image 4 22 to the lens flange 10 Install the bottom lens cover 11 Install the top lens cover 4 5 5 Connecting the lens What...

Page 28: ...he projector are fitted with a non volatile memory holding the lens serial number and dynamic aperture look up tables These look up tables allow to determine the exact opening position in function of...

Page 29: ...4 Image 4 26 Projector configurations 4 7 Connections Overview Power connection Signal connections Communication 4 7 1 Power connection Voltage Ampere Frequency rating Projector type Voltage range AC...

Page 30: ...cking spring OPEN CLOSED Image 4 28 CAUTION To prevent damage to the projector always ensure that the locking spring is well engaged 4 7 2 Signal connections Overview Input section Input specification...

Page 31: ...P or Pixel Map Processor Image 4 29 Projector left side view Image 4 30 Projector left side view Input section 4 7 2 2 Input specifications DVI input board This board includes two DVI dual link digita...

Page 32: ...female input connector and the DVI male connector of channel 2 in the DVI 2 female input connector IG IG Image 4 33 Connections connecting 2 DVI sources How to connect a dual channel DVI source 1 Conn...

Page 33: ...ons connecting a dual channel DVI source 4 7 2 4 Connecting an RGB source How to connect the RGB input 1 Connect the 4 or 5 BNC cables to the projector s 5 cable input IG Image 4 35 Connections connec...

Page 34: ...rk can be a local area network or a small dedicated network Following operations are made possible file transfer for firmware upgrade easy adjustment of projector wide range of control possibilities T...

Page 35: ...d the network does not allow the projector to obtain an IP address from the DHCP server the startup time will be delayed by upto five minutes After this time a time out occurs if the network detection...

Page 36: ...edited when Fixed IP is selected Hostname Hostname this field can be edited when DHCP is selected How to set up the network settings 1 Press the MENU key to activate the Menu bar 2 Push the cursor ke...

Page 37: ...ly settings to apply the changes A dialog box is shown The different executed operations are shown with a checkbox The last operation Restarting network takes a few seconds more Image 4 40 R59770066 S...

Page 38: ...4 Installation 34 R59770066 SIM 7Q SERIES 08 12 2014...

Page 39: ...rojector will display a warning on the projected image after 24 hours of continuous active mode saying that the projector will automatically switch off in four minutes A counter will count back from 4...

Page 40: ...nge 0 9 To know the address of the projector one can visualize it in projection mode on screen as well as in standby mode shown with the LED s on top cover of the projector For more info on addresses...

Page 41: ...room 2 Enter the same address with the digit buttons within 5 seconds after pushing the address key The projector can now be controlled with the RCU For example if the projector address is 3 then pre...

Page 42: ...n be programmed Projector address address defined by the user may be from 0 to 255 0 9 is used for RCU communication Common address address may be 0 or 1 How to change the projector s address 1 Press...

Page 43: ...e 5 8 5 Press to pull down the menu 6 Use or to select the desired orientation 7 Press ENTER The projection is adapted and a bullet shows the active configuration 5 7 Lens adjustments Overview Locking...

Page 44: ...he top lens cover Image 5 9 Lens top cover fixing screws 3 Slide both fixation blocks for the horizontal shift away from each other until they hit the lens holder frame Image 5 10 Horizontal shift fre...

Page 45: ...occur In order to avoid this the zoom ring and the focus ring of the lens can be locked mechanically on some of the lenses Depending on the lens article number the zoom and focus locking system will...

Page 46: ...system 2 Now the zoom and focus can be adjusted 5 7 3 Back focal length adjustment BFL Back Focal Length What can be done The position of the projector lens in relation to the interpolation lens can...

Page 47: ...ot allow optimal focus throughout the full zoom range Necessary tools BFL adjustment tool Allen key 2 5 mm hexagonal key How to adjust 1 Loosen the 4 screws along the outline of the lens top bottom le...

Page 48: ...in the adjustment hole Image 5 19 Back focal length adjustment tool 3 Zoom the lens to wide position 4 Focus the image on the screen using the BFL tool Image 5 20 Back focal length adjustment range 5...

Page 49: ...lock the focus ring and the zoom ring before adjusting the zoom or focus of the lens CAUTION In case of a projector with rugged option make sure to unlock the lens holder before shifting it up down or...

Page 50: ...form the desired action 9 0 EN T ER M EN U B A C K D I G I Z O O M PH A SE P A U SE PI P L O G O Image 5 25 How to adjust the zoom focus using the OSD 1 Press MENU to activate the Tool bar 2 Press or...

Page 51: ...28 The use of a sheet of paper held in front of the screen can be useful to determine the focus plane position for best focus Unsharp corners in the image can be adjusted with the Scheimpflug adjustme...

Page 52: ...5 Setup 48 R59770066 SIM 7Q SERIES 08 12 2014...

Page 53: ...Selecting a source How to select a source using the RCU A source must be connected and available to be able to display it 1 Press one of the following keys to display a source press 1 on the RCU to d...

Page 54: ...ff mode is the time to get it back to active state i e lamp on After switching the projector to standby the lamp is switched off and the cooling cycle is started two minutes Do not power off the proje...

Page 55: ...ol 1 Press ENTER to activate the input field Image 7 1 2 Key in the desired value Entering numeric values using the arrow keys on the remote control 1 Press ENTER to activate the input field 2 Press o...

Page 56: ...2 DVI 1 source 1 Press MENU to activate the Tool bar 2 Press to Pull down the Source Selection menu 3 Use or to select L2 DVI 1 Image 7 3 4 Press ENTER to confirm your choice A bullet indicates the se...

Page 57: ...Time of Day TOD Input balance RGB signals only 7 3 1 Introduction What can be done Correct image adjustments are important to achieve a good image reproduction The image adjustments like image settin...

Page 58: ...5 Press to pull down the menu 6 Use or to select Contrast 7 Press ENTER On the screen appears now a slider box Image 7 6 8 Use or the numeric keys on the remote or the keypad to change the contrast 7...

Page 59: ...he Tool bar 2 Press to select the Image item 3 Press to Pull down the Image menu 4 Use or to select settings 5 Press to pull down the menu 6 Use or to select Gamma 7 Press ENTER On the screen appears...

Page 60: ...an lead to an distorted image e g stretched in one direction or the other How to scale the image 1 Press MENU to activate the Tool bar 2 Press to select the Image item 3 Press to Pull down the Image m...

Page 61: ...option the dimming process is controlled in a different way See the concerning Appendix Each time the projector is restarted the Time Of Day TOD is automatically set to Day mode to get full light outp...

Page 62: ...e color signals of a particular source there are conditions in fact we must know the black and the white level of the source i e 1 the considered source must be able to generate a white signal ideally...

Page 63: ...t balance 5 Press to pull down the menu 6 Use or to select Automatic Black level 7 Press to pull down the menu 8 Use or to enable ON or to disable OFF Automatic Black level Image 7 17 9 Press ENTER to...

Page 64: ...s appear on the black part of the image 12 Adjust the Blue black level until bright spots appear on the black part of the image 13 Adjust the Red black level until bright spots appear on the black par...

Page 65: ...olors signals 11 Adjust the Green white level gain until bright spots appear on the white part of the image 12 Adjust the Blue white level gain until bright spots appear on the white part of the image...

Page 66: ...How to load a file 1 Press MENU to activate the Tool bar 2 Press to select the Image files item 3 Press to Pull down the Image files menu 4 Use or to select Load Image 7 22 5 Press ENTER A dialog box...

Page 67: ...g on file How to launch Auto Image 1 Press MENU to activate the Tool bar 2 Press to select the Image files item 3 Press to Pull down the Image files menu 4 Use or to select Auto Image 5 Press to open...

Page 68: ...s to Pull down the Image files menu 4 Use or to select Edit Image 7 25 5 Press ENTER A dialog box containing the active file is displayed Image 7 26 6 Use or the numeric keys on the remote or the keyp...

Page 69: ...the timings may be needed such as the setting of the Start pixels Active pixels Start lines Active lines In that case hit Enter and change the slider to position 1 thus enabling more settings in the...

Page 70: ...1 7 4 5 Rename file How to rename a file 1 Press MENU to activate the Tool bar 2 Press to select the Image files item 3 Press to Pull down the Image files menu 4 Use or to select Rename Image 7 32 5 P...

Page 71: ...to a custom file to the custom directory How to copy a file 1 Press MENU to activate the Tool bar 2 Press to select the Image files item 3 Press to Pull down the Image files menu 4 Use or to select c...

Page 72: ...d file 7 Press ENTER The selected file is deleted and is removed from the list 7 4 8 Forced file load Forced file load In some cases the user wants only one particular file to be loaded for a particul...

Page 73: ...re To delete the forced file go to the desired input and press ENTER 7 5 Geometry Overview Introduction Geometry files Accessing the Geometry menu Geometry distortions Load Edit Rename a Geometry File...

Page 74: ...ension xml Image 7 39 Geometry file notation Standard file directory also the type of file Custom or Standard Dist_file1 file name xml file extension Available Geometry operations Load loads an existi...

Page 75: ...e modes represent 21 levels each level represents a group of points or zones Each level will interact with other levels adjusting a point on a certain level will affect points in the levels underneath...

Page 76: ...9 20 18 20 19 20 20 21 17 21 21 20 21 19 21 20 21 18 21 20 21 19 21 21 20 21 21 21 21 21 21 19 20 18 20 19 20 20 21 17 21 21 20 21 19 21 20 21 18 21 20 21 19 21 21 20 21 21 21 21 21 21 19 20 18 20 19...

Page 77: ...op of this hierarchy the 2x2 points Adjusting points on level 1 will affect level 2 till 21 At the bottom of the structure we find the 33x33 points adjustment adjusting grid points on level 21 will no...

Page 78: ...ed on a hatch pattern generated internally by the projector see internal patterns Overview Accessing the Geometry Edit menu Geometry Edit wizard Geometry Edit Modes Editing a geometry file Axis link S...

Page 79: ...tering the Edit mode the Edit dialog box is displayed When selecting a point in a certain adjustment a yellow box shows the selection and a blue dotted box is placed around the selected grid point ind...

Page 80: ...to perform all the geometry corrections This gives the user real time access to the distortion characteristics Each individual point can be selected and shifted to the desired location in real time D...

Page 81: ...it box PixelY this edit box allows to edit the position of the point along the y axis Axislink see Axislink Modes see Geometry Edit Modes Table 7 2 dialog box legend When applying a distortion to the...

Page 82: ...7 Advanced Image 7 50 Image 7 51 Image 7 52 78 R59770066 SIM 7Q SERIES 08 12 2014...

Page 83: ...0 18 20 19 20 20 21 17 21 21 20 21 19 21 20 21 18 21 20 21 19 21 21 20 21 21 21 21 21 21 19 20 18 20 19 20 20 21 17 21 21 20 21 19 21 20 21 18 21 20 21 19 21 21 20 21 21 21 21 21 21 19 20 18 20 19 20...

Page 84: ...21 21 21 21 21 19 20 18 20 19 20 20 21 17 21 21 20 21 19 21 20 21 18 21 20 21 19 21 21 20 21 21 21 21 21 21 19 20 18 20 19 20 20 21 17 21 21 20 21 19 21 20 21 18 21 20 21 19 21 21 20 21 21 21 21 21 21...

Page 85: ...21 19 21 20 21 18 21 20 21 19 21 21 20 21 21 21 21 21 21 19 20 18 20 19 20 20 21 17 21 21 20 21 19 21 20 21 18 21 20 21 19 21 21 20 21 21 21 21 21 21 19 20 18 20 19 20 20 21 17 21 21 20 21 19 21 20 2...

Page 86: ...7 Advanced Image 7 56 Image 7 57 How to select another point 1 Press to select the next adjustment point 82 R59770066 SIM 7Q SERIES 08 12 2014...

Page 87: ...7 Advanced The column is adapted to 32 Image 7 58 Image 7 59 2 Press to select the next adjustment point R59770066 SIM 7Q SERIES 08 12 2014 83...

Page 88: ...7 Advanced The row is adapted to 32 Image 7 60 Image 7 61 3 Press to select the next adjustment point 84 R59770066 SIM 7Q SERIES 08 12 2014...

Page 89: ...mage 7 62 Image 7 63 How to adjust using the Adjust mode Adjusting point row 0 column 0 by 100 pixels along the x axis in the 2x2 mode 1 Press ENTER to go to the Adjust Mode R59770066 SIM 7Q SERIES 08...

Page 90: ...value of PixelsY The image is distorted along the X axis Notice the unaffected regions Image 7 65 The adjustment is done in small steps Adjusting for instance from 0 to 100 using the Adjust mode is n...

Page 91: ...is focused 3 Press ENTER The PixelsX edit box is put in edit mode Image 7 67 4 Use and to select the digit and use and to increment decrement the digit Tip One can also use the numeric digits to fill...

Page 92: ...asic 2x2 adjustment with AxisLink set On and Off 1 Start with a non distorted image assume the left top corner is selected 0 0 Image 7 68 2 Shift the left top corner 300 pixels to the left 0 0 Image 7...

Page 93: ...ed image this will result in a quick adjustment when dealing with complex setups AxisLink OFF The coordinate system used for the adjustment is absolute Y 300 216 300 300 300 X Y Y 3 0 0 AxisLink OFF A...

Page 94: ...djustment it is possible to shift the whole image This is considered as a displacement of the 4 corner points of the 2x2 mode The same dialog box is used as for the geometry edit How to use the Shift...

Page 95: ...7 Advanced The Edit mode is selected Image 7 73 5 Use and to select the PixelsX edit box The PixelsX edit box is focused Image 7 74 6 Press ENTER R59770066 SIM 7Q SERIES 08 12 2014 91...

Page 96: ...d to select the digit and use and to increment decrement the digit Tip One can also use the numeric digits to fill in the desired value The image is shifted along the X axis Image 7 76 8 Press BACK to...

Page 97: ...frame and is processed line by line In the example of a top side bow distortion the first pixel to be displayed is not pixel 1 of the original line 1 but pixel x 1 of the original line 1 This means th...

Page 98: ...of the Transport Delay Note The Transport Delay is by default set to 200 The Transport Delay Range can be set from 0 to 1023 Tip When the transport delay needs to be adjusted In a multi channel setup...

Page 99: ...s on the RCU or the local keypad to edit and change the value of the Sharpness Note The Sharpness can be set from 8 to 8 4 Press BACK to return to the Geometry Edit menu 7 5 6 9 Geometry Reset Overvie...

Page 100: ...jump 5 Press BACK to return to the Geometry Edit menu 7 5 6 9 2 Restore to a level What can be done Restore to a level means that all the higher level geometry corrections are reset all geometry corre...

Page 101: ...restoring to a 9x9 level How to restore to a level 1 Start the Geometry Edit menu 2 Push or to select Reset 3 Push the key to pull down the menu 4 Push or to highlight the desired level to restore Re...

Page 102: ...s this will be noticed in the image by a more or less accentuated jump 5 Press BACK to return to the Geometry Edit menu 7 5 7 Rename a Geometry File How to rename a geometry file 1 Start up the Geomet...

Page 103: ...se or to browse through the characters 5 Press ENTER The file is renamed 6 Press BACK to return to the Geometry Edit menu 7 5 8 Copy a Geometry File How to Copy a Geometry File 1 Start up the Geometry...

Page 104: ...ys on the RCU or the local keypad to edit and change the values confirm with ENTER 7 Press BACK to return to the Geometry Edit menu 7 5 9 Delete a Geometry File How to Delete a Geometry File 1 Start u...

Page 105: ...y for SIM 7Q SIM 7Q HC CLO Mode 7 6 1 Runtimes Typical runtime The lamp for this projector has its typical runtime It must be replaced when the runtime is reached When this runtime is reached a warnin...

Page 106: ...the lamp runtime warning will only be displayed at the next startup of the projector not during a session Enabling or disabling TextBox does not affect the display of the lamp runtime warning How to s...

Page 107: ...time Reset the lamp runtime whenever you replace a lamp WARNING Lamp runtime reset as well as the lamp replacement can only be done by a Barco authorized technician How to reset the lamp runtime 1 Pre...

Page 108: ...generation 2 lamp and the light output is decreasing accordingly SIM 7Q HB SIM 7Q HB C only run in Normal lamp power mode and have no Economic lamp power mode available CAUTION Switching between Norma...

Page 109: ...e Constant Light Output allows to force a constant light output set in the CLO Target menu of the projector over a certain period This will eliminate uncontrolled light output drop caused by natural a...

Page 110: ...to activate the Tool bar 2 Press to select the Lampsitem 3 Press to pull down the Lamps menu 4 Use or to select CLO 5 Press to pull down the menu 6 Use or to select Target Image 7 105 7 Press ENTER A...

Page 111: ...NU to activate the Tool bar 2 Press to select General 3 Press to Pull down the General menu 4 Use or to select Freeze Image 7 108 5 Press ENTER to activate the Freeze function The image can also be fr...

Page 112: ...on reproduction Color temperature Dynacolor Gray Level Definition Convergence 7 8 1 Textbox What can be done The Text box function allows to choose whether the different text boxes are displayed or no...

Page 113: ...ntent is not displayed soft edge region How to center the menu 1 Press MENU to activate the tool bar 2 Press to select the Display setup item 3 Press to Pull down the Display setup menu 4 Use or to se...

Page 114: ...ds The reason why this delay is needed is because the signal processing in the projector is faster than the source signal itself If the sync variance limit value is set too low the previous frame will...

Page 115: ...e the required geometry file is active and select the scaled pattern Moving hatch 2 Press MENU to activate the Tool bar 3 Press to select the Display setup item 4 Press to Pull down the Display setup...

Page 116: ...ty of simulation and virtual reality applications Image 7 117 Soft edge purpose What is the Basic Principal of electronic Soft Edge The principle of edge blending is achieved by linear modulation of t...

Page 117: ...tor software that can generate a user defined test pattern that is used to align projection systems It also has the ability to generate predefined patterns for standardized projection sys tems The sof...

Page 118: ...explained using a full white background Adjustment guide An adjustment guide consisting of a 4 brightness graduated bars can be applied on the background image during the soft edge adjustment Hierarc...

Page 119: ...7 Advanced Image 7 121 Image 7 122 Image 7 123 Image 7 124 R59770066 SIM 7Q SERIES 08 12 2014 115...

Page 120: ...e one point along the x axis How to start up the edit dialog box 1 Press the MENU key to activate the Tool bar 2 Push the cursor key or to highlight Display setup 3 Push the key to pull down the menu...

Page 121: ...The item is focused Image 7 126 2 Press ENTER The internal soft edge is selected Image 7 127 How to enable the soft edges 1 Push or to select the desired Edges check box R59770066 SIM 7Q SERIES 08 12...

Page 122: ...7 129 3 Do the same for the other desired edges The default soft edge is applied on the selected edges How to select the source background 1 Push or to select the desired Source check box in this cas...

Page 123: ...he selected check box is checked and a full white image is displayed with the soft edges on the 4 sides Image 7 131 How to enable the adjustment guide 1 Push or to select the check box ON to enable th...

Page 124: ...Press ENTER The selected check box is checked and the guide is displayed vertical and horizontal grey scale bars Image 7 133 How to set the hierarchy level 1 Push or to select the hierarchy level slid...

Page 125: ...int in this case the left top point of level 1 7 Press ENTER to confirm The selected point is displaced to the new position x 100 Y 0 8 Press BACK to exit A dialog box is displayed Press ENTER to conf...

Page 126: ...key or to highlight Display setup 3 Push the key to pull down the menu 4 Push or to select Soft edge 5 Push the key to pull down the menu 6 Push the cursor key or to highlight Edit Image 7 135 7 Pres...

Page 127: ...al vs Alpha planes this black level adjustment can be fixed internally by using a dialog box or externally by uploading a user defined Beta plane This beta plane will contain the values for the bright...

Page 128: ...planes 5 Push the key to pull down the menu 6 Push the cursor key or to highlight Black level Image 7 138 7 Press ENTER A dialog box will be displayed Black Level Internal Beta planes Planes Level 0 I...

Page 129: ...tivate the Tool bar 2 Push the cursor key or to highlight Display setup 3 Push the key to pull down the menu 4 Push or to select Soft edge 5 Push the key to pull down the menu 6 Push the cursor key or...

Page 130: ...ayed 8 Uncheck all the edges 9 Adjust the soft edge as desired same procedure as above 10 Press BACK to return to the Display setup menu 7 8 6 Auto Image Setup What can be done Auto Image allows to de...

Page 131: ...fast moving objects in a displayed image Any fast moving object will look blurred or smeared along the direction of relative motion What can be done Because of its inherent characteristics LC respons...

Page 132: ...he image and consult a doctor if you have any of the following symptoms Convulsions Eye or muscle twitching Loss of awareness Altered vision Involuntary movements Disorien tation 7 8 7 2 Enabling Smea...

Page 133: ...ge or worse smearing appearance How to adjust the Smearing reduction phase 1 Press MENU to activate the Tool bar 2 Press to select the Display setup item 3 Press to Pull down the Display setup menu 4...

Page 134: ...type of source next to Projector white which is brightest white point that can be produced by the projector 5 different presets are available Projector white Computer 9300 K Video 6500 K Film 5400 K B...

Page 135: ...bullet shows the active setting How to set a custom color temperature 1 Change the coordinates of the white point in the Dynacolor user interface 7 8 10 Dynacolor Overview Introduction Enabling DynaCo...

Page 136: ...3 The projector color gamut is defined by the triangle formed by the x y coordinates of Red Green and Blue Due to the tolerance on optical components the x y values of this color gamut of each project...

Page 137: ...the 3 points of intersection of the 2 separate color gamuts 0 1 0 2 0 1 0 3 0 4 0 5 0 6 0 7 0 8 0 2 0 3 0 4 0 5 0 6 0 7 0 8 X Y G1 W1 G2 W2 R1 R2 B1 B2 Gc Rc Wc Bc Image 7 156 R1 Red projector 1 R2 Re...

Page 138: ...nge the X and Y coordinates of the white point to fine tune the colors X and Y coordinates Coordinates in the CIE Chromaticity diagram Red Green Blue White Desired primary colors and desired white of...

Page 139: ...7 Advanced Image 7 157 R59770066 SIM 7Q SERIES 08 12 2014 135...

Page 140: ...or sets can and will be used if the Dynacolor feature is enabled Standard Dynacolor set Dynacolor set with advanced color tracking through CLO Dynacolor set with advanced color tracking through NVG On...

Page 141: ...own the Display setup menu 4 Use or to select Dynacolor 5 Press to open the menu 6 Use or to select Enable 7 Press to open the menu 8 Use or to select ON Image 7 159 9 Press ENTER A white bullet indic...

Page 142: ...alibration Dynacolor adjustment To adjust the Dynacolor settings it is sufficient to change the values in the field Desired of the user interface Make sure that the new x and y coordinates are within...

Page 143: ...the procedure below we consider a system of 2 projectors CAUTION Only to be done by Barco trained and qualified engineers Never change the values if not needed Altered color values will not guarantee...

Page 144: ...or 11 Press Proceed A Green test pattern is displayed 12 Proceed in the same way for Green Blue and White as for the Red color 13 The values are finally updated in the measured values of the Dynacolor...

Page 145: ...e ones of the first projector 7 8 10 3 3 Common color values What can be done The common color values can be determined manually Calculating the common color values 1 Calculate the common values and e...

Page 146: ...k Color adjustment 7 8 10 4 1 Introduction Black Color uniformity In a multi channel system the color of black can differ over the different channels projectors This can be matched using the Black col...

Page 147: ...lor variation caused by changing the dimmer transmission By default CLO TOD color tracking is enabled It is however possible to disable CLO TOD color tracking In this case the color variation amongst...

Page 148: ...l systems the white level can be matched using Dynacolor and the black levels can be tweaked using Black Color Matching When comparing the gray levels of certain projector platforms there can be a sig...

Page 149: ...6 4 87 9 76 6 100 0 The values in the table indicate measurable brightness on the screen 7 8 11 2 Illustrating the influence of GLD correction Illustrating GLD correction Without performing GLD corre...

Page 150: ...s the same correction done on Hierarchy level 3 Adjustment Linear response Sum Intensity Adj value Signal 0 1 0 1 5 0 5 512 1024 0 25 50 75 100 Image 7 170 GLD correction on Level 3 From the graph you...

Page 151: ...urce signals 3 Perform Gray Level Correction GLC if required 4 Set Gamma at projector side 2 2 and or IG side to the desired level 5 Turn off all lights and avoid all stray light the system surroundin...

Page 152: ...ray Level Definition Gray Levels and press ENTER to open the Gray Level Definition user interface Image 7 173 2 Use the arrows on the Remote Control Unit RCU to highlight Gray Level or Image in the So...

Page 153: ...el 2 then level 3 to end at level 4 2 Highlight Adjust and confirm by pressing Enter to open the alignment user interface Image 7 176 3 In the alignment user interface highlight the edit box in the Le...

Page 154: ...remaining Hierarchy levels 2 then 3 ending with 4 until all the intermediate grays are matched How to reset the gray levels 1 In the Gray Level Definition user interface highlight Reset Image 7 177 2...

Page 155: ...of the vertical adjustment for green is only 4 to 4 in pixels whereas all other adjustment ranges are from 8 to 8 pixels Note No image lines or columns are lost by changing these convergence settings...

Page 156: ...tion 1 See the Setup section 7 9 4 Network settings How to set the network 1 See the Communications section 7 9 5 Automatic shutdown How to switch to Automatic Shutdown mode 1 Press MENU to activate t...

Page 157: ...Shutdown mode No Image 7 181 7 9 6 Internal Patterns What can be done The projector is equipped with different internal patterns which can be used for adjustment purposes Geometry adjustments can not...

Page 158: ...7 Advanced Hatch Image 7 183 Internal Hatch pattern Color Bars Image 7 184 Internal Color Bars pattern Checkerboard Image 7 185 Internal Checkerboard pattern 154 R59770066 SIM 7Q SERIES 08 12 2014...

Page 159: ...7 Advanced Full White Image 7 186 Internal Full White pattern HGBWS Image 7 187 Internal HGBWS pattern Character Set Image 7 188 Internal Character Set pattern R59770066 SIM 7Q SERIES 08 12 2014 155...

Page 160: ...H H H H H H H H H H H H H H H H H H H H H H H H H H H H H H H H H H H H H H H H H H H H H H H H H H H H H H H H H H H H H H H H H H H H H H H H H H H H H H H H H H H H H H H H H H H H H H H H H H H H...

Page 161: ...tern Focus Image 7 195 Internal focus pattern Fine Res H Layout Image 7 196 Internal Fine Res H Layout pattern Purity Purity Pattern This allows the user to check the gradual transition between the di...

Page 162: ...Pattern 1 Press the MENU key to activate the Menu bar 2 Push the cursor key or to highlight Installation in the menu bar 3 Push the key to pull down the Installation menu 4 Push the cursor key or to...

Page 163: ...can be set The user interface to do so is the same as the one which is used in the internal purity pattern None Geometry Graylevels Moving hatch Image 7 199 Stereo pattern Purity Image 7 200 Scaled Pu...

Page 164: ...ted by hitting ENTER on the RCU while the pattern is displayed and some patterns can be changed to another color by hitting Color or Color on the RCU Available Combiner Patterns Composite Alternating...

Page 165: ...he RCU while the pattern is displayed and some patterns can be changed to another color by hitting Color or Color on the RCU Available Driver Patterns Diagonal Hatch Color bars Gray levels How to disp...

Page 166: ...nced items under More can be protected by a password The items are by default protected by the password 0000 This password can reprogrammed How to change the password 1 Press MENU to activate the Tool...

Page 167: ...enter the old password and to enter and confirm the new password Each character is displayed as an asterisk The new password is accepted if the new password and the confirmed password are a 100 match...

Page 168: ...7 Advanced 164 R59770066 SIM 7Q SERIES 08 12 2014...

Page 169: ...ools Compressed air Clean Toraysee cloth or any micro fiber lens cleaning cloth Clean cotton cloth Necessary parts Lens cleaner e g Carl Zeiss lens cleaner or Purasol or any water based lens cleaner H...

Page 170: ...to prevent dust from entering the projector These air filters must be checked and replaced on a regular basis depending on the environment conditions of the projector x cube air filter electronics ai...

Page 171: ...filter Installing the electronics filter 8 3 1 Removing the x cube filter Necessary tools Torx screwdriver T10 How to remove the x cube filter 1 Loosen the four screws fixing the x cube filter cover...

Page 172: ...tion Never put the air filter upside down Always place it with the seal pointing to the surface where you place it 8 3 2 Installing the x cube filter Necessary tools Torx screwdriver T10 How to instal...

Page 173: ...ice book 8 3 3 Removing the electronics filter Necessary tools Torx screwdriver T10 How to remove the electronics filter 1 Loosen the two screws fixing the filter cover Tip These screws are fixed to t...

Page 174: ...mage 8 12 Electronics filter release the side filter cover 4 Pull out the electronics filter Image 8 13 Electronics filter removing 8 3 4 Installing the electronics filter Necessary tools Torx screwdr...

Page 175: ...air filter 2 Place the electronics filter cover against the electronics filter Image 8 15 Electronics filter cover mounting Image 8 16 Exact position of the cover against the electronics filter 3 Pus...

Page 176: ...lamp area in the projector to remove all glass particles and install the new lamp WARNING The lamp removal and lamp installation procedures may only be performed by Barco trained and qualified service...

Page 177: ...own 3 to release and remove it See image 8 19 3 In case of SIM 7Q SIM 7Q HC unplug the lamp power connector Image 8 20 Lamp power connector SIM 7Q SIM 7Q HC 4 Release the three fixing screws 1 of the...

Page 178: ...IM 7Q HB SIM 7Q HB C unplug the lamp power connector Image 8 23 Lamp power connector SIM 7Q HB SIM 7Q HB C 6 Lift the lamp locking handle 1 then pull out the lamp in a straight way 2 1 1 2 Image 8 24...

Page 179: ...s Torx screwdriver T10 Installing the lamp 1 Open the lamp locking system by lifting the handle Image 8 26 Open lamp locking system 2 Slide the lamp in the projector in the correct orientation the con...

Page 180: ...7Q SIM 7Q HC 3 3 2 2 1 1 Image 8 30 Lamp fixation SIM 7Q HB SIM 7Q HB C 4 Then firmly push the top side of the lamp 2 while carefully pushing the lamp locking handle down 3 See image 8 29 and image 8...

Page 181: ...and tighten the three screws 2 Mind the positioning pins and holes 2 2 2 1 Image 8 32 Lamp door installation SIM 7Q SIM 7Q HC 2 2 2 1 Image 8 33 Lamp door installation SIM 7Q HB SIM 7Q HB C 8 In case...

Page 182: ...etting the lamp runtime Necessary tools No tools Description The lamp runtime must be reset whenever a lamp is replaced by a new one WARNING Both lamp runtime reset and lamp replacement can only be do...

Page 183: ...Maintenance Image 8 37 3 Enter the serial number of the new lamp 4 Press ACCEPT to confirm the serial number The lamp runtime is now set to zero 5 Exit the menu R59770066 SIM 7Q SERIES 08 12 2014 179...

Page 184: ...8 Maintenance 180 R59770066 SIM 7Q SERIES 08 12 2014...

Page 185: ...ading Rescue program Software error LED 2 Not used Not used Hardware error LED 3 IR acknowledgement blinks Not used Standby Status Backlight Not used Not used Keypad activation 9 2 Basic troubleshooti...

Page 186: ...es and connectors Check IG LAMP OFF PROJECTOR IN STANDBY Switch to active state Replace lamp ARTEFACTS STRETCHED SHRUNK IMAGE Adjust the Scaling setting WRONG ORIENTATION Adjust the Orientation settin...

Page 187: ...ite at http www barco com en AboutBarco weee Disposal of batteries in the product This product contains batteries covered by the Directive 2006 66 EC which must be collected and disposed of separately...

Page 188: ...it requirement in SJ T11363 2006 X SJ T 11363 2006 X Indicates that this toxic or hazardous substance contained in at least one of the homogeneous materials used for this part is above the limit requi...

Page 189: ...mercury 10 4 Production address Factories Barco NV Noordlaan 5 B 8520 Kuurne BELGIUM Made in information The made in country is indicated on the product ID label on the product itself Production date...

Page 190: ...10 Environmental information 186 R59770066 SIM 7Q SERIES 08 12 2014...

Page 191: ...for Red and Blue are omitted The Green input signal is converted to red and processing is done by the Red channel of the projector During the NVG mode of IR enhanced the full color signal R G and B i...

Page 192: ...OD is set to 1001 NVG filter moves out of the light path ECR returns to its minimum being 40 CCD returns to the position that meets the TOD setting of 1001 CLO TOD tracking Dynacolor set is enabled 4...

Page 193: ...LO The Lamp Runtime counting is doubled when the NVG filter is moved into the light path i e if TOD drops below 1000 B 2 Description of a full dimming cycle Introduction The operator does not have to...

Page 194: ...f the light path ECR is still at its minimum being 25 CCD closes to the position of around 40 to meet the TOD value of 1001 CLO TOD tracking Dynacolor set is enabled 3 Third phase TOD value is further...

Page 195: ...155 161 165 2 6 30 25 35 45 55 64 72 80 88 95 101 107 56 30 158 169 178 185 191 196 201 204 208 210 213 3 1 60 8 13 19 25 32 38 45 51 58 64 69 14 10 50 63 75 86 96 104 113 120 127 133 138 39 10 116 13...

Page 196: ...C GLD alignment 192 R59770066 SIM 7Q SERIES 08 12 2014...

Page 197: ...024 800 625 600 SVGA 60 xml 800x600 60 37 68 39 79 1056 800 628 600 SVGA 85 xml 800x600 85 53 635 56 209 1048 800 631 600 ESVGA 73 xml 832x624 73 48 18 53 962 1120 832 660 624 SVGA_1 72 xml 800x600 72...

Page 198: ...0 xml 1400x1050 60 63 96 107 964 1688 1400 1066 1050 SXGA_2 72 xml 1280x1024 72 76 968 130 076 1690 1280 1069 1024 SXGA 85 xml 1280x1024 85 91 12 157 455 1728 1280 1072 1024 SXGA _2 60 xml 1400x1050 6...

Page 199: ...1600 WUXGA 50 xml 1920x1200 50 61 9 158 464 2560 1920 1238 1200 SGI 96 xml 1280x1024 96 102 048 172 257 1688 1280 1063 1024 SGI 108 xml 1280x1024 108 112 428 164 145 1460 1280 1041 1024 SGI 110 xml 1...

Page 200: ...D Image files 196 R59770066 SIM 7Q SERIES 08 12 2014...

Page 201: ...rease the contrast of the image while the light output decreases GLC Gray Level Correction GLD Gray Level Definition NEMA5 American power plug to connect the power cord to the wall outlet Smearing Sme...

Page 202: ...Glossary 198 R59770066 SIM 7Q SERIES 08 12 2014...

Page 203: ...t 54 Convergence 150 Copy 99 Geometry 99 File 99 correction 144 Gray Level Definition 144 Creating editing a soft edge 116 D delete 100 geometry 100 Delete a Geometry File 100 diagnostic LEDs 181 Dime...

Page 204: ...s 36 connection 23 lens 23 connections 30 communication 30 guidelines 11 Installation 7 13 151 Installation guidelines 11 Safety 11 safety warnings 11 installing 168 170 electronics filter 170 x cube...

Page 205: ...scaling 56 screen width 18 Selecting a DVI source 52 selecting a source 49 Selecting an RGB source 52 Setting the orientation 39 setup 35 39 42 45 lens 39 42 45 adjustment 42 Setup 35 Power up 35 Shar...

Page 206: ...Index Z zoom 41 locking 41 202 R59770066 SIM 7Q SERIES 08 12 2014...

Page 207: ...List of tables LIST OF TABLES 4 3 Pinout overview table 24 7 2 dialog box legend 77 7 4 dialog box legend 114 R59770066 SIM 7Q SERIES 08 12 2014 203...

Page 208: ...List of tables 204 R59770066 SIM 7Q SERIES 08 12 2014...

Page 209: ...top cover fixing screws 40 5 10 Horizontal shift free 40 5 11 Horizontal shift blocked 40 5 12 Fixation screws for horizontal lens shift locking system 40 5 13 Fixation screw for vertical lens shift...

Page 210: ...tronics filter removing 170 8 14 Electronics filter install 171 8 15 Electronics filter cover mounting 171 8 16 Exact position of the cover against the electronics filter 171 8 17 Electronics filter p...

Reviews: