background image

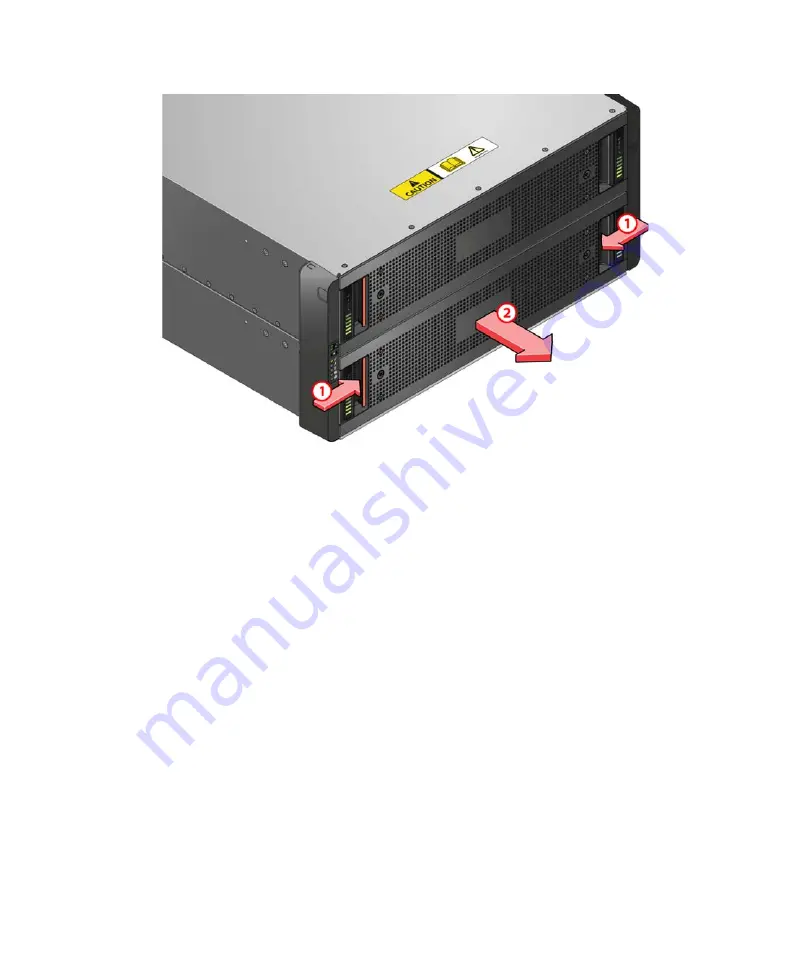
Opening and Closing the Media Drive Drawers

47

To close a drive drawer:

1. Pull and hold both of the white latches on the sides of the drawer.

n

You might need to pull the drawer completely open before pulling the white latches. 

2. Push the drawer in slightly.

3. Release the white latches.

4. Slowly push the drawer all the way back into the Engine, making sure it clicks in place.

c

Take care not to push the drawer in hard or to slam it shut, doing so could potential 
damage the drives or the drawer.

Summary of Contents for ISIS 2000

Page 1: ...Avid ISIS 2000 Setup Guide...

Page 2: ...icon Graphics Inc Permission to use copy modify distribute and sell this software i e the TIFF library and its documentation for any purpose is hereby granted without fee provided that i the above cop...

Page 3: ...e equivalent of Install It including by reverse assembly or reverse compilation Ray Sauers Associates Inc shall in no event be liable for any damages resulting from reseller s failure to perform resel...

Page 4: ...LFX Lightning Link Sync ListSync LKT 200 Lo Fi MachineControl Magic Mask Make Anything Hollywood make manage move media Marquee MassivePack Massive Pack Pro Maxim Mbox Media Composer MediaFlow MediaLo...

Page 5: ...Engine Control Panel 19 Engine Rear View 21 Cooling Modules 21 Power Supplies 22 Storage Configurations 24 Storage Group Size 24 RAID 6 Storage Groups Single Drive 24 RAID 6 Storage Groups Dual Drive...

Page 6: ...g the Media Drives 48 Installing the Cooling Modules 50 Installing the Power Supplies 50 Installing the Engine Controller 51 Connecting Power to Equipment 52 Connecting Power Cords 53 Turning System O...

Page 7: ...pping and Restarting the System Directors 101 Chapter 5 Avid ISIS Software Licensing 104 What You Need to Activate the ISIS Software License 104 License Activation Using an Internet Connection 105 Lic...

Page 8: ...tion 136 On Site Spares 136 Spares Checklist 137 Additional spares for a comprehensive spares parts list 137 Chapter 9 Avid ISIS Recommended Maintenance 138 Minimum Storage Space Requirement 138 Daily...

Page 9: ...ooling Module Replacement 164 Power Supply Replacement 165 Engine Controller Replacement 166 Engine Replacement 170 Replacing an Internal System Director Drive 172 Saving ISIS Metadata 173 Replacing S...

Page 10: ...8 Cables 198 Canadian Notice Avis Canadien 198 Class A Equipment 198 LED Safety Notices 198 European Union Declaration of Conformity 199 Disposal of Waste Equipment by Users in the European Union 201...

Page 11: ...cause you to lose data w A warning describes an action that could cause you physical harm Follow the guidelines in this document or on the unit itself when handling electrical equipment This symbol in...

Page 12: ...available 24 hours per day 7 days per week Search this online Knowledge Base to find answers to view error messages to access troubleshooting tips to download updates and to read or join online messag...

Page 13: ...fferentiate yourself is always changing and Avid continually updates course content and offers new training delivery methods that accommodate your pressured and competitive work environment For inform...

Page 14: ...line ISIS systems Avid ISIS 2000 Engines are available in two configurations ISIS 2000 240 82 3 TB drives providing 240 TB of raw storage which equates to 192 TB of usable storage ISIS 2000 120 42 3 T...

Page 15: ...synchronized with a common time of day For information on setting the Network Time Protocol NTP see Setting Up the Network Address On the Engine on page 55 The System Director connects to the ISIS sw...

Page 16: ...S automatically uses the spare drive to rebuild the RAID group The failed drive can be removed and replaced with a new drive without interrupting the operation of the Avid ISIS System Director Front P...

Page 17: ...inates green when a good network connection is established and blinks when there is network activity on the four built in 1 GB network ports The number beside the LED corresponds with the number besid...

Page 18: ...h 3 terabytes TB SAS drives These media drives are configured for redundant array of independent disks RAID 6 storage protection Engines can be configured as separate Storage Groups or be added to exi...

Page 19: ...f the three rows starting in the front and ending in the back right corner For more information on the drive slot configuration see ISIS 2000 240 Media Drive Configuration on page 25 and ISIS 2000 120...

Page 20: ...ss to power on the enclosure Power on Standby Indicator Illuminates green when the power is on A power switch is located on each of the two power supplies on the back of the Engine Module Fault Indica...

Page 21: ...ngine to function properly You can remove and replace a cooling modules while the system is running if one fails Logical Status Indicator Flashes amber when arrays are performing a background function...

Page 22: ...wer supplies not only provide power but they also contain fans that cool the system The system only needs one of the two power supplies to supply the needed power to function properly You can remove a...

Page 23: ...supply voltage fan module or temperature over or under fault Flashing logical fault unknown invalid or mixed module type installed bus failure inter communication failure or EBOD VPD configuration er...

Page 24: ...ltiple Engines to be a single Storage Group If you have Engines configured as in a single Storage Group and want to make two Storage Groups you must delete the Storage Group and create two new Storage...

Page 25: ...age which equates to 96 TB of usable storage with two spares ISIS 2000 240 Media Drive Configuration The ISIS 2000 240 has 82 media drives with two drives reserved as hot spares The drives are configu...

Page 26: ...u must install the replacement drive in the slot where you removed the failed drive Do not install replacement drives in the slots identified as Not Used in the following illustrations Drive Slot 0 Em...

Page 27: ...18 Drive Slot 19 Drive Slot 20 Drive Slot 21 Drive Slot 22 Drive Slot 23 Drive Slot 24 Drive Slot 25 Drive Slot 26 Drive Slot 27 Drive Slot 0 Drive Slot 1 Drive Slot 2 Drive Slot 3 Drive Slot 4 Drive...

Page 28: ...System Director and the switch you must turn off the CIFS service after you have installed the ISIS 2000 software Disable the CIFS service as described in Turning Off the CIFS Service With a 1 Gb Conn...

Page 29: ...e number of hops and load balanced across ISIS VLANs approximately a 60 40 ratio Support for different client and device types vary by zone Zone 1 Not applicable Zone 2 AirSpeed editors Interplay Zone...

Page 30: ...fic routed to Avid ISIS measured by the number of hops and load balanced across ISIS VLANs approximately a 60 40 ratio The house switch should have uplinks to the Avid Production Network through an Et...

Page 31: ...lients corporate network ISIS 7000 Client systems in Zone 1 Chassis interconnect ISS VLAN 10 ISS VLAN 20 Engine Engine System Director ISS VLAN 20 ISS VLAN 10 System Director Zone 2 Avid Production Ne...

Page 32: ...ng the Media Drives Installing the Cooling Modules Installing the Power Supplies Installing the Engine Controller Connecting Power to Equipment Connecting a Keyboard Monitor and Mouse Setting Up the N...

Page 33: ...standard rail configuration is for racks with square mounting holes Optional brackets are included for racks with threaded holes The rack mounting kit requires inner slide rails be mounted to the ser...

Page 34: ...operating ambient temperature of the rack environment might be greater than room ambient Therefore consider installing the equipment in an environment compatible with the maximum ambient temperature T...

Page 35: ...the inner movable section to the System Director and the outer fixed section to the rack rails To separate the slide rails 1 Slide the slide rail completely open 2 Press the spring clip on the inner...

Page 36: ...ted from the outer slide rails to the System Director To attach the inner slide rails 1 Position the inner slide rail against the side of the server so that the screw holes are toward the rear of the...

Page 37: ...ils on page 35 perform the following procedure If your mounting rails have threaded holes see Attaching the Outer Rails to a Threaded Hole Rack on page 39 To attach the outer slide rails to the rack w...

Page 38: ...towards the outside of the rack to secure the outer rail in place Insert the Outer Slide Rail to the Front Rack Mounting Rail 4 Adjust the outer slide rail bracket assembly to the rear mounting rail 5...

Page 39: ...ollowing procedure If your mounting rails have threaded holes you first need to clip on the threaded hole adapter To attach the outer slide rails to the rack with threaded holes 1 Locate the four thre...

Page 40: ...he outer slide rail bracket assembly onto the side rack mounting rail so that the threaded hole adapter is over the rack rail n You should have someone helping you hold the slide rails level while you...

Page 41: ...r slide rails secured to the System Director are aligned with the outer slide rails secured to the rack 2 Push the front of the System Director server flush against the front mounting rail The holes i...

Page 42: ...threaded holes Additional instructions are included on a decal located on the side of one of the bracket rails n Do not lift the Engine by the handles on the power supply units cooling modules or Eng...

Page 43: ...ket rail side allows you to adjust the bracket rail to the depth of your rack The adjustment screws are highlighted in a colored circle around the screw 3 Position the bracket rail between your rackmo...

Page 44: ...sure that the media drives are not installed in the Engine 8 Using two people lift the Engine and place the rear of the Engine onto the brackets as shown in the following figure 9 Position the bracket...

Page 45: ...to the front of the rack through top and bottom holes of the plastic end caps on each side of the Engine as shown in the following figure using the screws included in the rack mount kit Bracket extend...

Page 46: ...media drive drawer and replace a media drive The procedure is the same for both drawer 1 and drawer 2 w To ensure the stability of the rack enclosure The Engine includes a mechanism that only allows o...

Page 47: ...might need to pull the drawer completely open before pulling the white latches 2 Push the drawer in slightly 3 Release the white latches 4 Slowly push the drawer all the way back into the Engine maki...

Page 48: ...e top drawer The last 14 drives are installed in the front most slots of the bottom drawer c The ISIS 2000 120 media drive configuration is mandatory You must install the drives in the slots specified...

Page 49: ...following illustration populate 41 media drives in each drawer Do not populate the Drive 0 and Drive 42 slots For more information on drive slots see ISIS 2000 240 Media Drive Configuration on page 2...

Page 50: ...at the red release latch and handle are on the right hand side 2 Slide the cooling module into its slot until the latch clicks in place 3 Repeat this procedure to install the remaining four cooling mo...

Page 51: ...nsert an Engine Controller 1 Position the Engine Controller so that the release latch is at the bottom 2 Open the release latch and rotate it to its most open position 3 Slide the Engine Controller in...

Page 52: ...de The ISIS 2000 Engine cooling modules provides airflow for the Engine A failed module should be left in place until a replacement is available in order to ensure proper airflow is maintained The pow...

Page 53: ...mmends each power supplies be on a separated 20 amp circuit Connecting Power Cords When using two circuits for the System Director and Engine they should be configured as follows To connect the power...

Page 54: ...supplied with your KVM switch You need to supply KVM cables that are compatible with your KVM switch n There are only two USB ports on the rear of the System Director When you purchase your KVM consi...

Page 55: ...Director password is preset to is admin The System Director Management Console Web Page Administrator user whose default password is blank The following static IP addresses have been pre configured on...

Page 56: ...5 Open a browser and navigate to the ISIS 2000 Storage Manager Agent Web page via the following address https 192 168 0 10 5015 6 You are asked for the password Type se admin 7 Click Network in the l...

Page 57: ...going to be using a Zone 3 environment you must set the default gateway addresses for the Engine These addresses must come from the site s IS department n Make sure no DHCP servers are assigning addr...

Page 58: ...rd and the system will restart The Engine is now properly addressed 12 Assign appropriate static IP address to the network port of the System Director 13 Attach the System Director to the switch and v...

Page 59: ...nnection System Director s 1 Gb Connection 2 Connect the other end of your network cable to the appropriate port on your ISIS 2000 switch The following example shows the physical connections between a...

Page 60: ...re a The first time you set up the ISIS 2000 Engine you must connect to the Management port to on the Engine Controller to configure the IP address see Setting Up the Network Address On the Engine on...

Page 61: ...r s 10 Gb Connection with SFP Transceiver 2 Connect the other end of your network cable to the appropriate port on your ISIS 2000 switch Depending on the type of switch you have an X2 or SFP transceiv...

Page 62: ...ble to a 10 Gb port on your ISIS 2000 switch Depending on the type of switch you have an X2 or SFP transceiver might be needed for the switch port n The Force10 S4810 switches need SFP transceivers wi...

Page 63: ...as follows a The first time you set up the ISIS 2000 Engine you must connect to the Management port to on the Engine Controller to configure the IP address see Setting Up the Network Address On the E...

Page 64: ...ts similar to the Connecting Network Cables with a 10 Gb System Director Connection on page 60 If you are upgrading an existing ISIS 2000 to the latest version of ISIS software see Avid ISIS 2000 Upgr...

Page 65: ...ccess the documentation in the AvidISISDocumentation folder on the Avid ISIS installer kit You need to download and install Acrobat Reader on your Avid ISIS 2000 before you can access the PDF document...

Page 66: ...This function is not performed if your RAID set has already been configured Typically this is the case when upgrading the software version n When you initially install the Avid ISIS 2000 system and i...

Page 67: ...losure or have multiple enclosures but want this enclosure to be the System Director which includes the software that runs the Management Console and tracks the metadata stored in all the media drives...

Page 68: ...e all the ISIS software without installing other ISIS software This one selection saves you from selecting several software components in the Windows Control panel Software Installation System Directo...

Page 69: ...Director Management Console This code is applied when you click the Upgrade button in the Management Console Storage Manager page ISIS SNMP Extension Agent Installs software to support Simple Network...

Page 70: ...ystem This ReadMe provides information that is not in the other Avid ISIS documentation n Search the Avid Knowledge Base for the most up to date ReadMe file which contains the latest information that...

Page 71: ...tch Activating the License Key You need to activate your Avid ISIS software before you can make an Active File System After installing your software see Avid ISIS Software Licensing on page 104 n Prev...

Page 72: ...SIS Launch Pad click ISIS Control Panel icon or Start Programs Avid ISIS System Director and select Control Panel 2 Click Stop System Director The Configure File System button becomes active 3 Click C...

Page 73: ...In the System Director Control Panel the System Director is running display turns green 5 Option If creating a Standby System Director in an metadata redundancy configuration see Configuring System Di...

Page 74: ...software 1 Go to http IP address of System Director or virtual name 2 Log into the System Director n The default Administrator password is blank The ISIS Management Console opens 3 Click Storage Manag...

Page 75: ...eted the software automatically starts building the RAID sets in the ISIS 2000 Engines Due to the size and number of drives in the Engine the RAID configuration takes a couple days to complete Clients...

Page 76: ...the Status is empty the upgrade is complete 8 ISIS 2000 240 Double click the IP address of the original Storage Element in the Details pane to open ISIS 2000 Storage Manager Agent Web page 9 ISIS 200...

Page 77: ...sical cable is not needed both IP address are handled through the existing 10 Gb connection between Engine Controller and the switch 12 ISIS 2000 240 Click Submit a A dialog box appears warning you a...

Page 78: ...haned Storage Managers To bind the Storage Managers 1 Type http IP address of System Director in your browser If already logged into the System Director click the Management Console icon in the Launch...

Page 79: ...ces click Workspaces icon in the Management Console See the Avid ISIS Administration Guide for information on creating Workspaces Creating User Accounts User accounts allow individual users or groups...

Page 80: ...click on the My Computer icon and select Manage The Server Manager window opens 2 Expand the Configuration menu in the left pane and select Services 3 Right click AvidISISFileGateway in the right pan...

Page 81: ...an Avid ISIS Launch Pad is displayed on the System Director Desktop To open and close the Launch Pad 1 If the ISIS Launch Pad is not displayed on the Avid ISIS System Director Desktop click the ISIS L...

Page 82: ...ue square icon to stop the System Director t Click the blue triangle icon to start the System Director Loading Client Software Avid ISIS client software is supported on Windows Macintosh and Linux cli...

Page 83: ...copy the software to a USB flash drive You can store the client software somewhere on the network and allow everyone who needs the software to gain access to it and load it You can load the ISIS softw...

Page 84: ...f you were able to access the Management Console it means that your client already has Flash installed To install your Avid ISIS Windows client software from the software kit 1 Log into your Windows c...

Page 85: ...lash drive The installers are in the Avid ISIS software kit located on drive AvidISISClientInstallers You can also log into the Management Console and access the Installers link and download the appro...

Page 86: ...ensitive 3 Type cd user s home directory and press Enter 4 Do one of the following t If you are not the root user type sudo AvidISISClient_el6 x86_x x x bin and press Enter You will need to enter your...

Page 87: ...ime you login you might need to select a Remote Host Avid ISIS system For information about adding a remote host see the Avid ISIS Client Guide 4 Select the ISIS system in the Systems panel 5 Click th...

Page 88: ...Client Manager buttons become active Adding a Remote Host for Zone 3 and 4 Clients If your client is not on the same subnet as the ISIS shared storage network you need to add the name of your System...

Page 89: ...dialog box opens 5 In a Dual System Director configuration you need to type the actual server name or IP address of the Standby System Director You cannot use the virtual server name or the virtual I...

Page 90: ...rtual name The System Director s virtual name must not match the actual host name and must be entered in the General Configuration Options dialog box even if your Avid ISIS system configuration only h...

Page 91: ...ep the procedure easy to use we use the following nomenclature When adding a new System Director to an existing Avid ISIS system or creating a failover system configuration the original System Directo...

Page 92: ...ee Configure a Failover Connection on page 93 n The configuration information for the notification service SMTP information contacts and filters is stored in the registry on the System Director This i...

Page 93: ...255 255 255 0 Onboard Ethernet port 2 ETH2 192 168 2 1 netmask 255 255 255 0 3 Set the New System Director to the following TCP IP addresses for ports 1 and 2 Onboard Ethernet port 1 ETH1 192 168 1 2...

Page 94: ...becomes active 4 Click the Change button beside the Virtual System Director Name and type a name in the Virtual System Director Name text box and click OK n The same virtual name must be assigned to b...

Page 95: ...tem on a System Director that already has a file system all of your existing data will be lost The Avid ISIS System Director service automatically starts when complete In the System Director Control P...

Page 96: ...port set to 5000 If you have another application that uses port 5000 change the Monitor port to an available port number This port number must be the same on both the existing and the new System Direc...

Page 97: ...Panel icon or Start Programs Avid ISIS System Director and select Control Panel 3 Click Stop System Director The Configure Dual System Director button becomes active 4 Click the Change button beside...

Page 98: ...or service automatically starts when complete In the System Director Control Panel the System Director is running display turns green 7 Click Stop System Director The Configure Dual System Director bu...

Page 99: ...the Local Machine area leave the Monitor port set to 5000 If you have another application that uses port 5000 change the Monitor port to an available port number This port number must be the same on b...

Page 100: ...on the other System Director 2 On the Sending System Director you see the Red Box turn Green for each connection The numbers in the Packets Received boxes indicate the number of packets received from...

Page 101: ...e click Network Connections 2 Click the Advanced menu in the Network Connections window and select Advanced Settings 3 Click the Adapters and Bindings tab 4 If the connections for the VLAN 10 and VLAN...

Page 102: ...Launch Pad icon in the Taskbar s System Tray to display or hide the Launch Pad n You can also open other ISIS tools by clicking the icons in the Launch Pad The ISIS Launch Pad is displayed 2 Start or...

Page 103: ...k Control Panel icon in the Launch Pad or Start Programs Avid ISIS System Director and select Control Panel 2 Start or stop the System Director by clicking the appropriate buttons in the ISIS Control...

Page 104: ...esponse communication Port 3443 is the primary port but if this port is blocked the Activation Service tries port 443 which is more likely to be open for web communication Existing installations if yo...

Page 105: ...n ID and System ID card shipped with your new ISIS system The System ID is used for expediting warranty verification and customer service Once activated the License Profile tab of the Avid License Con...

Page 106: ...the Internet and will use this computer and then click Continue n If you select I am not connected to the Internet and will be using another computer that is connected to the Internet continue with Li...

Page 107: ...activate your license for any reason you cannot use the same activation file to reactivate your license You must repeat the License Activation Without an Internet Connection procedure and obtain a new...

Page 108: ...vate your Avid ISIS software 11 Copy the license bin file to the ISIS System Director you want to activate A USB flash drive is a good method of moving the license bin file to the System Director 12 C...

Page 109: ...irector configuration You do need a separate Activation ID for each System Director Deactivating the License You must deactivate your ISIS software license when replacing the System Director so you ca...

Page 110: ...ging the host name When changing the System Director host name 1 Deactivate the Avid License on your Avid ISIS System Director see Deactivating the License on page 109 2 Browse to the following locati...

Page 111: ...ins the following sections Creating Windows Users and User Groups on the System Director Adding Users and Setting Permissions Mapping Network Workspaces on CIFS Clients Creating Windows Users and User...

Page 112: ...uters or Groups dialog box under Enter the object names to select type the name of the user account or group account that you want to add and then click OK 9 In the New Group dialog box click Create a...

Page 113: ...e the Configuration Editor You cannot type in other user names 5 Click the Connect button 6 Move the Bandwidth slider to the bandwidth speed you want available to the users you can also type in the va...

Page 114: ...nge and full control Read read permission Read Write read and change permission 4 Click Set Access 5 Repeat steps 2 and 4 until permission have been set for all users 6 Click Save The file is read imm...

Page 115: ...tem Directors with a 10 Gb connection to the switch supports CIFS clients The recommended bandwidth setting is 100 MB s so that there is little impact to ISIS clients Mapping Network Workspaces on CIF...

Page 116: ...ector and the software The FTP service is not started automatically use the following procedures to enable the FTP server for FTP client access to the data on the ISIS 2000 storage The following are F...

Page 117: ...e following procedure is provided to help with that process but for details on creating user and group accounts on the System Director right click on the Local Users and Groups folder in the left pane...

Page 118: ...ing system must also be created on the ISIS 2000 System Director using the ISIS 2000 Management Console The ISIS client username and password must match the username and password on the Windows operat...

Page 119: ...ns pane click Bindings 5 In the Site Bindings window select the FTP entry and click Edit 6 Enter a virtual hostname in Host name text box n This hostname must not match the actual hostname of the Syst...

Page 120: ...Manager 3 In the Connections pane click the plus sign to expand your System Director name Sites and select ISIS FTP Share 4 In the Actions pane click View Virtual Directories 5 In the Actions pane cl...

Page 121: ...rtual Directory wizard completes and the newly created Virtual Directory is displayed in the ISIS FTP Sites folder workspace_name 13 Repeat these steps to create multiple workspaces Log In Using the C...

Page 122: ...Using the Command Prompt 122 3 Type the virtual_hostname ftp_user_name and press Enter 4 Type the user name password and press Enter n When finished with your FTP client session type quit to exit the...

Page 123: ...y you can start the Avid ISIS system upgrade see Software Upgrade Process on page 124 After you finish the upgrade confirm everything is functioning properly see Post Upgrade System Verification on pa...

Page 124: ...ctor Active to Standby Failover Turn off one of the System Directors and verify in the System Director Control Panel that the Active Mode indicator has turned red Turn the System Director back on and...

Page 125: ...tem Director has restarted continue with the next step 10 Upgrade your Storage Manager using the ISIS Management Console Storage Managers Select the original Storage Manager typically labeled SM000 an...

Page 126: ...Controller and the switch 17 ISIS 2000 240 Click Submit a A dialog box appears warning you a Engine reboot is required click the Reboot button b A second dialog box appears type se admin in the passwo...

Page 127: ...latest ISIS software that is when to update add the 40 new drives 120 TB to the existing ISIS 2000 120 Engine and Bind the new Storage Manager After the new Storage Manager is Bound you can add additi...

Page 128: ...ector has restarted upgrade your Storage Manager using the ISIS Management Console Storage Managers Select the Storage Manager typically labeled SM000 and click Upgrade The Upgrade Storage Managers wi...

Page 129: ...used drives you must clear the foreign configuration after they are installed in the Engine see Clearing Foreign Configurations on Used Drives on page 131 6 Power on the ISIS Engine and wait a couple...

Page 130: ...ing 10 Gb connection between Engine Controller and the switch 14 Click Submit a A dialog box appears warning you a Engine reboot is required click the Reboot button b A second dialog box appears type...

Page 131: ...t is not raw 1 To open the Storage Manager Agent do one of the following For more information see the Avid ISIS Administration Guide t From the Storage Managers tool select an IP address from the IP A...

Page 132: ...Check the Metadata Status tab on the standby The date stamp in the saved and replicated fields should be current and updating frequently d Check the RAID status on the System Director On the System D...

Page 133: ...t the following parameters g Click Ok and Start 1 Gb clients that are not bandwidth limited should expect at least 65 MB sec in the Path Diag tool Custom Test Settings 1 Gb client not bandwidth limite...

Page 134: ...ath Diag client over each switch b Run a couple of Zone 3 path diag clients and verify consistent performance n ISIS 2000 does not support Zone 1 clients A Zone 3 client might not have the bandwidth o...

Page 135: ...P address Virtual ISIS Name System Director Host name Administrator Password IP address ISIS IP Address Default Gateway First failover IP address Second failover IP address System Director 2 Host name...

Page 136: ...Avid ISIS spare parts that are onsite Engine 1 Serial Number Engine IP Engine 2 Serial Number Engine IP Spare Components and Cables Part Quantity Firmware Version if known Drives XFP X2 and SFP used...

Page 137: ...ite when performing any Avid ISIS upgrade This can be a mix of customer spares and parts brought onsite by upgrade technicians 2 drives 1 SFP Additional spares for a comprehensive spares parts list If...

Page 138: ...ld not fill Storage Group more than 95 full Exceeding 95 used space can produce severe performance issues in some situations To calculate the right amount of free space log into the ISIS management Co...

Page 139: ...formation is displayed in blue and errors display as red or yellow components with a warning icon Check System Director Control Panel for errors make sure there are no red indicators in the status box...

Page 140: ...s are healthy Make sure you have at least one 5 worth of free space in the Storage Group see Minimum Storage Space Requirement on page 138 Saving ISIS Metadata This procedure describes how to save the...

Page 141: ...folder 3 Verify that you have the current copy of the Metadata by comparing the date in the Metadata tab of the ISIS control Panel 4 Start the System Director service using the ISIS Control Panel Avai...

Page 142: ...entify the problem using the information under Status LEDs on page 144 Complete Server Room Shutdown There is no requirement to power cycle the entire Avid infrastructure but if the need arises to tur...

Page 143: ...ystem Directors 11 Shutdown Standby Avid ISIS System Director 12 Shutdown Active Avid ISIS System Director 13 Shutdown Avid ISIS Engines 14 Shutdown the network switches n Power up the entire rack of...

Page 144: ...cate a fault unless the LEDs remain lit after a few seconds Hardware Faults LED colors are used consistently throughout the Engine and its components for indicating status Green good or positive indic...

Page 145: ...Engine Controller see Engine Controller LEDs on page 151 Verify that the device driver for the operating system are operating properly Front Panel LEDs The front panel LEDs displays the aggregated st...

Page 146: ...Logical Status LED Amber indicates a fault from something other than GEM usually a media drive fault host bus adapter or RAID controller Check the drawer LEDs to see if a drive fault is indicated see...

Page 147: ...ailed Replace the drive Logical Fault Flashes amber if one or more arrays are in an impacted state Cable Fault Amber if the cabling between the drawer and the back of the Engine has failed Activity Ba...

Page 148: ...ndicate a fault unless the LEDs remain lit after a few seconds n If a power supply s firmware is being programmed and the download fails the power supply LEDs will flash Power Supply LEDs Power Supply...

Page 149: ...ails the power supply LEDs will flash Off On Off AC power missing power supply in standby other power supply is providing power On On On Software has lost communication with the power supply On Off Po...

Page 150: ...oon as possible Cooling Module LEDs Led Description Module Ok Constant green indicates that the fan is working correctly If the green LED is off the fan has failed Replace cooling module see Cooling M...

Page 151: ...Engine Controller LEDs 151 Engine Controller LEDs The LEDs on the Engine Controller are shown in the following illustration and table...

Page 152: ...nd disconnecting a media drive causes the system to fail the drive and start rebuilding with the hot spare For details on how to replace media drives see Media Drive Replacement on page 159 Engine Con...

Page 153: ...d drive Foreign disk status in the Management Console denotes that a physical disk is connected in the Engine but is not either raw or already part of the existing ISIS configuration This can happen i...

Page 154: ...for the ISIS 2000 configuration You might need to do use the Delete and Recreate command in the Advanced tab to recover once all drives are available No RAID Arrays Exist The RAID sets should be confi...

Page 155: ...ermal Monitoring and Control Symptom Cause Action If the ambient air is below 25 C and the fans increase in speed Any restriction of airflow can cause the internal temperature to rise n This is not a...

Page 156: ...ld Check that the local ambient environment temperature is within specification see Environment on page 190 Check the installation for any airflow restrictions at either the front or rear of the Engin...

Page 157: ...System Director Drive c Do not lift the Engine by the handles on the power supply units cooling modules or Engine Controllers they are not designed to take the weight c Always have available a replac...

Page 158: ...er 1 and drawer 2 To open a drive drawer 1 Make sure the anti tamper locks are not engaged The red arrows on the locks will point inwards if the locks are disengaged Unlock them if necessary by rotati...

Page 159: ...he Management Console displays amber and states the drive set is rebuilding with the percentage of how much of the RAID set rebuild has completed You can remove a failed media drive whenever the LED h...

Page 160: ...sing one of the two previous conditions Removing a Media Drive The procedure for replacing media drives is the same for both drawer 1 and drawer 2 To remove a media drive 1 Make sure the anti tamper l...

Page 161: ...Media Drive Replacement 161 4 Push the drive carrier latch in the direction shown in the following illustration to unlock the drive...

Page 162: ...the new drive into a hot spare To insert a media drive 1 If the appropriate drawer is not already open open it using the instructions in section see Media Drive Drawer on page 158 2 Lower the Media Dr...

Page 163: ...a foreign drive 1 Open the Storage Manager Agent do one of the following For more information see the Avid ISIS Administration Guide t From the Storage Managers tool select an IP address from the IP...

Page 164: ...ve a replacement module to insert before removing a module When the Engine power is left on a new cooling module should be inserted within two minutes of the removal of the defective cooling module To...

Page 165: ...ou should have a replacement module to insert before removing a module When the Engine power is left on a new power supply should be inserted within two minutes of the removal of the defective power s...

Page 166: ...The Engine will automatically detect the new unit Engine Controller Replacement This section describes how to replace the Engine Controller If the Engine Controller has failed the fault LED will be li...

Page 167: ...ontroller is not accessible through the ISIS interface continue with step 2 and skip to 4 removing the cables and pulling out the Engine controller Leave the ISIS Management Console Storage Manager Ag...

Page 168: ...his will lever the controller out of its connector on the midplane 6 Pull the Engine Controller out of the Engine 2 7 Install and configure the new Engine Controller as described in the following proc...

Page 169: ...the System Director and the management port of the Engine Controller left 1 Gb Ethernet port 7 Open a browser and navigate to the ISIS 2000 Storage Manager Agent Web page via the following address htt...

Page 170: ...failed Engine and the replacement Engine as new Engine To replace an ISIS Engine 1 If the Engine Controller is still accessible through the ISIS Management Console Agent Page log into the ISIS Manage...

Page 171: ...all the media drives from both drawers and put them in a safe place see Removing a Media Drive on page 160 c As a precaution Avid recommends you record the slot location of the removed drives and rei...

Page 172: ...stomer Support 19 Verify that the Storage Manager is online with a green icon with no Status displayed in the Management Console Storage Manager page n If any Status errors are listed call Avid Custom...

Page 173: ...metadata 1 Stop the System Director service using the ISIS Control Panel n The System Director is constantly writing metadata Metadata files are always open and locked so the best way to copy the meta...

Page 174: ...n the same order in the new System Director To replace a single failed system drive 1 Open the Intel Rapid Storage Technology application Start Programs Intel Intel Rapid Storage Technology 2 Click th...

Page 175: ...e status line says Rebuilding x complete n You can perform other work while the rebuild completes To replace both system drives 1 If both system drives fail shut down the system and unplug the power c...

Page 176: ...artitionDump bin file This file is also helpful when identifying the data on the media drives If possible include this file with the two Partition metadata files The following are a couple suggested w...

Page 177: ...o other switches before removing the switch Any trunking involved with the switch would be part of the configuration file and would help when reconfiguring the trunk on the new switch You do not have...

Page 178: ...VRAM n The PUTTY scroll back buffer needs to be increased from the default 200 to at least 2000 If you increase it to 50000 and make the screen longer and wider you can capture show tech support outpu...

Page 179: ...using CIFS clients a 10 Gb connection between the System Director and the switch is required see Connecting Network Cables with a 10 Gb System Director Connection on page 60 After noting the necessar...

Page 180: ...red for this connection The 10 Gb port on the ISIS 2000 Engine Controller requires an SFP transceiver The following example shows the physical connections between a System Director Engine and a Force1...

Page 181: ...de 11 Select the new Storage Manager in the list 12 Click Upgrade The Upgrade Storage Managers window opens 13 Select the zip file and click Upgrade The Storage Manager installation takes approximatel...

Page 182: ...are asked for the password Type se admin The ISIS 2000 Storage Manager Agent page appears 17 Click Network in the left pane of the System tab 18 Enter an IP address in the gx0 1 and Netmask text boxes...

Page 183: ...existing Storage Group if the ISIS v4 5 upgrade data conversion redistribution has not completed 21 Bind your new Storage Managers using the ISIS Management Console Storage Managers page For binding...

Page 184: ...Administrator password is set to is admin You might need to reinstall the Windows Storage Server 2008 R2 operating system on your Avid ISIS System Director if you are directed to do so by Avid Custom...

Page 185: ...create a product recovery USB flash drive 1 Locate the 16 GB USB flash drive Avid provided with the Avid ISIS and insert it into the front USB port 2 Click Create Recovery USB Drive from the installe...

Page 186: ...USB flash drive The Write image button becomes a Cancel button when the image is being created If you cancel the write image process the process starts over from the beginning on the next undertaking...

Page 187: ...election in the BIOS changes 10 Select the Advanced tab CPU Configuration make sure the hyper thread option Intel HT Technology is Disabled 11 Select the Advanced tab APM Configuration make sure Resto...

Page 188: ...number is on the Windows Certificate located on the System Director top cover You need this Windows number in the following procedure To set up the Windows operating system 1 If removed Reconnect all...

Page 189: ...main settings c When the operating system is restored in the Avid ISIS Engine a unique computer host name is created based on the MAC ID of the system board Each time you re image your Avid ISIS Engin...

Page 190: ...le lists the environmental specifications Component Dimensions and Weight Component Height Width Depth Weight AS3000 System Director 1 75 in 44 4 mm 19 in 482 6 mm 27 in 685 8 mm 40 0 lb 18 1 kg with...

Page 191: ...ite done by a licensed electrician The electrical changes must meet country state and local electrical codes The ISIS 2000 System Director supports UPS devices that are connected using network connect...

Page 192: ...Style and Maximum Cable Length Ethernet network cable Cat 5e Cat 6 Cat 6a or Cat 7 Connects Ethernet shared storage clients System Directors and clients to 1 Gb ports on an ISS Avid Interplay servers...

Page 193: ...ble using 850 nm transceivers 1000BASE SX short distances Specifications for these cables can be found in the ISO 11801 structured cabling document OM1 62 5 125 100 Mb Ethernet up to 2000 meters FX 1...

Page 194: ...LR for SMF n The minimum cable length for LR and SR transceivers is 2 meters Avid ISIS XFP optical transceivers Transceiver used in Force10 S25N and S25P switches and ISIS 7500 7000 ISS 1000 LC connec...

Page 195: ...ing 195 Cisco C4948E SPF 10G SR for MMF SPF 10G LR for SMF n The minimum cable length for LR and SR transceivers is 2 meters Supported Cables Cable Connection Type Function Connector Style and Maximum...

Page 196: ...on in a RESTRICTED ACCESS LOCATION c Never install equipment if it appears damaged c Disconnect the power cord before servicing unit c Only perform the services explicitly described in this document F...

Page 197: ...ipment has been tested and found to comply with the limits for a Class A digital device pursuant to Part 15 of the FCC rules These limits are designed to provide reasonable protection against harmful...

Page 198: ...s A Equipment This Class A digital apparatus meets all requirements of the Canadian Interference Causing Equipment Regulations Cet appareil num rique de la classe A respecte toutes les exigences du R...

Page 199: ...l rung D claration de conformit Declaraci n de Confomidad Verklaring de overeenstemming Dichiarazione di conformit We Wir Nous WIJ Noi Avid Technology 75 Network Drive Burlington MA 01803 USA European...

Page 200: ...r other normative documents auf das sich diese Erkl rung bezieht mit der den folgenden Norm en oder Richtlinie n bereinstimmt auquel se r f re cette d claration est conforme la aux norme s ou au x doc...

Page 201: ...ctronic equipment The separate collection and recycling of your waste equipment at the time of disposal will help conserve natural resources and ensure that it is recycled in a manner that protects hu...

Page 202: ...ase the user may be required to take corrective actions VCCI A Korean EMC Regulations Class A Equipment Please note that this equipment has obtained EMC registration for commercial use In the event th...

Page 203: ...lt from high temperatures under normal operating conditions causing Burns due to contact with hot accessible parts Degradation of insulation and of safety critical components Ignition of flammable liq...

Page 204: ...ion and explosion respectively Provision of markings to warn USERS where access is unavoidable 5 Radiation Injury to USERS and to SERVICE PERSONS may result from some forms of radiation emitted by equ...

Page 205: ...out the hazards 7 Safety warning statement for equipment that is under hazardous voltages 8 Equipment with touch current exceeding 3 5 mA One of the following labels or a label with similar wording sh...

Page 206: ...tteries the following applies If the battery is placed in an OPERATOR ACCESS AREA there shall be a marking close to the battery or a statement in both the operating and the servicing instructions If t...

Page 207: ...RVICE PERSON to a possible hazard where both of the following conditions exist Where a fuse is used in the neutral of single phase equipment either permanently connected or provided with a non reversi...

Page 208: ...id online support 12 training services 13 web site 70 Avid License Control tool 69 B Bind Storage Elements 78 Binding order 101 Boards space for changing 34 Button NMI 17 power 17 20 23 system reset 1...

Page 209: ...e 138 Deactivate License software 109 Device ID 105 Dimensions 190 Documentation client software 12 65 Drive activity 17 flash 184 Dump metadata 72 93 97 103 E EIA rack units 33 42 Enclosure Managemen...

Page 210: ...h cable 192 License key activation 71 License software activation 105 deactivate 109 host name change 110 Loading software 65 Log in 78 M Macintosh clients 82 Maintenance check system health 123 157 C...

Page 211: ...te Host 88 Replace engine 170 switch 178 Requirements for rack mounting 34 S Safety information 197 Server room shutdown 142 Servicing space for 34 SFP 194 Shutdown 129 168 171 Shutdown server room 14...

Page 212: ...194 194 Troubleshooting 12 check health 123 157 recommended maintenance 138 U Upgrade media drives 116 post upgrade verification 132 preupgrade checklist 134 procedure 124 179 software 124 179 USB un...

Page 213: ...twork Drive Burlington MA 01803 2756 USA Technical Support USA Visit the Online Support Center at www avid com support Product Information For company and product information visit us on the web at ww...

Reviews: