


Interactive installation
Issue 1.1 August 2004
41
Note:
Note:
If you are upgrading from R4, do not use the same configuration file address
for Avaya IP Agent R5. Create a new area with a new configuration file.
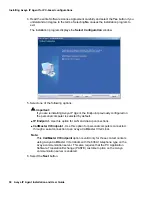
17. If you want to use the software update feature to search for patches and updates for
Avaya IP Agent on your internal network, place a check mark in the
Enable software
update using HTTP
check box.
18. In the
Address
field, enter the Uniform Resource Locator (URL) address where the
Avaya IP Agent configuration file will be stored. For more information about this
feature, see
General Settings panel
on page 213.
19. Select the
Next
button.
The installation program displays the
Shortcut and Startup Features
window.
20. Select the associated check boxes for the shortcuts you want the system to create.
Note:
Note:
If you select a shortcut location, but do not select a language, the install
program displays a warning indicating that you need to select at least one or
more languages.
21. If you selected one of the check boxes on the upper portion of this dialog box, ensure
that one of the languages in the field,
Select the languages you would like to have
added
, is highlighted.
22. If you want Avaya IP Agent to run automatically when Microsoft Windows is started,
select the
Automatically start the following version of Avaya IP Agent when
Windows is started
check box and then select the language from the drop-down list.
Note:
Note:
You must establish a connection to your corporate network before logging in
to the Avaya communication server with Avaya IP Agent. If you are using a
dial-up modem with a dynamically assigned IP address, do not select this
option.
23. Select the
Next
button.
The installation program displays the
Start Copying Files
window.
This window displays the options that you selected. If you need to make any changes
to the selections you made, select the
Back
button until you reach the necessary
window.
Note:
Note:
If you are recording selections for a silent installation, the
Setup Mode
item
displays
Record
.
24. When you are satisfied with the specified options, select the
Next
button.
The install program begins copying files. When this process is complete, the
View the
Release Information File
window is displayed.
Summary of Contents for IP Agent
Page 1: ...Avaya IP Agent Release 5 0 Installation and User Guide Issue 1 2 April 2005 ...
Page 26: ...Introduction 26 Avaya IP Agent Installation and User Guide ...
Page 166: ...Using VuStats 166 Avaya IP Agent Installation and User Guide ...
Page 178: ...Using a Public Directory with Avaya IP Agent 178 Avaya IP Agent Installation and User Guide ...
Page 194: ...Screen pops 194 Avaya IP Agent Installation and User Guide ...
Page 244: ...Dialog Reference 244 Avaya IP Agent Installation and User Guide ...
Page 252: ...Language support 252 Avaya IP Agent Installation and User Guide ...
Page 268: ...Troubleshooting 268 Avaya IP Agent Installation and User Guide ...
Page 286: ...286 Avaya IP Agent Installation and User Guide ...


