


Interactive installation
Issue 1.1 August 2004
39
7. If you selected
IP Endpoint
in the previous step, Avaya IP Agent displays the
IP
Endpoint Options
window. If you are performing an Avaya CallMaster VI installation,
skip to Step 8.
Place a check mark in the options you want to use:
●
Enable support for Auto-Answer
- Selecting this option allows Avaya IP Agent to
automatically answer calls received at a station or extension. The
Auto-Answer
feature requires that Avaya communication server configuration for this station is
also set for auto-answer. Failure to have this option set in both Avaya IP Agent and
the Avaya communication server can result in problems during agent login or when
agents answer incoming calls. The agent does not have to interact with a telephone
set or Avaya IP Agent to talk to the other party on a newly received call.
●
Share Station Login information between users
- Selecting this option uses the
same Avaya communication server registration information, such as extension
number and password, regardless of the user IDs used to log on to this personal
computer. If you leave this check box blank, each user of this personal computer
must enter Avaya communication server registration information.
For IP Endpoint configurations, proceed to step 9.
8. If you selected the
CallMaster VI Endpoint
configuration, the install program displays
the
Provide PASTE Feature Access Code
window. The PC Application Software
Translation Exchange (PASTE) is an Avaya communication server feature that uses
the Avaya CallMaster VI terminal to pass software translation information to Avaya IP
Agent.
Enter the PASTE Feature Access Code in the provided field. If you do not know the
PASTE Feature Access Code, leave this field blank. You can enter this code at a later
time through the
Program Options
dialog box.
You can find the PASTE Feature Access Code in the Feature Access Code (FAC) form
on the Avaya communication server. For more information on the PASTE Feature
Access Code, see the documentation for your Avaya communication server.
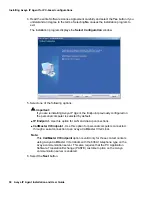
9. Select the
Next
button.
The installation program displays the
Choose Destination Location
window.
10. If you want to install Avaya IP Agent in a folder other than the default, click the
Browse
button in the
Destination Folder
dialog box and select a new location.
11. When you are satisfied with the folder in which Avaya IP Agent will be installed, select
the
Next
button.
The installation program displays the
Setup Type
window.
12. In the
Setup Type
window, select one of the following options and then select the
Next
button:
●
Typical
- This option installs the basic options in English as well as in the language
of your Microsoft Windows operating system. Proceed to step 19.
Summary of Contents for IP Agent
Page 1: ...Avaya IP Agent Release 5 0 Installation and User Guide Issue 1 2 April 2005 ...
Page 26: ...Introduction 26 Avaya IP Agent Installation and User Guide ...
Page 166: ...Using VuStats 166 Avaya IP Agent Installation and User Guide ...
Page 178: ...Using a Public Directory with Avaya IP Agent 178 Avaya IP Agent Installation and User Guide ...
Page 194: ...Screen pops 194 Avaya IP Agent Installation and User Guide ...
Page 244: ...Dialog Reference 244 Avaya IP Agent Installation and User Guide ...
Page 252: ...Language support 252 Avaya IP Agent Installation and User Guide ...
Page 268: ...Troubleshooting 268 Avaya IP Agent Installation and User Guide ...
Page 286: ...286 Avaya IP Agent Installation and User Guide ...


