8 Software
72
© Copyright Reserved Autonics Co., Ltd.
8.1.3
Connecting atDesigner and GP Device
Connect atDesigner and GP-A Series to download/upload projects and upgrade firmware. The
communication between PC and GP-A series uses serial interface (RS-232C), Ethernet, USB
interface.
the method for connecting atDesigner and GP deive is as follow below.
1st
Connect the PC and the GP with one of the serial communication cable, LAN cable,
USB mini cable.
2nd
Turn on the PC and after boot is completed, turn on the GP device.
3rd
When the GP finishes booting, touch the upper left corner of the screen to call up the
system setup menu.
The upper left corner of the screen is the factory default for the system setting menu
call button position.
4th
Touch "Communication Settings" in the [Preferences] menu.
5th
Touch the interface of the internal channel / EDITOR row to select the interface that
matches the connected cable.
6th
Touch "Settings" to set detailed specifications for each interface.
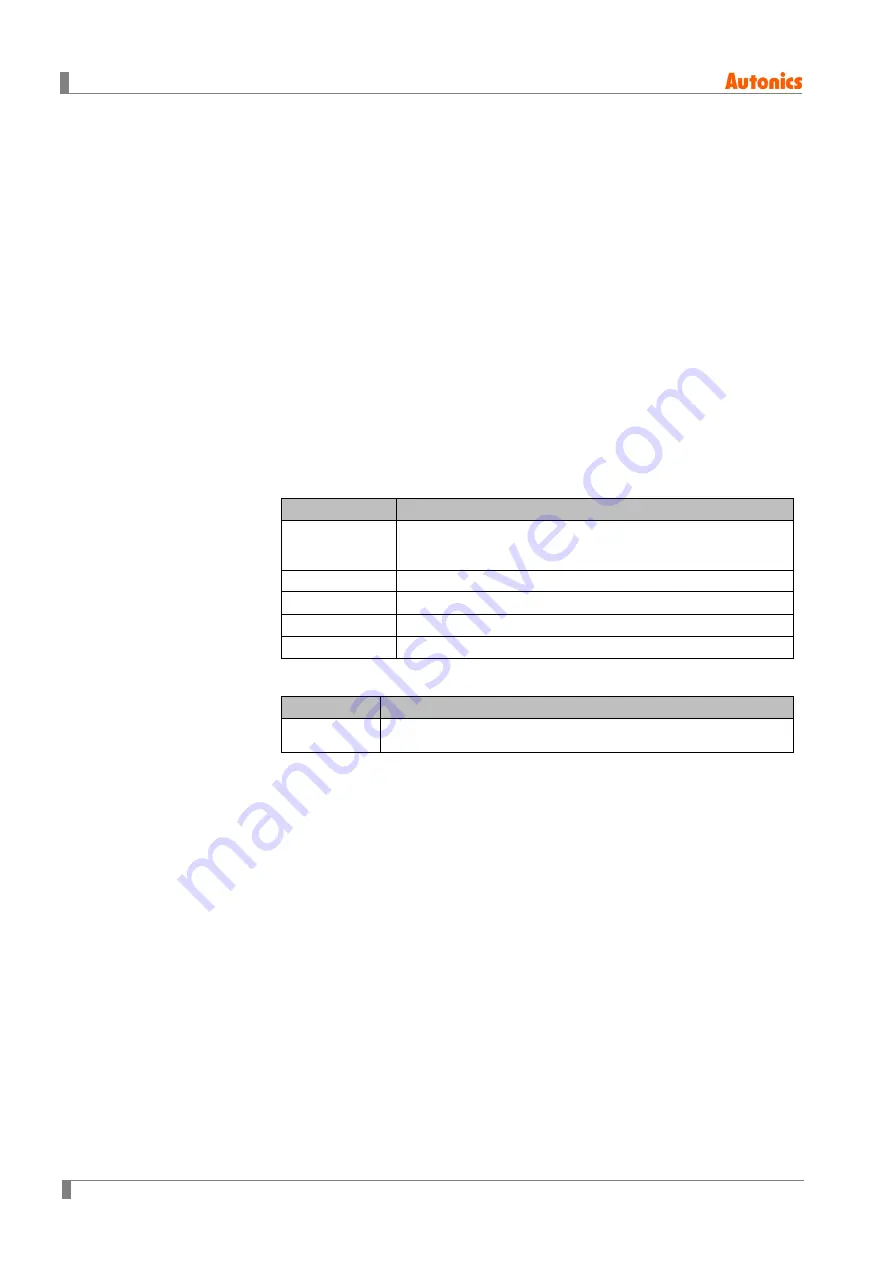
RS-232C
Item
Specification
Communication
speed
115200 bps
(Must be set to the same as atDesigner. atDesigner
specification is fixed as 115200 bps.)
Data bit
7bit, 8bit
Flow control
NONE, XON/XOFF, DSR/DTR
Parity bit
NONE, ODD, EVEN
Stop bit
1bit, 2bit
Ethernet
Item
Specification
Port number 0 to 65535
(Must be set to the same as atDesigner.)
7th
Run atDesigner.
8th
Click “Communication Options” on the [Communication] Ribbon.
9th
When 'Communication Options' window appears, select the interface to which your
PC and GP are connected in 'Connection method' and click 'Search'.
10th
When the list of GPs currently connected to the PC appears in the lower list, click the
GP to be connected with atDesigner and check the communication settings in
'Detailed settings' and modify them.
11th
When the detailed setup is completed, click "OK" to connect atDesigner and GP.
12th
Click "Download" under [Communications] to download the project from atDesigner to
GP, or click "Upload" to upload it from GP to atDesigner.
Summary of Contents for LP-A Series
Page 2: ...ii Copyright Reserved Autonics Co Ltd ...
Page 27: ...1 Overview Copyright Reserved Autonics Co Ltd 27 1 8 Dimension 1 8 1 LP A070 unit mm ...
Page 28: ...1 Overview 28 Copyright Reserved Autonics Co Ltd 1 8 2 LP A104 unit mm ...
Page 29: ...1 Overview Copyright Reserved Autonics Co Ltd 29 1 8 3 Common ...
Page 30: ...1 Overview 30 Copyright Reserved Autonics Co Ltd ...
Page 38: ...2 Installation 38 Copyright Reserved Autonics Co Ltd ...
Page 46: ...3 System Organization 46 Copyright Reserved Autonics Co Ltd ...
Page 66: ...6 Troubleshooting 66 Copyright Reserved Autonics Co Ltd ...
Page 70: ...7 Repair Maintenance Inspection 70 Copyright Reserved Autonics Co Ltd ...
Page 105: ...9 Appendix Copyright Reserved Autonics Co Ltd 105 ...


