


2-11
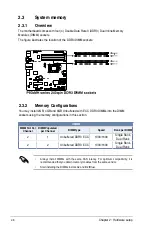
ASUS RS300-H8-PS12
3.
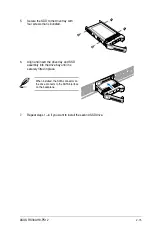
Place the drive tray on a flat and stable surface.
4.
Prepare your 3.5-inch Serial ATA HDDs.
5.
Get four (4) screws from the bundled set of special screws.
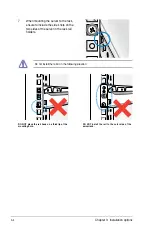
6.
Attach the screws at the bottom of the Serial ATA HDD that you want to install. Use a
Phillips screwdriver to secure the screws and mind the gap between the bottom of the
HDD and the head of screws.
Mind the gap between the bottom of HDD and the head of screws.
Summary of Contents for RS300-H8-PS12
Page 1: ...1U Rackmount Server RS300 H8 PS12 User Guide ...
Page 12: ...xii ...
Page 29: ...2 7 ASUS RS300 H8 PS12 4 Secure the airduct cover to the motherboard with a screw ...
Page 72: ...Chapter 4 Motherboard information 4 24 ...
Page 110: ...5 38 Chapter 5 BIOS setup ...
Page 148: ...6 38 Chapter 6 RAID configuration ...
Page 188: ...7 40 Chapter 7 Driver installation 8 When done click Finish ...
Page 192: ...A 4 Appendix ...