


6-24
Chapter 6: RAID configuration
3.
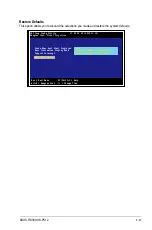
The
Create New Volume
screen shows the disks you can add to make up the RAID
1E/10 volume.
RAID 1E/10 supports three to ten disks, or, seven mirrored disks plus two hot spare
disks. Use the arrow key to select a disk, then move the cursor to the
RAID Disk
column. To include this disk in the array, press <+>, <->, or <Space>.
Esc = Exit Menu F1/Shift+1 = Help
SPACE/+/- = Select disk for volume C = Create volume
LSI Corp Config Utility v7.29.00.00 (2012.11.12)
Create New Volume -- SAS2308-2
Volume Type: RAID 1E
Volume Size(GB): -------
Slot Device Identifier RAID Drive Pred Size
Num Disk Status Fail (GB)
0 ATA WDC WD800JD-22LS1D06
[No]
---------- No
1 ATA WDC WD800JD-22LS1D06
[No]
---------- No
2 ATA WDC WD800JD-22LS1D06
[No]
---------- No
3 ATA WDC WD800JD-22LS1D06
[No]
---------- No
By default, the
RAID Disk
field shows
No
before volume creation. This field is grayed out
under the following conditions:
•
The disk does not meet the minimum requirements for use in a RAID volume.
•
The disk is not large enough to mirror existing data on the primary drive.
•
The disk is already part of another volume.
4.
Repeat step 3 to add the other disks to the volume.
5.
When done, press <C> to create the volume then select
Save changes then exit this
menu
.
6.
Wait for the utility to finish creating the volume.
Create and save new volume?
Cancel Exit
Save changes then exit this menu
Discard changes then exit this menu
Exit the Configuration Utility and Reboot
LSI Corp Config Utility v7.29.00.00 (2012.11.12)
Create New Volume -- SAS2308-2
Processing...may take up to 1 minute
Creating RAID Volume...
Summary of Contents for RS300-H8-PS12
Page 1: ...1U Rackmount Server RS300 H8 PS12 User Guide ...
Page 12: ...xii ...
Page 29: ...2 7 ASUS RS300 H8 PS12 4 Secure the airduct cover to the motherboard with a screw ...
Page 72: ...Chapter 4 Motherboard information 4 24 ...
Page 110: ...5 38 Chapter 5 BIOS setup ...
Page 148: ...6 38 Chapter 6 RAID configuration ...
Page 188: ...7 40 Chapter 7 Driver installation 8 When done click Finish ...
Page 192: ...A 4 Appendix ...


