


ASUS RS300-H8-PS12
6-9
Select a destination disk with the same size as the original hard disk.
6.2.5
Rebuilding the RAID
This option is only for the RAID 1 set.
Rebuilding the RAID with other non-RAID disk
If any of the SATA hard disk drives included in the RAID 1 array failed, the system displays
the status of the RAID volume as “Degraded” during POST. You can rebuild the RAID array
with other installed non-RAID disks.
To rebuild the RAID with other non-RAID disk:
1.
During POST, press <Ctrl>+<I> at the prompt to enter the Intel Rapid Storage
Technology option ROM utility.
2.
If there is a non-RAID SATA Hard Disk available, the utility will prompt you to rebuild the
RAID. Press the up/down arrow keys to select the destination disk then Press <Enter>
to start the rebuilding process or press <ESC> to exit.
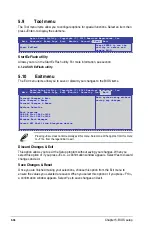
6.2.4
Exiting the Intel
®
Rapid Storage Technology
enterprise SATA Option ROM utility
To exit the utility:
1.
From the utility main menu, select 4. Exit then press <Enter>.
2.
From the following warning message, press <Y> to exit or press <N> to return to the
utility main menu.
Select the port of destination disk for rebuilding (ESC to exit):
Port Drive Model Serial # Size
X XXXXXXXXXXX XXXXXXXX XXX.GB
“Degraded” volume and disk available for rebuilding detected. Selectign
a disk initiates a rebuild. Rebuild completes in the operating system.
[ ]-Previous/Next [ENTER]-Select [ESC]-Exit
[
DEGRADED VOLUME DETECTED
]
Are you sure you want to exit? (Y/N):
[
CONFIRM EXIT
]
Summary of Contents for RS300-H8-PS12
Page 1: ...1U Rackmount Server RS300 H8 PS12 User Guide ...
Page 12: ...xii ...
Page 29: ...2 7 ASUS RS300 H8 PS12 4 Secure the airduct cover to the motherboard with a screw ...
Page 72: ...Chapter 4 Motherboard information 4 24 ...
Page 110: ...5 38 Chapter 5 BIOS setup ...
Page 148: ...6 38 Chapter 6 RAID configuration ...
Page 188: ...7 40 Chapter 7 Driver installation 8 When done click Finish ...
Page 192: ...A 4 Appendix ...