


Chapter 1: Product introduction
1-6
1.4
Front panel features
The front panel of the RS300-H8-PS12 features a simple yet compact design with the four
3-in-1 HDD trays with hot-swap support and I/O boards conveniently located on the front
panel for easy access.
The HDD trays’s modular design allows the server to support tool-less installation of up to 12
3.5-inch Serial ATA HDDs.
Refer to section
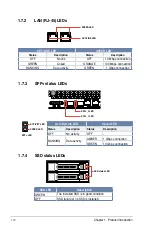
1.7.1 Front panel LEDs
for the LED descriptions.
Turn off the system power and detach the power supply before removing or replacing any
system component.
Asset tag
The Asset tag is a small polyester film or foil that is located in the left side of the server’s front
panel that allows you to log important information about the server such as asset barcode or
serial number. The Asset tag is useful in asset tracking and inventory management.
1
2
3
2
1
3
2
1
3
2
1
3
2
1
3
1
2
3
4
HDD drive tray
Rack screw
Rack screw
SFP+_LED2
SFP+_LED1
Message LED
LAN2 LED
LAN1 LED
Asset tag
Power Button
Reset button
Location button and LED
HDD1 LED
Drive tray handle
Drive tray lock
HDD2 LED
HDD3 LED
HDD drive tray
HDD Access LED
Summary of Contents for RS300-H8-PS12
Page 1: ...1U Rackmount Server RS300 H8 PS12 User Guide ...
Page 12: ...xii ...
Page 29: ...2 7 ASUS RS300 H8 PS12 4 Secure the airduct cover to the motherboard with a screw ...
Page 72: ...Chapter 4 Motherboard information 4 24 ...
Page 110: ...5 38 Chapter 5 BIOS setup ...
Page 148: ...6 38 Chapter 6 RAID configuration ...
Page 188: ...7 40 Chapter 7 Driver installation 8 When done click Finish ...
Page 192: ...A 4 Appendix ...


