


Chapter 2: Hardware setup
2-4
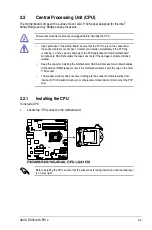
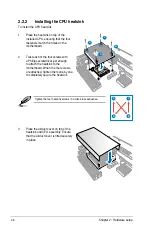
Do not remove the PnP cap yet from
the CPU socket. Doing so may bend
the pins of the socket.
2.
Press the load lever with your thumb
(A), then move it to the right (B) until it is
released from the retention tab.
Retention tab
Load lever
3.
Lift the load lever until the load plate is
completely lifted.
Load plate
4.
Position the CPU above the socket,
ensuring that the gold triangle mark is on
the bottom-left corner of the socket, then fit
the CPU notches to the socket's alignment
keys.
The CPU fits in only one orientation. DO
NOT force the CPU into the socket to
prevent bending the pins on the socket
and damaging the CPU.
Gold
triangle
mark
CPU notches
Alignment
key
Alignment
key
Summary of Contents for RS300-H8-PS12
Page 1: ...1U Rackmount Server RS300 H8 PS12 User Guide ...
Page 12: ...xii ...
Page 29: ...2 7 ASUS RS300 H8 PS12 4 Secure the airduct cover to the motherboard with a screw ...
Page 72: ...Chapter 4 Motherboard information 4 24 ...
Page 110: ...5 38 Chapter 5 BIOS setup ...
Page 148: ...6 38 Chapter 6 RAID configuration ...
Page 188: ...7 40 Chapter 7 Driver installation 8 When done click Finish ...
Page 192: ...A 4 Appendix ...


