4-8
Chapter 4: Motherboard information
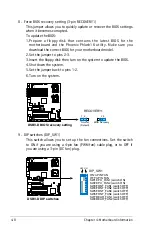
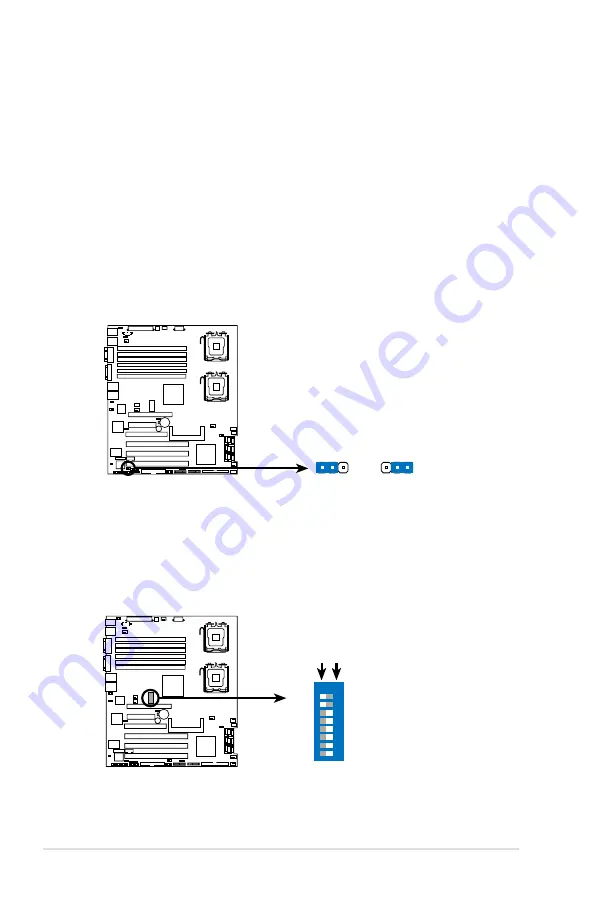
8. Force BIOS recovery setting (3-pin RECOVERY1)
This jumper allows you to quickly update or recover the BIOS settings
when it becomes corrupted.
To update the BIOS:
1. Prepare a floppy disk that contains the latest BIOS for the
motherboard and the Phoenix Phlash16 utility. Make sure you
download the correct BIOS for your motherboard model.
2.Set the jumper to pins 2-3.
3.Insert the floppy disk then turn on the system to update the BIOS.
4.Shut down the system.
5.Set the jumper back to pins 1-2.
6.Turn on the system.
DSBV
-D
DSBV-D BIOS recovery setting
RECOVERY1
(Default)
Normal
BIOS Recovery
1 2
2 3
DSBV
-D
DSBV-D DIP switches
DIP_SW1
ON:4-PIN FAN
OFF:3-PIN FAN
SW1:CPU_FAN1 (switch ON)
SW2:CPU_FAN2 (switch ON)
SW3:FRNT_FAN1 (switch OFF)
SW4:FRNT_FAN2 (switch OFF)
SW5:FRNT_FAN3 (switch OFF)
SW6:FRNT_FAN4 (switch OFF)
SW7:REAR_FAN1 (switch OFF)
SW8:REAR_FAN2 (switch OFF)
ON
OFF
ON
1
2
3
4
5
6
7
8
9. DIP switches (DIP_SW1)
This switch allows you to set up the fan connections. Set the switch
to ON if you are using a 4-pin fan (PWM fan) cable plug, or to OFF if
you are using a 3-pin (DC fan) plug.
Summary of Contents for Pedestal/5U Rackmount Server TS500-E4 Server
Page 1: ...TS500 E4 Server Pedestal 5U Rackmount Server User s Manual ...
Page 12: ...xii ...
Page 76: ...Chapter 3 Installation option 3 ...
Page 136: ...5 42 Chapter 5 BIOS information ...
Page 176: ...6 40 Chapter 6 RAID configuration ...
Page 191: ...ASUS TS500 E4 7 15 8 Follow the screen instructions to complete installation ...
Page 196: ...7 20 Chapter 7 Driver installation ...
Page 202: ...Appendix Reference information A ...


