background image


Amano PIX-200 Operation Manual 

6-1


Chapter 6: Appendix 

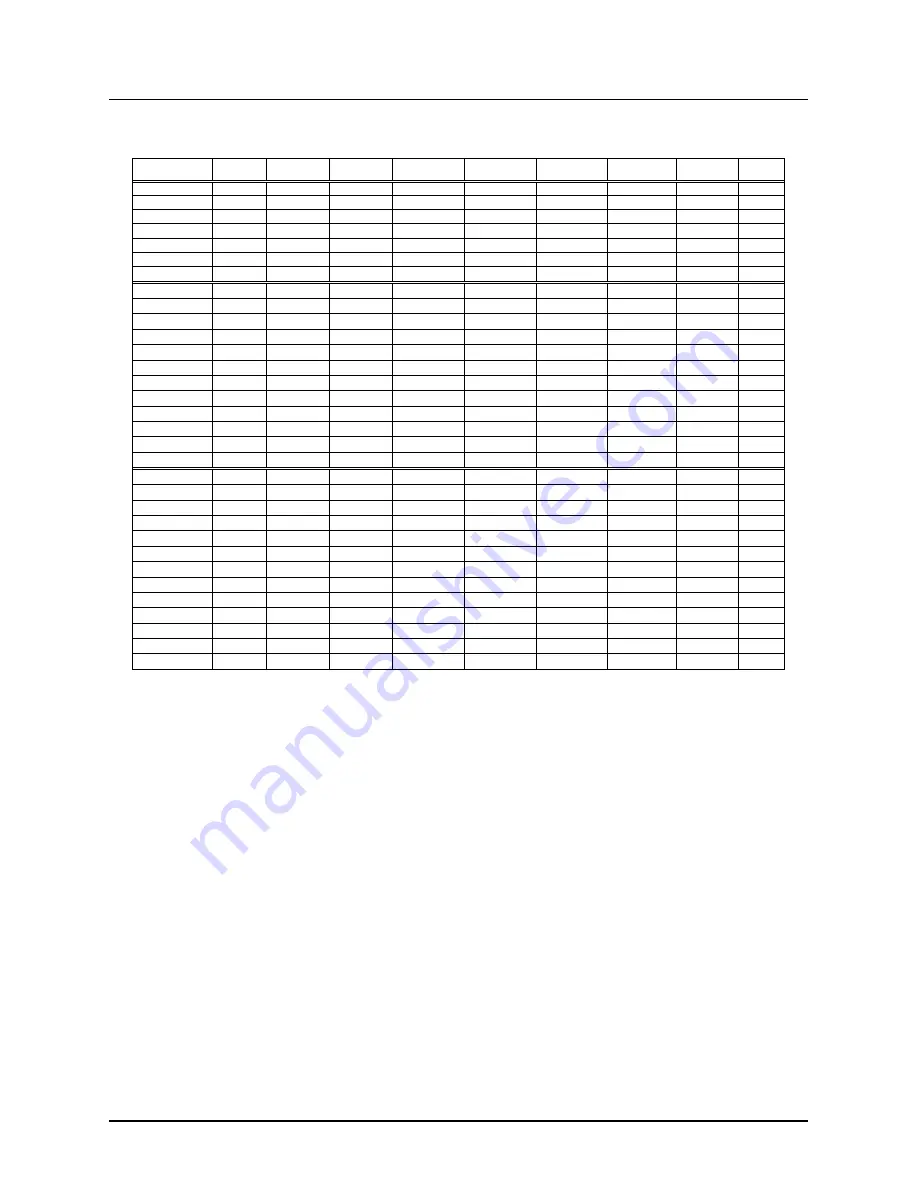
Diagram of preprogrammed comments and languages. 


Japanese 

English 

Spanish 

French 

German 

Italian 

Portuguese 

Roman 

no. 

No. 

Monday 

月 

MO 

LU 

LU 

MO 

LU 

SG 

Ⅰ 

Tuesday 

火 

TU 

MA 

MA 

DI 

MA 

TR 

Ⅱ 

Wednesday 

水 

WE 

MI 

ME 

MI 

ME 

QU 

Ⅲ 

Thursday 

木 

TH 

JU 

JE 

DO 

GI 

QI 

Ⅳ 

Friday 

金 

FR 

VI 

VE 

FR 

VE 

SX 

Ⅴ 

Saturday 

土 

SA 

SA 

SA 

SA 

SA 

SB 

Ⅵ 

Sunday 

日 

SU 

DO 

DI 

SO 

DO 

DO 

Ⅶ 

January 

JAN 

ENE 

JAN 

JAN 

GEN 

JAN 

Ⅰ 

February 

FEB 

FEB 

FEV 

FEB 

FEB 

FEV 

Ⅱ 

March 

MAR 

MAR 

MAR 

MAR 

MAR 

MAR 

Ⅲ 

April 

APR 

ABR 

AVR 

APR 

APR 

ABR 

Ⅳ 

May 

MAY 

MAY 

MAI 

MAI 

MAG 

MAI 

Ⅴ 

June 

JUN 

JUN 

JUN 

JUN 

GIU 

JUN 

Ⅵ 

July 

JUL 

JUL 

JUL 

JUL 

LUG 

JUL 

Ⅶ 

August 

AUG 

AGO 

AOU 

AUG 

AGO 

AGO 

Ⅷ 

September 

SEP 

SEP 

SEP 

SEP 

SET 

SET 

Ⅸ 

October 

10 

OCT 

OCT 

OCT 

OKT 

OTT 

OUT 

Ⅹ 

10 

November 

11 

NOV 

NOV 

NOV 

NOV 

NOV 

NOV 

ⅩⅠ 

11 

December 

12 

DEC 

DIC 

DEC 

DEZ 

DIC 

DEZ 

ⅩⅡ 

12 

received 

RCVD 

RCVD 

RCBDO 

RECU 

EING 

RICEV 

RCBDO 

RCVD 

RCVD 

sent 

SENT 

SENT 

ENVDO 

ENV 

AUSG 

SPED 

ENVDO 

SENT 

SENT 

faxed 

FAXED 

FAXED 

FAX 

FAXE 

FAX 

FAX 

FAX 

FAXED 

FAXED 

void 

VOID 

VOID 

ANLDO 

ANNUL 

LAGER 

ANNUL 

ANUL 

VOID 

VOID 

paid 

PAID 

PAID 

PGADO 

PAYE 

BEZ 

PAGA 

PAGO 

PAID 

PAID 

confirmed 

CFM

CFM

CONF 

CONF 

EMPF 

CONF 

CONF 

CFM

CFM

approved 

APR

APR

APBDO 

APPR 

BEST 

APPR 

APRV 

APR

APR

completed 

CMPL

CMPL

TRMDO 

TERM 

ABGES 

COMPL 

TERM 

CMPL

CMPL

origin 

ORIGN 

ORIGN 

ORIGN 

ORIG 

ORIG 

ORIG 

ORIG 

ORIGN 

ORIGN 

file 

FILE 

FILE 

ARCH 

FICH 

AKTE 

FILE 

ARQV 

FILE 

FILE 

in 

IN 

IN 

ENTRA 

ENTRE 

KOMMT 

ENTRA 

ENTRA 

IN 

IN 

out 

OUT 

OUT 

SALID 

SORTI 

GEHT 

USCIT 

SALID 

OUT 

OUT 

Used 

USED 

USED 

UTIL 

UTIL 

GEBRA 

UTIL 

UTIL 

USED 

USED 


Diagram of Character Code  

The alphanumeric characters on the upper row are for the first digit of the 
code and the ones on the far left column are for the second digit of the code.  

For example, if you want to program: 
“(Year)(Month)(Date)(SP)(Hour)(:)(Minute)(AM/PM)(SP)(A)(M)(A)(N)(O)" 
the code will be; 10, 11, 12, 20, 13, 3A, 14, 1C, 20, 41, 4D, 41, 4E, 4F 
and the PIX-200 would print the following: 

IMPRINT IMAGE: 

‘05DEC 15  8:23AM AMANO 


Note:

  Space characters in the bold square shown in the following illustration 

will not be recognized as one-byte font (7 dots in width), but instead will 
be recognized as a narrow font (5 dots in width). When “In” is placed 
before the space character when changing the font size, the font will be 
bigger. Please refer to the diagram showing the fonts. 

Summary of Contents for PIX-200

Page 1: ...PIX 200 Atomic Time Clock Operation Manual ...

Page 2: ...manual in its entirety before any attempt is made to operate the equipment After you have finished reading this manual be sure to store it and in a safe place for further reference Thank You For purchasing another fine product from Amano Cincinnati Inc Warranty Notice Any claim for warranty express or implied due to the clocks failure to properly receive the radio signal because of interference wh...

Page 3: ... Date Displayed is Incorrect 3 2 Setting the Date Format 3 3 Date Format Table 3 4 Setting the Layout for Customized Comments 3 7 Test Printing for Customized Comments 3 8 Changing the Print Position 3 9 Setting the Print Pattern 3 9 Setting the Printing Length 3 12 Setting the Printing Activation Detecting Sensor 3 13 Setting the Number 3 14 Setting the Initial Number and Auto Reset 3 15 Setting ...

Page 4: ...ii Amano PIX 200 Operation Manual Chapter 5 Maintenance and Troubleshooting 5 1 Ribbon Cartridge Replacement 5 1 Cleaning 5 1 Error Codes 5 2 Chapter 6 Appendix 6 1 ...

Page 5: ...g NiMH battery option Ambient Humidity 10 to 90 non condensing Dimensions 6 1 4 159 mm Wide X 6 1 2 165 mm High X 6 3 4 171 mm Deep Weight Approximately 4 85 lbs 2 2 kg Environment Indoor use only dust free environment Keep out of direct sunlight Accessories The following accessories are provided with the Amano PIX 200 After unpacking please ensure that all of the following items are provided PIX ...

Page 6: ...e Date Print Button Press this button to print in manual mode or when setting the printing activation Print Window Large window to assist in accurate printing position Buttons 5 control buttons located on top of unit under the cover Ribbon Cartridge Easy to replace ribbon cartridge Clear LED Illuminates the printing position to increase visibility Paper Sensor Sensors which detect the paper positi...

Page 7: ...hen you use the Quick Set or Program Mode to change the settings of the PIX 200 the instructions to change the clock are shown in this window The 5 function buttons underneath the cover are used to navigate through the Quick Set and Program Mode to change the clock s settings The button is used to change the information on the display by decrementing the set value or moving the to the left The but...

Page 8: ...m for a total movement 25 5mm This adjuster will move the paper detecting sensor forward or backward to change the margin from the paper edge to the print as illustrated in the following diagram The minimum distance from the form edge to print is approximately 0 5mm 2 0mm This is achieved when you slide the slide lever to the front of the machine The maximum distance from form edge to print is app...

Page 9: ...r Step 2 Lift the cover to remove Step 3 Remove the spacers between the Ribbon Cartridge and the Printer Carriage Step 1 Step 2 Step 3 Mounting When choosing a mounting location for your PIX 200 you should consider the following The mounting surface or hardware must be capable of supporting the unit s weight 2 2 kg 4 85 lbs The area must be within the specified operating temperature range 14 F 113...

Page 10: ...ugh one of the holes in the back plate 6 Align the clock with the two upper tabs on the back plate Tilt the back of the clock upwards to fully insert the back plate tabs into the clock Be careful not to pinch the power cord with the bracket 7 Once the tabs are inserted tilt the clock back down and push it against the wall The tabs will snap into place 8 Replace the cover and lock it in place with ...

Page 11: ...lowing 1 Make sure the AC adapter for the PIX 200 is plugged in 2 The LED should light up and illuminate the printing position 3 Insert a piece of paper or time card along the guide into the PIX 200 The clock will automatically print YEAR MONTH DATE and TIME with AM or PM IMPRINT SAMPLE 4 If the imprint format is satisfactory the PIX 200 is ready for use Print Guide metal plate ...

Page 12: ...2 4 Amano PIX 200 Operation Manual This page intentionally left blank ...

Page 13: ...nking 3 Press the or buttons to position the under MON 4 Press the E button once to display the time and the Hour display will be blinking While the Hour display is blinking adjust time to the desired hours using the or buttons Once you have the correct hour press the E button to confirm and move to the minute 5 While the Minute display is blinking adjust the minutes using the or buttons to obtain...

Page 14: ...s Incorrect The illustrations to the right show samples of the displays The shaded area means that the symbols numbers or characters are blinking To set the correct date perform the following 1 Unlock and remove the cover 2 Press the and E buttons on the top of the unit at the same time holding down for 2 seconds until SEt UP Pro9 appears on the display The on the top of the display will be blinki...

Page 15: ... on the top of the unit at the same time holding down for 2 seconds until SEt UP Pro9 appears on the display The on the top of the display will be blinking 3 Press the button twice to position the under WED 4 Press the E button once to display Pr ordEr the print order style format and the code number will be blinking While the code number is blinking adjust code number to the desired number see th...

Page 16: ...MD C 05 JUN 1 RCVD 3 YMD hm 05JUN 1 3 05PM 19 MDY C JUN 1 05 RCVD 4 MDY hm JUN 1 05 3 05PM 20 DMY C 1 JUN 05 RCVD 5 DMY hm 1 JUN 05 3 05PM 21 N YMD hms 1 6 YMD 05 JUN 1 22 N YMD hm 1 05JUN 1 3 05PM 7 MD hm JUN 1 3 05PM 23 N YMD 1 05 JUN 1 8 DM hm 1 JUN 3 05PM 24 N MDY 1 JUN 1 05 9 MD JUN 1 25 N DMY 1 1 JUN 05 10 W D hm WE 1 3 05PM 26 N MD hm 1 JUN 1 3 05PM 11 W hm WE 3 05PM 27 N D hm 1 1 3 05PM 12...

Page 17: ... the print order style format and the code number will be blinking While the code number is blinking adjust code number to 32 print style by using the or button 5 Press the E button once to confirm the 32 and show the P1 inPut CodE in the display Press the E button once to program the 1st line The Prn LinE 1 display means that you can program the 1st line The 0 on the left side of the Line number ...

Page 18: ...age 5 2 Error Codes Note You can choose the character font when programming the customized comments In order to make the imprint clearer we recommend you to use Two Byte Font Please refer to page 6 3 Diagram of Font Use the following codes to edit the customized comments Code Function in Insert character dL Delete character En End of the sentence Use the following codes to change the font for cust...

Page 19: ... holding down for 2 seconds until SEt UP Pro9 appears on the display The on the top of the display will be blinking 3 Press the button twice to position the under the WED 4 Press the E button once to display the print order style format and the code number will be blinking While the code number is blinking adjust code number to 32 print style by using the or buttons 5 Press the E button once to co...

Page 20: ...nfirming the layout press the E button to test print the customized comments 2 When the PAPEr button display is blinking insert a paper and press the or button to perform a test print 3 Press the E button to end a test print 4 Press the E button once at the P4 End display to return to Set UP Pro9 on the display WARNING Touching the printing area while test printing may cause an accident resulting ...

Page 21: ...hree times to position the under the THU 4 Press E button once to display Prn Po5n ri9ht blinking 5 Press the or button to change the display to LEFt blinking 6 Press the E button once to confirm the setting and return back to the SEt UP Pro9 display Setting the Print Pattern The following illustrations show samples of the displays The shaded area means that the symbols numbers or characters are b...

Page 22: ...ess the E button once to confirm the setting and display P3 Print Hour to set the printing style of hour Press the E button again to display Hour AM PM Prn 12H While the 12H is blinking select either AM PM 12H or 24H by pressing the or button 8 Press the E button once to confirm the setting and display P4 Print minUt to set the printing style of minutes Press the E button again to display min Prn ...

Page 23: ... APR D 11 Press the E button once to confirm the setting and display P7 SLASH 2Ero to set the printing style of Zero Press the E button again to display SLASH 0 While the oFF is blinking select either OFF or on by pressing the or button Slash Zero on ø 12 Press the E button once to confirm the setting and display P8 LEAd 2Ero to set the printing of Leading Zeros Press the E button again to display...

Page 24: ...er than the minimum length you will see an error message Error 05 when the cover is put back on The minimum length depends on the imprint format you have chosen while the maximum length is 35mm To change print length perform the following 1 Unlock and remove the cover 2 Press the and E buttons on the top of the unit at the same time and hold down for 2 seconds until SEt UP Pro9 appears on the disp...

Page 25: ...wn for 2 seconds until SEt UP Pro9 appears on the display The on the top of the display will be blinking 3 Press the button six times to position the under the SUN 4 Press E button once to display P1 Print tri9Er to set the printing activation 5 Press E button again to display tri 99Er Au btn While the Au btn is blinking press the or button to select either Au btn Auto or button 6 Press the E butt...

Page 26: ...ress the button seven times to position the alongside the 1st line in the upper righthand corner of the display alongside NUMBER on the label 4 Press E button once to display P1 Print nubEr to set the starting number 1st digit thru 8th digit depending upon how many digits are selected in the following step 5 Press the E button once again and the number to be changed will be blinking Select the num...

Page 27: ...owing 1 Unlock and remove the cover 2 Press the and E buttons on the top of the unit at the same time holding down for 2 seconds until SEt UP Pro9 appears on the display The on the top of the display will be blinking 3 Press the button eight times to position the alongside the 2nd line from the upper righthand corner of the display alongside NUMBER AT RESET on the label 4 Press E button once to di...

Page 28: ...unction is useful when the same number needs to be imprinted on more than one paper Repeat times can be set from 1 to 9 To set the repeat times for a number perform the following 1 Unlock and remove the cover 2 Press the and E buttons on the top of the unit at the same time holding down for 2 seconds until SEt UP Pro9 appears on the display The on the top of the display will be blinking 3 Press th...

Page 29: ...Off With Atomic Clock Without Atomic Clock United States DST On Germany UK DST On DST On Japan Others DST Off DST Off The illustrations to the right show samples of the displays The shaded area means that the symbols numbers or characters are blinking To set Daylight Saving Time perform the following 1 Unlock and remove the cover 2 Press the and E buttons on the top of the unit at the same time ho...

Page 30: ... beginning of the day to be set Select the desired beginning hour in military time format by pressing or button Press the E button to confirm your setting and display SEt UP Pro9 Displaying Settings Programming Password and Time The illustrations to the right show samples of the displays The shaded area means that the symbols numbers or characters are blinking To set Display and Password perform t...

Page 31: ...ss the E button to confirm your setting and display P3 PA55 word 6 At P3 PA55 word press the E button to set the password The first digit will blink and it can be set by pressing the or button Once you select the first digit press E to confirm and advance to the remaining three digits following the same steps Note When you would like to cancel the password change the 1st digit back to and the pass...

Page 32: ...program display by entering 1441 Make sure you only use the button when you input this password or this password will not work Note Once a password has been entered whenever you attempt to press the and E buttons on the top of the unit at the same time and hold down for 2 seconds you will see PASS _ _ _ _ with the left _ blinking to begin entering the 4 digit password Once the correct password has...

Page 33: ...40kHz Fukushima East Japan Optional JJY 60kHz Saga West Japan In the United States for more information about the WWVB Radio signal visit NIST s website at www boulder nist gov For actual signal coverage in North America visit http www boulder nist gov timefreq stations wwvbcoverage htm Note The atomic clock function is only available for the country in which you have purchased PIX 200 The Atomic ...

Page 34: ...Setting the Time or page 3 2 Easy Way to Set the Time Note When the Completed Time Synchronization symbol is on it means that the unit has received the time code signal within 24 hours The clock may display the wrong time This may happen if it fails to receive radio wave signals properly because of interference an inappropriate location or bad radio wave receiving conditions Should this happen mov...

Page 35: ...ion the alongside the 5th line down from the upper righthand corner of the display alongside OTHERS on the label 3 Press E button and you will see P1 LCd diSPly display Press button 3 times to advance to P4 CloC 5Ync display 4 Press E button to select official standard Atomic Clock frequency or disable the Atomic Clock If you are in Europe you can select from GErAny DCF in Germany britAN MSF in UK...

Page 36: ...for Eastern Time Zone EST 4 When you see the t 2onE display where the hour is blinking select the time difference by pressing or button Press E button to confirm the setting and go to the P5 End display 5 If you need to disable the Atomic Clock function because of a failure to receive the radio signal interference an inappropriate location or just bad radio wave receiving conditions please press o...

Page 37: ...e clock will require approximately 3 minutes to complete sysnchronization During the automatic reception every night from 1 15 am to 4 00 am it may take up to 166 minutes to complete time synchronization depending on the radio wave reception When you manually start reception the clock will continue to search for time code signals until this operation is discontinued Refer to page 4 1 through 4 4 f...

Page 38: ...4 6 Amano PIX 200 Operation Manual This page intentionally left blank ...

Page 39: ...d unplug the clock then plug it back in to move the carriage up This will make the ribbon installation easier 5 Insert a new ribbon underneath the printer head as shown 6 Turn the knob on the cassette clockwise one turn to take up any slack in the ribbon 7 Check the printing quality to confirm that you have installed the ribbon properly 8 Reset the INK capacity gauge by pressing the and buttons at...

Page 40: ...on and that the ribbon cassette is correctly inserted in place After clearing any jams plug the clock back in The 05 error code signifies that the print length should be changed by adjusting the Year Digit Type of Hour Language type and Digit Number If the error does not disappear please contact your AMANO Cincinnati Inc representative for assistance Note Printing errors can be caused by the absen...

Page 41: ...NUL ANUL VOID VOID paid PAID PAID PGADO PAYE BEZ PAGA PAGO PAID PAID confirmed CFM D CFM D CONF CONF EMPF CONF CONF CFM D CFM D approved APR D APR D APBDO APPR BEST APPR APRV APR D APR D completed CMPL D CMPL D TRMDO TERM ABGES COMPL TERM CMPL D CMPL D origin ORIGN ORIGN ORIGN ORIG ORIG ORIG ORIG ORIGN ORIGN file FILE FILE ARCH FICH AKTE FILE ARQV FILE FILE in IN IN ENTRA ENTRE KOMMT ENTRA ENTRA I...

Page 42: ... 6 Day of the week 6 F V f v 月 Æ 6 Dot SP 7 Week No 7 G W g w 日 Ä 7 Dot SP 8 Julian Date 8 H X h x 平 Ø 8 Dot SP 9 Number 9 I Y i y Ö 9 Dot SP A Repeat Time J Z j z à J B Preprogrammed Comment K k É Jn C AM PM L l Å L D M m Γ LL E N n Ln F O _ o Θ Un Code Function in Insert character dL Delete character En End of the sentence Code Function J Start Two Byte Jn Undo Two Byte L Start Emphatic Byte LL ...

Page 43: ...hatic 8 Double Width 13 II Common Two Byte 9 Two Byte Emphatic 10 Double Width 17 III Special Symbols Two Byte 9 Emphatic 10 Double Width 17 IV Space Character Un 5 7 Emphatic 6 8 Double Width 9 13 V Second One Byte 7 15 VI AM PM Fixed 13 1C VII Chinese Character Fixed 10 From 90 to 98 From 10 to 89 A1 to A4 Excluding IV V VI From A6 to B5 Characters in the Bold Square Refer to page 25 ...

Page 44: ...9 9 100B 5 100 0 0 0 05 05 05 10 10 10 15 40 40 45 45 45 50 50 50 55 55 55 85 85 85 90 90 90 95 95 95 100A One hour 3 600 seconds is divided by 100 and the minutes are printed in a 00 99 range The minute increments by 1 every 36 seconds and seconds are printed in a 00 35 range 60th mins 100A mins 00 00s 00 00s 00 35s 00 35s 00 36s 01 00s 33 00s 55 00s 33 01s 55 01s 33 35s 55 35s 33 36s 56 00s 59 2...

Page 45: ...Amano PIX 200 Operation Manual 6 5 NOTES ...

Page 46: ...6 6 Amano PIX 200 Operation Manual NOTES ...

Page 47: ......

Page 48: ...AJR 501100 Copyright 2006 Amano Cincinnati Inc 6 06 0 Corporate Headquarters 140 Harrison Avenue Roseland NJ 07068 1239 800 526 2559 ...

Reviews: