background image

69

-EN

01GB05INE-S920E.fm

ALPINE INE-S920E/INE-Z928E 68-21057Z31-A (EN)

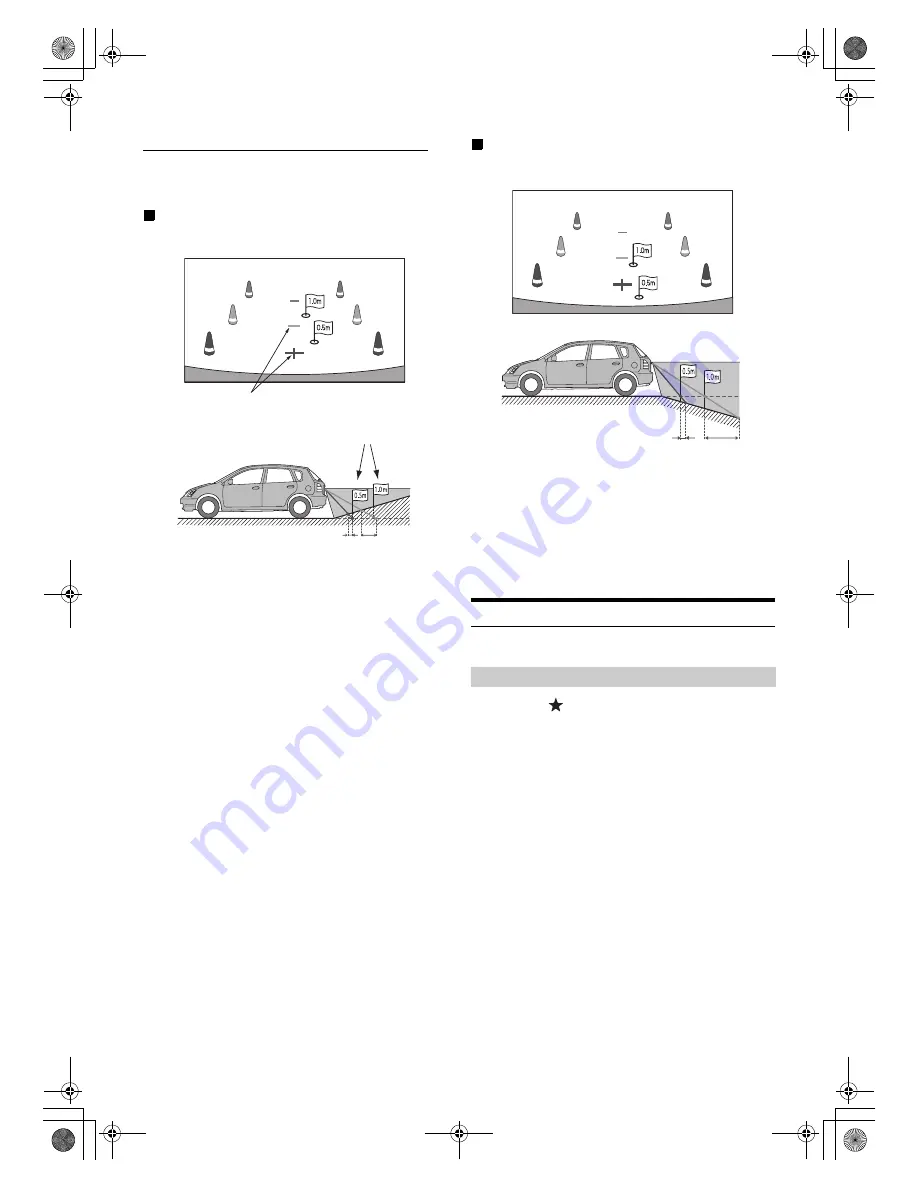
Error between the screen and the actual road surface

In the following conditions, errors are produced between the screen 
guidance and the actual road surface. (The illustrations represent a case 
when the camera is installed in the standard position.)

When there is a steep upward slope behind the car 
(example)

<Screen>

<Situation of the car>

The distance guidance mark represents the distance to a 
flat road surface. Therefore in the case of an upward 
slope behind the car, the distance guides are displayed 
closer to the rear bumper than the actual distance. For 
example, if there is an obstacle on the upward slope, it 
may appear farther away than its actual position.
Also, an error may occur between the guidance and the 
actual path of the car on the road surface.

When there is a steep downward slope behind the 
car (example)

<Screen>

<Situation of the car>

In the case of a downward slope behind the car, the 
distance guides are displayed farther from the rear 
bumper than the actual distance. 
If there is an obstacle on the downward slope, it seems 
closer than its actual position.
Also, an error may occur between the guidance and the 
actual path of the car on the road surface.

Front Camera Operation

Set “Front” for “Direct Camera Setting” (page 55). 

1

Press the 

 (My Favorites) button

.

The Favorites screen is displayed.

2

Touch 

[Camera]

.

The Camera mode is activated and the front view video is 
displayed.
When the front camera (direct camera) and rear camera or 
side camera (AUX camera) are connected simultaneously, 
the screen for selecting which camera image to display 
appears.

Distance guidance marks

Actual distances

Error Error

Displaying the Front View Video Manually

Error

Error

01GB00INE-S920E.book  Page 69  Tuesday, June 12, 2012  10:56 AM

Summary of Contents for INE-S920E

Page 1: ... Toronto Ontario M3J 2M9 Canada Phone 1 800 ALPINE 1 1 800 257 4631 ALPINE ELECTRONICS OF AUSTRALIA PTY LTD 161 165 Princes Highway Hallam Victoria 3803 Australia Phone 03 8787 1200 ALPINE ELECTRONICS GmbH Wilhelm Wagenfeld Str 1 3 80807 München Germany Phone 089 32 42 640 ALPINE ELECTRONICS OF U K LTD Alpine House Fletchamstead Highway Coventry CV4 9TW U K Phone 0870 33 33 763 ALPINE ELECTRONICS ...

Page 2: ...rning Power On or Off 19 Turning the System On 19 Initial System Start Up 20 Inserting Ejecting a Disc 20 Inserting the Disc 20 Removing the Disc 20 Adjusting the Monitor Viewing Angle 20 Adjusting the Volume 20 Lowering Volume Quickly 20 Common Operations Using My Favorites 21 User Registration 21 Setting My Favorites 22 Adding My Favorites 22 Editing My Favorites 23 Displaying the Camera Image 2...

Page 3: ...htness of the Backlighting 38 Adjusting the Minimum Level of Backlight 38 Adjusting the Dimmer of Button Lighting at Night 38 Switching the Display Colour 39 Adjusting the Touch Panel 39 Initialising the Touch Panel Corrected Values 39 Visual Setting 39 Switching Display Modes 39 Adjusting the Live Contrast 40 Selecting the Visual EQ Mode Factory s setting 40 Adjusting Brightness 40 Adjusting Colo...

Page 4: ...t Camera Setting 55 Setting the Camera Input 55 AUX Camera Setting 56 Setting the Camera Input 56 Camera Interrupt Setting Power OFF Mode 56 BLUETOOTH Operation Setup Before Using 57 About BLUETOOTH 57 About the Hands Free Phone 57 Before Using BLUETOOTH 57 Hands Free Phone Control Connecting a BLUETOOTH Device 57 Disconnecting the BLUETOOTH Connection 57 Changing the connecting BLUETOOTH Device 5...

Page 5: ...ation 70 Other Camera Operation 70 About the adjustment of the Caution display location 70 USB Memory Optional Playback 71 Repeat Play 71 Random Play M I X 72 Random Play M I X ALL 72 Searching for a Desired Song 72 File Folder Name Search 72 Tag Search 72 Direct Up Down Function 73 Select the desired Folder Folder up down 73 iPod iPhone Optional Playback 75 Searching for a Music File 75 Searching...

Page 6: ...ns or any other factors which may affect the safety or timing of your driving experience Use your personal judgment if the navigation system is unable to provide you with an alternate route There may be situations where the navigation system may display the vehicle s location erroneously Use your own driving judgment in this situation taking into account current driving conditions Please be aware ...

Page 7: ...ns or road warning signals train crossings etc can be dangerous and may result in an accident LISTENING AT LOUD VOLUME LEVELS IN A CAR MAY ALSO CAUSE HEARING DAMAGE MINIMIZE DISPLAY VIEWING WHILE DRIVING Viewing the display may distract the driver from looking ahead of the vehicle and cause an accident DO NOT DISASSEMBLE OR ALTER Doing so may result in an accident fire or electric shock USE ONLY I...

Page 8: ...nt pen Playing a disc while driving on a very bumpy road may result in skips but this will not scratch the disc or damage the player Irregular Shaped Discs Be sure to use round shaped discs only for this unit and never use any special shaped discs Use of special shaped discs may cause damage to the mechanism New Discs To prevent the disc from jamming Disc error is displayed if discs with irregular...

Page 9: ...ving The INE S920E INE Z928E draws minimal current even when its power switch is turned off If the switched power ignition lead of the INE S920E INE Z928E is connected directly to the positive post of the vehicle s battery the battery may be discharged An SPST Single Pole Single Throw switch sold separately can be added to simplify this procedure Then you can simply place it in the OFF position wh...

Page 10: ...lays DVD Video DivX Audio CD and has a built in MP3 WMA AAC decoder The following information is designed to help you create your own music CDs either Audio CD or MP3 WMA AAC encoded CD R RW files What is the difference between an Audio and MP3 WMA AAC CD An Audio CD is the same format as the commercial CDs you buy in the store also known as CD DA MP3 MPEG Audio Layer 3 WMA Windows Media Audio AAC...

Page 11: ...rmat that can be played back on the unit is MP3 WMA AAC The video file format that can be played back on the unit is DivX Artist song name etc can be displayed Certain special characters may not be correctly displayed On Handling USB Memory This unit can control a memory storage device that supports the USB Mass Storage Class MSC protocol Playable audio file formats are MP3 WMA and AAC USB memory ...

Page 12: ...cessory with iPod or iPhone may affect wireless performance 2010 Nokia All rights reserved Nokia and Works with Nokia are trademarks or registered trademarks of Nokia Corporation DivX DivX Certified and associated logos are trademarks of Rovi Corporation or its subsidiaries and are used under license The BLUETOOTH word mark and logos are registered trademarks owned by the Bluetooth SIG Inc and any...

Page 13: ... is displayed If no BLUETOOTH device has been registered or if you want to switch users manually users can be switched by pressing and holding the My Favorites button For details of which settings are affected by switching users refer to Settings When Switching Users page 25 My Favorites Up to eight My Favorites can be registered as shortcut keys for each registered user Frequently used functions ...

Page 14: ...splay example when setting is completed About Dual Screen If you want to display the music playback screen while route guidance is displayed etc you can display the Navigation and Audio Visual screens simultaneously 1 During video playback Dual Wide Dual Full and Full Screen appear on the screen for selecting the screen size For details refer to Switching the Dual Screen Display page 26 Audio Visu...

Page 15: ...and left screens using drag drop To switch the screens touch the middle of the screen you want to move and drag it to the desired display position The screens will switch positions when you remove your finger Dual Screen Display Position 01GB00INE S920E book Page 15 Tuesday June 12 2012 10 56 AM ...

Page 16: ...e mute mode Press and hold for at least 3 seconds to turn the power off c Eject button Ejects a disc DISC Slot For details of the RESET switch refer to Initial System Start Up page 18 Turning Power On or Off Some of this unit s functions cannot be performed while the vehicle is in motion Be sure to stop your vehicle in a safe location and apply the parking brake before attempting these operations ...

Page 17: ...the connector terminals on the back of the front panel This is not a malfunction Attaching 1 Insert the under side of the front panel into the main unit 2 Push the up side of the front panel until it locks firmly into the main unit Before attaching the front panel make sure that there is no dirt or dust on the connector terminals and no foreign object between the front panel and the main unit Atta...

Page 18: ...Do not touch the surface of the disc directly with your fingers Before inserting or removing the disc always turn the ignition key to ACC or ON You cannot remove or insert the disc with the ignition key turned to OFF 1 Press Eject When the disc has been ejected part way take it out If the disc cannot be ejected by pressing press and hold again for at least 5 seconds Adjusting the Volume Rotate the...

Page 19: ... ignition is turned off it will remain in radio mode when ignition is turned back on 2 Press and hold the AUDIO button for at least 3 seconds to turn the power off The unit can be turned on by pressing any button The INE Z928E is a precision device Careful handling of the unit should provide you with years of trouble free operation Turning the System On With the Alpine system when the ignition key...

Page 20: ...nitor will stop at the set tilt angle when closing Adjusting the Monitor Viewing Angle Adjust the monitor s angle for better visibility 1 Press c Eject The Open Tilt screen is displayed 2 Touch Up or Down of Tilt to adjust the desired monitor angle The monitor angle can be adjusted in 5 stages 3 Touch to return to the normal mode The screen colour will vary when viewed at certain angles Adjust the...

Page 21: ...orites button returns to the original screen without registering a user 3 Input the user name from the keypad and touch OK The BLUETOOTH Device Setup screen is displayed Touch to edit the name For details of how to input characters from the keypad refer to How to Input Characters and Numbers Keypad page 25 4 Touch Link then touch OK The BLUETOOTH Device List is displayed The BLUETOOTH devices regi...

Page 22: ...y Favorites Navigation Registers the destination search category or nearby place search category in My Favorites Specific Place You can display the places registered in My Favorites and set your destination Search for a place registered in My Favorites by Address Find Place Address Book History then touch Add Quick Place search Displays the address search keypad Help Nearby Displays the nearby sea...

Page 23: ...UETOOTH device You can change the BLUETOOTH devices associated with a user 1 Touch the user Phone you want to change The BLUETOOTH Device Setup screen is displayed 2 Touch Link then touch OK The BLUETOOTH Device list is displayed The BLUETOOTH devices set by User Registration are highlighted For detailed settings touch Search 3 Select the device you want to change and touch OK The device is change...

Page 24: ... Parametric EQ the data will be overwritten The Easy sound settings are reflected in the following Audio Setup items Setting the MX Media Xpander Adjusting the Parametric Equalizer Curve Parametric EQ Adjusting the Time Correction Time Correction Adjusting the Crossover Settings X OVER only when Subwoofer is set to On The Equalizer Presets Bass Max EQ settings are disabled Downloaded Sound Setting...

Page 25: ...and erases it Touching here for more than 2 seconds will erase all input characters Character keypad Special character selector switch Character keypad Special character keypad Symbol keypad Character keypad Space Input number is confirmed Item Ref page My Favorites User Registration 21 Setting My Favorites 1 22 Displaying the Camera Image 2 23 General Setup Setting Top banner and Bottom banner Di...

Page 26: ...this option is not available Switching Sources Using the Top banner Touch the source button for the Top banner at the top of the Audio Visual Playback screen and select the desired source If the source button is hidden touch When Source Layout Setting page 48 is set to On you can switch sources by tracing the middle of the screen from right to left or from left to right This mode is useful if you ...

Page 27: ...screen before dragging and that item will be selected About the Indicator Display The Indicator Bar at the bottom of the screen displays various types of information like the current time The display will differ depending on the source For details refer to the display example of each source Lights up when connected to a BLUETOOTH compatible device BLUETOOTH connection to audio device BLUETOOTH con...

Page 28: ...desired band and repeat the procedure A total of 18 stations can be stored in the preset memory 6 stations for each band FM1 FM2 or AM If a preset memory has already been set in the same preset number it will be cleared and the new station will be memorised Presetting Stations Automatically The tuner can automatically seek and store 6 strong stations in the selected band in order of signal strengt...

Page 29: ...ains both audio data and MP3 WMA AAC data this unit plays back only the audio data The track display for CD audio data playback shows the track numbers recorded on the disc If an MP3 WMA AAC disc with many files and folders is played it may take longer than normal to start playback The playback time may not be correctly displayed when a VBR Variable Bit Rate recorded file is played back Repeat Pla...

Page 30: ...capable of compressing audio data at extremely high ratios reducing the size of music files to as much as one tenth their original size This is achieved while still maintaining near CD quality The MP3 format realises such high compression ratios by eliminating the sounds that are either inaudible to the human ear or masked by other sounds What is AAC AAC is the abbreviation for Advanced Audio Codi...

Page 31: ...ot correctly play back discs recorded with Track At Once or packet writing Order of files Files are played back in the order that the writing software writes them to the disc Therefore the playback order may not be what s expected Verity the writing order in the software s documentation The playback order of the folders and files is as follows The following numbers may differ from actually display...

Page 32: ...be used CD R CD RW DVD R DVD RW DVD R DVD RW discs that are recorded in the DivX mode can be used WARNING It is dangerous for the driver to watch the DVD TV Video while driving the vehicle The driver may be distracted from looking ahead and an accident could occur Install the INE S920E INE Z928E correctly so that the driver cannot watch DVD TV Video unless the vehicle is stopped and the emergency ...

Page 33: ...ric Keypad Input Mode screen refer to Numeric Keypad Input Operations page 33 3 Touch Enter to confirm the selected item 1 Touch 10KEY of Bottom banner The numeric keypad input mode screen appears If 10KEY is not displayed touch in the bottom banner to display 10KEY 2 Touch a desired number Touch to delete an entered number Touch Delete All to delete all entered number 3 Touch Enter on the numeric...

Page 34: ...ng fast forwarding fast reversing This operation may not be possible on certain discs Finding the Beginnings of Chapters Tracks Files During playback touch or The chapter track file switches each time the button is touched and playback of the selected chapter track file starts Some DVDs do not have chapters Playing Still Frames Pausing 1 During playback Touch of Bottom banner 2 Touch or in the mid...

Page 35: ...ng PRE STOP or while playback is paused 1 Touch 10Key of Bottom banner The numeric keypad input mode screen will appear If 10KEY is not displayed touch in the bottom banner to display 10KEY 2 Touch and enter the chapter number you want to play See page 33 for operation of the numeric keypad 3 Touch Enter to confirm your selection Playback will start from the selected chapter 4 Touch This function ...

Page 36: ...all discs will allow changing the subtitles during playback In these cases select subtitles from the DVDs menu The subtitle language selected becomes the default setting every time the power is turned on or the disc is replaced If the disc does not include that language the disc s default language is selected instead However the subtitle language may differ depending on the disc For some discs the...

Page 37: ... Initial setting The character code to be used for tag text information displayed on the screen can be selected from 6 character codes Setting item Format Sel Setting contents EU1 EU2 Initial setting RUS CHI THA ARA The Setup menu feedback information etc for this unit can be changed to appear in the selected language Setting item Language Sel Setting contents English German French Spanish Portugu...

Page 38: ...r for the audio visual source Setting item Top Bottom Banner Fade Out Setting contents Off Initial setting On Screen LED Customize Touch Screen LED Customize on the General setup menu in step 3 Refer to General Setup Operation page 37 Backlighting is provided by a fluorescent light built into the liquid crystal panel The illumination control adjusts the brightness of the backlighting based on the ...

Page 39: ...on Audio Video media Display Mode 1 Live Contrast Visual EQ Bright Colour Tint Contrast Sharp Direct Camera 2 Live Contrast Bright Colour Contrast AUX Camera 2 Live Contrast Bright Colour Contrast Navigation Bright Contrast 1 When media is set to AUX the settings cannot be changed in the situations below When AUX In is set to DVB T is On 2 The camera names set under the Direct Camera AUX Camera se...

Page 40: ... adjusting audio video media you can store the settings made for Adjusting Live Contrast Brightness Color Tint Contrast and Sharp Setting item Preset1 Preset2 1 After completing Adjusting Live Contrast Brightness Color Tint Contrast and Sharp page 40 touch and hold Preset1 or Preset2 to save the settings 2 Touch Preset1 or Preset2 to call the saved settings Display Mode cannot be registered About ...

Page 41: ...setup menu in step 3 See General Setup Operation page 37 Setting item Installation The Installation check screen is displayed Sound Setup Operation 1 Touch Setup icon of Top banner The Setup main screen is displayed 2 Touch Sound The Sound Setup screen appears 3 Select the desired item Setting items Balance Fader Subwoofer Media Xpander Bass Max EQ Parametric EQ Time Correction X OVER Defeat Volum...

Page 42: ...If the Subwoofer setting is Off the setting cannot be set Setting the MX Media Xpander Media Xpander is selected on the Audio setup menu in step 3 Refer to Sound Setup Operation page 41 When the currently playing source is AM radio band MW LW this option is not available MX Media Xpander makes vocals or instruments sound distinct regardless of the music source The FM radio CD USB memory and iPod i...

Page 43: ...l taste Setting item Parametric EQ 1 Adjust the Parametric EQ to your preference Adjusting the Band Touch Band to select the band to be adjusted You can select a band directly by touching the screen Adjusting the Frequency Touch or of Freq to adjust the frequency of the selected band Adjustable frequency bands 20 Hz to 20 kHz in 1 3 octave steps Adjusting the Level Touch or of Level to adjust the ...

Page 44: ...udio setup menu in step 3 Refer to Sound Setup Operation page 41 Before performing the following procedures refer to About the Crossover page 47 Setting item X OVER 1 Touch Channel to select the channel Each time you touch the channel switches The channel being adjusted is displayed in red 2 Adjust the crossover to your preference Selecting the Cut Off Frequency Touch or of Freq then select the cu...

Page 45: ...left ear To correct this this unit is able to delay the audio signal to the speakers closest to the listener This effectively creates a perception of increased distance for those speakers The listener can be placed at an equal distance between the left and right speakers for optimum staging The adjustment will be made for each speaker in 3 4cm steps Adjust the time correction level of the front le...

Page 46: ... 4 1 0 34 0 13 4 6 1 207 4 81 7 1 1 37 4 14 7 6 2 210 8 83 1 1 2 40 8 16 1 6 3 214 2 84 4 1 3 44 2 17 4 6 4 217 6 85 8 1 4 47 6 18 8 6 5 221 0 87 1 1 5 51 0 20 1 6 6 224 4 88 4 1 6 54 4 21 4 6 7 227 8 89 8 1 7 57 8 22 8 6 8 231 2 91 1 1 8 61 2 24 1 6 9 234 6 92 5 1 9 64 6 25 5 7 0 238 0 93 8 2 0 68 0 26 8 7 1 241 4 95 1 2 1 71 4 28 1 7 2 244 8 96 5 2 2 74 8 29 5 7 3 248 2 97 8 2 3 78 2 30 8 7 4 25...

Page 47: ...AT to bypass the HP or LP filters Do not use a tweeter without the HPF on or set to a low frequency as it may cause damage to the speaker due to the low frequency content You cannot adjust the crossover frequency higher than the HPF or lower than the LPF Adjustment should be made according to the recommended crossover frequency of the connected speakers Determine the recommended crossover frequenc...

Page 48: ...efore making changes To temporarily change the language of the current disc either do so from the DVD menu or by using the operation described in the section Switching the Audio Tracks page 36 If the disc does not include the selected language the disc s default language is set To play in a language other than those displayed 1 Touch Menu Language Code Audio Language Code or SUBT Language Code The...

Page 49: ...ENTAL 4 Touch Parental 5 Touch on to turn On Select Off to cancel parental lock or if you do not want to set a rating level 6 Touch to return to the previous screen 7 Touch Parental Level 8 Touch or to select the rating level 1 to 8 The smaller the number the higher the restriction 9 Touch to return to the previous screen Changing the password 1 Touch Password Change The numeric keypad screen is d...

Page 50: ...connect one more External Input device Setting the Secondary name can change the mode name display of this device Setting the Secondary AUX Name Secondary name can be set only when Primary name is set to DVB T Setting item Secondary Name Setting contents Off Initial setting AUX2 DVD GAME EXT DVD DVD CHG DVB T 1 TV The selected source name is displayed instead of AUX mode name 1 If the Primary Name...

Page 51: ...iver Volume Transmitter Volume Calling Volume Delete Call History 4 Touch or etc to change its setting When the pop up window for setup is displayed touch to close the window after setting 5 Touch to return to the previous screen Immediately after changing the BLUETOOTH Setup while the system is writing data automatically do not turn the ignition key to OFF Otherwise the settings may not be change...

Page 52: ...nother device you need to delete one of the devices from position 1 to 5 first Setting the BLUETOOTH Device Select one of 5 paired BLUETOOTH compatible devices that you previously registered 1 Touch Set BLUETOOTH Device 2 Touch Audio or Hands free of the device you want to connect from the Paired Device list Deleting a BLUETOOTH Device from the list You can delete the information of a previously c...

Page 53: ...c 1 Touch Auto Answer Time The Auto Answer setting screen is displayed 2 Touch or Selecting the Output Speaker Phone Speaker is selected on the BLUETOOTH setup menu in step 3 Refer to BLUETOOTH Setup Operation page 51 You can select which speaker in the car will output the audio from the phone Setting item Phone Speaker Setting contents All Initial setting Front L Front R Front LR The setting cann...

Page 54: ...mera is connected set this item 1 Touch Setup icon of Top banner The Setup main screen is displayed 2 Touch CAMERA The Camera Setup screen appears 3 Select the desired item Setting items Direct Camera AUX Camera Camera Interrupt Power OFF Mode 4 Touch or etc to change its setting When the pop up window for setup is displayed touch to close the window after setting 5 Touch to return to the previous...

Page 55: ...position Setting item Guide Adjustment 1 Touch Guide Adjustment The camera guide adjustment screen is displayed If the video pattern is set to Corner the camera guide will not be displayed 2 Touch Adjust If Adjust does not appear proceed to step 3 3 Touch the guide you intend to adjust Guide line can also be selected by touching Display example for rear camera mode Display example for front camera...

Page 56: ...Touching Clear clears adjustments and returns to the setting before guide line alteration 5 After the adjustment is completed touch Set Adjusting guides simultaneously for Rear camera only Touch Link The 3 vertical guides of the currently selected guide link together allowing them to be adjusted simultaneously Turning guide display ON OFF Turning the selected guide off 1 Touch ON OFF The currently...

Page 57: ...y Certain mobile phone features are dependent on the capabilities and settings of your service provider s network Additionally certain features may not be activated by your service provider and or the provider s network settings may limit the feature s functionality Always contact your service provider about feature availability and functionality All features functionality and other product specif...

Page 58: ... make a phone call You can assign up to 4 phone numbers for one touch dialing to make a call easily For how to assign one touch dialling refer to Assigning as a Short Cut Dialling Number page 60 1 Press the PHONE button The phone menu screen is displayed 2 Touch Favorites 3 Touch Dial1 Dial2 Dial3 or Dial4 The phone call is sent to the stored number Pressing and holding Dial1 Dial2 Dial3 or Dial4 ...

Page 59: ...ou can adjust the transmit volume and receive volume respectively Touch or for Vol You can adjust the volume in 11 levels Touch to turn down the volume Touch to turn up the volume The voice output for calls is switchable between car speakers and the mobile phone speaker Touch Depending on the mobile phone this operation may not be possible Transmits a DTMF Touch Tone during a call 1 Touch TONE The...

Page 60: ...layed 3 Touch the phone number you intend to delete 4 Touch Delete The confirmation screen is displayed If multiple phone numbers are registered they are all deleted 5 Touch OK The selected number is deleted Deleting All Entries from the Phone Book 1 Press the PHONE button The Phone menu screen is displayed 2 Touch The Phone Book screen is displayed 3 Touch Delete All The confirmation screen is di...

Page 61: ...e portable player etc is connected by wireless you can play back a song operation is controllable from the unit Display example for BLUETOOTH Audio main screen Song title Artist title Album title Elapsed time BLUETOOTH devices Name The displayed onscreen buttons may differ depending on the AVRCP version Status Indicator Song title Artist title Album title Elapsed time do not display for AVRCP Ver ...

Page 62: ...he button is touched Operations may differ depending on the connected BLUETOOTH compatible device M I X Random Play Available for AVRCP Ver 1 3 and 1 4 only Touch during playback The M I X mode switches every time is touched Operations may differ depending on the connected BLUETOOTH compatible device Selecting Groups Available for AVRCP Ver 1 3 and 1 4 only Touch Group or Group to select the group...

Page 63: ...X operation screen touch the video display area Touch the display panel to display the operation screen again Setting the AUX name for EXT DVD DVD CHG DVB T and TV mode displays their individual operation switches and enables operation Refer to Setting the Primary AUX Name AUX Setup page 50 and Setting the Secondary AUX Name page 50 Operating an External DVD Player To operate an External DVD playe...

Page 64: ...ps play Top Menu Calls up the Top Menu screen Menu Calls up the Menu screen Menu Control Calls up the menu operation mode Switches the programme playlist folder down Switches the programme playlist folder up Angle Switches angle Audio Switches audio Sub Title Switches sub titles Menu operation mode screen display example Key The menu operation mode will be displayed Moves key panel location Closes...

Page 65: ...een in the DVB T mode the operation screen is displayed For details on how to operate refer to the Owner s Manual of the connected Digital TV Receiver DVB T Menu operation mode screen display example Switches the Channel number Favorite channel number down Switches the Channel number Favorite channel number up TUNE Channel or FAV Switches between the Channel mode and the Favorite channel mode EPG ...

Page 66: ...wner s Manual of the connected TV Switches the Channel number Preset channel frequency down Switches the Channel number Preset channel frequency up TUNE Channel or PRESET or MANUAL Switches amongst Channel mode Preset mode and Manual mode Band Switches the band A Memo The tuner automatically seeks and stores stations About the TV operation screen Touch 01GB00INE S920E book Page 66 Tuesday June 12 ...

Page 67: ...when the reverse wire is properly connected If the camera has a view switch function the Direct Change switch is displayed 1 Touch the screen when the image from the rear camera is displayed The operation screen is displayed on the screen After a 5 second time out the operation screen returns to the camera display screen 2 Touch Back Panorama Corner or Top The image pattern changes Back Rear View ...

Page 68: ...dings Depending on the car the guidance may deviate to the right or left This is not a malfunction Distance guidance mark The distance guides represent the ground level distance from the rear bumper It is difficult to accurately estimate the distance to objects above ground level Screen Positions of A B and C In the screen according to the distance guidance marks the truck seems to be parked about...

Page 69: ...h of the car on the road surface When there is a steep downward slope behind the car example Screen Situation of the car In the case of a downward slope behind the car the distance guides are displayed farther from the rear bumper than the actual distance If there is an obstacle on the downward slope it seems closer than its actual position Also an error may occur between the guidance and the actu...

Page 70: ...g page 67 and Adjusting the Caution Display Location page 67 for the operations Other Camera Operation Set OTHER for AUX Camera Setting page 56 1 Press the My Favorites button The Favorites screen is displayed 2 Touch Camera When the front camera direct camera and rear camera or side camera AUX camera are connected simultaneously the screen for selecting which camera image to display appears As wi...

Page 71: ...ress the AUDIO button 2 Touch USB of Top banner The USB mode is activated and the display changes to the USB screen 3 Touch or or to select the desired track file Returning to the beginning of the current track file Touch Fast reverse Touch and hold Advancing to the beginning of the next track file Touch Fast forward Touch and hold 4 To pause playback touch is displayed in the middle of the screen...

Page 72: ...the desired folder name The file name of the selected folder is displayed 5 Touch the desired file name The selected file is played back To return to the previous hierarchy touch For details on how to scroll through the list refer to Selecting an Item in a List page 27 After selecting a folder via a Folder name search touch on the main screen to display the folder search screen After selecting a f...

Page 73: ...cent song search was a Tag Search Playlist Artist Album Genre Composer can be easily changed For example if you listen to a song from a selected album the album can be changed Touch or to select the desired Playlist Artist Album Genre Composer If an album is selected from an artist search the album can be searched For details on icon display refer to Direct Up Down switch icon page 76 If search se...

Page 74: ... 3 1 The following devices have been tested and shown to work with this unit Correct function of earlier versions cannot be guaranteed iPhone 4 16GB 32GB Ver 4 3 1 iPhone 3GS 8GB 16GB 32GB Ver 4 3 1 iPhone 3G 8GB 16GB Ver 4 2 1 iPhone 4GB 8GB 16GB Ver 3 1 3 For clarity in identifying your model of iPod please see Apple s own document Identifying iPod models at http support apple com kb HT1353 Disp...

Page 75: ...irectly 1 Touch of the artist s name All songs of the selected artist are played back To Search for the Album of the Artist 1 Touch the selected artist name The Albums search screen of the selected artist is displayed 2 Touch of the desired album s name All songs of the selected album are played back To Search for a Song in the Album of the Artist 1 Touch the desired artist s name All albums of th...

Page 76: ... you selected last in the search mode is displayed Repeated touches return to each previous level up to the highest Repeat Play Touch to repeatedly play back the currently track The tracks files will be played repeatedly Touch again to deactivate Repeat play Random Play Shuffle Touch during playback The files will be played back in a random sequence The Shuffle mode switches every time is touched ...

Page 77: ...s compared to less than 300 for VHS tape In addition DVDs offer a variety of functions Multiple audio page 36 Movies can be recorded in up to eight languages The desired language can be selected from the unit Subtitles function page 36 Movies can include subtitles in up to 32 languages The desired subtitle language can be selected from the unit Multi angle function page 36 When the DVD contains a ...

Page 78: ... 6979 6983 6984 6985 7065 7073 7074 7079 7082 7089 7165 7168 7176 7178 7185 7265 7273 7282 7285 7289 7365 Abbreviation IE IK IN IS IT IW JP JI JW KA KK KL KM KN KO KS KU KY LA LN LO LT LV MG MI MK ML MN MO MR MS MT MY NA NE NL NO OC OM OR PA PL PS PT QU RM Code 7369 7375 7378 7383 7384 7387 7465 7473 7487 7565 7575 7576 7577 7578 7579 7583 7585 7589 7665 7678 7679 7684 7686 7771 7773 7775 7776 777...

Page 79: ...IR IS IT JM JO JP KE KG KH 6877 6879 6890 6967 6969 6971 6972 6982 6983 6984 7073 7074 7075 7077 7079 7082 7165 7166 7168 7169 7170 7172 7173 7176 7177 7178 7180 7181 7182 7183 7184 7185 7187 7189 7275 7277 7278 7282 7284 7285 7368 7369 7376 7378 7379 7381 7382 7383 7384 7477 7479 7480 7569 7571 7572 Dominica Dominican Republic Algeria Ecuador Estonia Egypt Western Sahara Eritrea Spain Ethiopia Fi...

Page 80: ...69 8371 8372 8373 8374 8375 8376 8377 8378 8379 8382 8384 8386 8389 8390 8467 8468 8470 8471 8472 8474 8475 8477 8478 8479 8480 8482 8484 8486 8487 8490 8565 8571 8577 8583 8589 8590 8665 8667 8669 8671 8673 8678 8685 8770 8783 8969 8984 8985 9065 9077 9087 PE PF PG PH PK PL PM PN PR PT PW PY QA RE RO RU RW SA SB SC SD SE SG SH SI SJ SK SL SM SN SO SR ST SV SY SZ TC TD TF TG TH TJ TK TM TN TO TP T...

Page 81: ... if broken replace the antenna with a new one Broadcast is noisy The antenna is not the proper length Extend the antenna fully replace it if it is broken The antenna is poorly grounded Make sure the antenna is grounded properly at its mounting location The station signal is weak and noisy If above solution does not work tune in another station Disc Disc playback sound is wavering Moisture condensa...

Page 82: ...quire details from the service center An access error to DVD drive occurred for some reasons Please ask Service Centre for help Audio Visual Read error Please check the Disc Scratched disc contaminated disc poor recording disc incompatible with this unit Touch Disc on the Open Tilt screen Change the disc USB device error An iPod iPhone that is not supported by the unit is connected Connect an iPod...

Page 83: ...ile being attempted to play has a limited number of viewings The viewing limit has been reached and can no longer be played on this device After the message has been displayed the beginning of the next file will automatically be played back This DivX rental has used XX out of YY views Continue If the total number of viewings for this file has not been exceeded the views remaining is displayed To p...

Page 84: ...f Channels 2 Channel Stereo Frequency Response 5 20 000 Hz 1 dB Total Harmonic Distortion 0 008 at 1 kHz Dynamic Range 95 dB at 1 kHz Signal to Noise Ratio 100 dB Channel Separation 85 dB at 1 kHz Frequency response may differ depending on the encoder software bit rate Frequency Response 5 20 000 Hz 1 dB Wow Flutter WRMS Below measurable limits Total Harmonic Distortion 0 008 at 1 kHz Dynamic Rang...

Page 85: ... AGREEMENT TO THIS EULA OR RATIFICATION OF ANY PREVIOUS CONSENT GRANT OF SOFTWARE LICENSE This EULA grants you the following license You may use the SOFTWARE only on the DEVICE NOT FAULT TOLERANT THE SOFTWARE IS NOT FAULT TOLERANT ALPINE HAS INDEPENDENTLY DETERMINED HOW TO USE THE SOFTWARE IN THE DEVICE AND MS HAS RELIED UPON ALPINE TO CONDUCT SUFFICIENT TESTING TO DETERMINE THAT THE SOFTWARE IS S...

Page 86: ... must destroy all copies of the SOFTWARE and all of its component parts INTELLECTUAL PROPERTY RIGHTS All title and intellectual property rights in and to the SOFTWARE including but not limited to any images photographs animations video audio music text and applets incorporated into the SOFTWARE the accompanying printed materials and any copies of the SOFTWARE are owned by MS Microsoft Corporation ...

Page 87: ...request If the Database does not perform in accordance with this limited warranty NAVTEQ will use reasonable efforts to repair or replace your non conforming copy of the Database If these efforts do not lead to performance of the Database in accordance with the warranties set out herein you will have the option to either receive a reasonable refund of the price you paid for the Database or to resc...

Page 88: ...uropean Union or Switzerland where you acquired the Database shall apply In all other cases or if the jurisdiction where you acquired the Database cannot be defined the laws of the Netherlands shall apply The courts competent at your place of residence at the time you acquired the Database shall have jurisdiction over any dispute arising out of or relating to this Agreement without prejudice to NA...

Page 89: ...RELY Be sure to use only the specified accessory parts Use of other than designated parts may damage this unit internally or may not securely install the unit in place This may cause parts to become loose resulting in hazards or product failure ARRANGE THE WIRING SO IT IS NOT CRIMPED OR PINCHED BY A SHARP METAL EDGE Route the cables and wiring away from moving parts like the seat rails or sharp or...

Page 90: ...vered obstructed by any metallic surface or object 4 Mounting the Microphone For safe use make sure of the following location is stable and firm driver s view and operations are not obstructed microphone is located where the driver s voice can be easily picked up on the sun visor etc When you speak into the microphone you should not have to change your driving posture This may cause a distraction ...

Page 91: ...e INE S920E into the dashboard until it clicks This ensures that the unit is properly locked and will not accidentally come out from the dashboard Removal 1 Insert the bracket keys into the unit along the guides on either side The unit can now be removed from the mounting sleeve 2 Pull the unit out keeping it unlocked as you do so JAPANESE CAR Take the face plate off and secure the ground lead of ...

Page 92: ...d in the OFF position and the battery may be discharged INE S920E INE Z928E Red Yellow SPST SW Optional FUSE 5A Optional FUSE 20A Optional Battery ACC BATTERY To prevent external noise from entering the audio system Locate the unit and route the leads at least 10 cm away from the car harness Keep the battery power leads as far away from other leads as possible Connect the ground lead securely to a...

Page 93: ...al lead Battery Green Black Ignition key Yellow Red White Yellow Red White Amplifier Amplifier Amplifier Rear Left Rear Right Front Left Front Right Subwoofers To Front Rear camera To Audio Input terminals R L To Audio Output terminals R L To Video Input terminal To Video Output terminal Brown REMOTE OUT CAMERA2 CAMERA SW To Rear Other camera TOPVIEW Camera Switch connector 1 Microphone Included G...

Page 94: ...ideo audio is input Vehicle Display Interface Connector Outputs Vehicle Display Interface control signals Connect this to the optional Vehicle Display Interface box For details about connections consult your nearest Alpine dealer MIC Input Connector To Microphone Included USB Connector To USB Memory or iPod iPhone Power Supply Connector Remote Turn On Lead Blue White Connect this lead to the remot...

Page 95: ... Ignition key Yellow Red White Yellow Red White Amplifier Amplifier Amplifier Rear Left Rear Right Front Left Front Right Subwoofers To Front Rear camera To Audio Input terminals R L To Audio Output terminals R L To Video Input terminal To Video Output terminal Brown REMOTE OUT CAMERA2 CAMERA SW To Rear Other camera TOPVIEW Camera Switch connector 1 Microphone Included Green Front left Front right...

Page 96: ...ideo audio is input Vehicle Display Interface Connector Outputs Vehicle Display Interface control signals Connect this to the optional Vehicle Display Interface box For details about connections consult your nearest Alpine dealer MIC Input Connector To Microphone Included USB Connector To USB Memory or iPod iPhone Power Supply Connector Remote Turn On Lead Blue White Connect this lead to the remot...

Page 97: ... required Do not leave a iPod iPhone in a vehicle for a long time Heat and humidity may damage the iPod iPhone and you may not be able to play it again USB Memory Sold separately USB extension cable Included USB connector GPS Antenna included or Nokia Phone connection kit KCU 230NK Sold separatery Nokia Phone Sold separately USB connector USB extension cable Included iPod VIDEO AV extension cable ...

Page 98: ...ote Control Output Lead Brown Connect this lead to the remote control input lead This lead outputs the controlling signals from the remote control You can change the name of an external device Refer to Setting the AUX Mode page 50 Camera Connector AUX PRE OUT Connector AUX PRE OUT cable Yellow Red White Yellow Red White To Video Output terminal To Audio Output terminal DVD Changer Sold separately ...

Page 99: ...ce only when the Primary Name is set to DVB T Refer to Setting the Primary AUX Name AUX Setup page 50 To connect an external input device to the iPod VIDEO connector set AUX3 In Sel to AUX3 Refer to Setting the AUX3 page 51 Camera Connector AUX PRE OUT Connector AUX PRE OUT cable Yellow Red White iPod VIDEO input connector To Audio Input Terminal Mobile Digital TV Receiver Sold separately Camera c...

Page 100: ...ft 3 Subwoofer RCA Connector 4 RCA Extension Cable Sold separately AUX PRE OUT Connector Power Supply Connector AUX PRE OUT cable Red White Amplifier 4 ch Sold separately Input Input Front speaker Rear speaker REMOTE TURN ON Blue White Power cable Amplifier for subwoofer Sold separately Input Subwoofer Red White REMOTE ON Blue White REMOTE ON Blue White Red White 01GB00INE S920E book Page 100 Tues...

Page 101: ...Camera extension cable Included with direct rearview camera 3 CAMERA Input RCA Connector 4 RCA Extension Cable sold separately Camera Connector CAMERA 1 CAMERA 2 Camera cable Direct rearview camera sold separately Camera with RCA video output sold separately To Video Output terminal HCE C117D etc 01GB00INE S920E book Page 101 Tuesday June 12 2012 10 56 AM ...

Page 102: ...ately When the screen switches from the front view camera image to the Navigation screen the location of your vehicle may not be displayed correctly AUX PRE OUT Connector REVERSE To plus side of the back lamp signal lead of the car Yellow Red Control Unit To Video Output Terminal AUX PRE OUT Cable White Orange White Camera Control Lead Orange Black 01GB00INE S920E book Page 102 Tuesday June 12 201...

Page 103: ...ALPINE INE S920E INE Z928E 68 21057Z31 A EN User Manual Alpine Navigation Navigation software for the Alpine INE S920E INE Z928E English EN NAVIGATION SECTION ...

Page 104: ...AVI as your navigator Start using your device right away This document is the detailed description of the navigation software You can easily discover the software while you are using it however we still recommend that you read this manual to fully understand the screens and features ...

Page 105: ...0 2 2 6 Checking the details of the current position Where Am I 22 2 3 Navigation menu 23 3 On road navigation 25 3 1 Selecting the destination of a route 25 3 1 1 Entering an address or a part of the address 25 3 1 1 1 Entering an address 26 3 1 1 2 Entering the midpoint of a street as the destination 28 3 1 1 3 Selecting an intersection as the destination 29 3 1 1 4 Selecting a city town centre ...

Page 106: ...4 5 Checking route alternatives 55 3 4 6 Changing the vehicle used in route planning 56 3 4 7 Changing the road types used in route planning 57 3 5 Saving a location as an Address Book entry 58 3 6 Saving a location as an alert point 59 3 7 Editing an alert point 60 3 8 Watching the simulation of the route 61 4 Off road navigation 63 4 1 Selecting the destination of the route 63 4 2 Navigating in ...

Page 107: ...31 A EN ALPINE INE S920E INE Z928E 68 21057Z31 A EN 5 5 3 8 Trip monitor settings 81 5 4 Trip monitor 81 6 Glossary 82 7 Copyright note 84 ...

Page 108: ...cannot track you It is important that you look at the display only when it is safe to do so If you are the driver of the vehicle we recommend that you operate your software before you start your journey Plan the route before your departure and stop if you need to change the route You must obey the traffic signs and follow the road geometry If you deviate from the recommended route your software ch...

Page 109: ...Regional settings page 80 2 Read the End User Licence Agreement Tap to continue 3 The Configuration wizard starts Tap to continue 4 Select the language and speaker used for voice guidance messages Later you can change it in Sound and Warnings settings page 80 5 If needed modify the time format and unit settings Later you can change them in Regional settings page 80 6 If needed modify the default r...

Page 110: ...ons and applies the new settings without confirmation as soon as you use the controls Type Example Description How to use it Button Tap it to initiate a function to open a new screen or to set a parameter Tap it once Button with value Some buttons display the current value of a field or setting Tap the button to change the value After the change the new value is shown on the button Tap it once Ico...

Page 111: ...yboard Alphabetic and alphanumeric keyboards to enter text and numbers Each key is a touch screen button 2 1 1 Using keyboards You only need to enter letters or numbers when you cannot avoid it You can type with your fingertips on the full screen keyboards and you can switch between various keyboard layouts for example English Greek or numerical Task Instruction Switching to another keyboard layou...

Page 112: ... the list of search results Tap Finalising the keyboard entry saving your input Tap Cancelling the keyboard entry returning to the previous screen Tap 2 1 2 Beyond single screen tap You usually need to tap the screen only once However some useful features can be accessed with combined touch screen tapping Those are the following Action Details Tapping and holding the screen Tap and keep pressing t...

Page 113: ... the surrounding map area The application starts with a full screen map Tap to reduce the map size to half and allow information from your Alpine NAVI audio system to appear on the other half You can decide which side of the map is the navigation Simply tap the audio part and drag it to the other side of the screen When there is no GPS position the Vehimarker is transparent It shows your last know...

Page 114: ...ows the distance you need to travel on the route before reaching your final destination Shows the time needed to reach the final destination of the route based on information available for the remaining segments of the route If your device is capable of receiving live traffic information the calculation takes into account traffic delays affecting your route if they are received However this calcul...

Page 115: ...ating x Tap the map when you are asked to confirm the destination at the end of a search or x Tap the map in Find on Map page 45 When a map location is selected the Cursor appears at the selected point on the map The Cursor is displayed with a radiating red dot to make it visible at all zoom levels The location of the Cursor can be used as the destination of the route a new alert point you can sea...

Page 116: ...splays the next manoeuvre Both the type of the event turn roundabout exiting motorway etc and its distance from the current position are displayed Most of these icons are very intuitive The following table lists some of the frequently shown route events Icon Description Turn left Turn right Turn back Bear right Turn sharp left Keep left Continue straight in the intersection Go left on the roundabo...

Page 117: ...re similar to the real ones you can see above road or by the roadside They show the available destinations and the number of the road the lane leads to All signposts look similar when cruising when there is no recommended route When navigating a route only the signpost that points to the lane s to be taken is displayed in vivid colours all others are darker If you want to hide the currently displa...

Page 118: ...9 2 2 3 6 3D object types Your software supports the following 3D object types Type Description 3D terrain 3D terrain map data shows changes in terrain elevations or depressions in the land when you view the map in 2D and use it to plot the route map in 3D when you navigate Hills and mountains are shown in the background of the 3D map and illustrated by colour and shading on the 2D map Elevated ro...

Page 119: ...ur The route always stands out with its colour on the map both in daytime and in night colour mode Streets and roads that are excluded from the navigation You can choose whether you want to use or avoid certain road types page 74 However when your software cannot avoid such roads the route will include them and it will show them in a colour that is different from the route colour Streets and roads...

Page 120: ...ee its details and to display the affected road segment in its full length on the map 2 2 4 Manipulating the map Tap the map anywhere to browse it during navigation The map stops following the current position the Vehimarker a blue arrow by default is not locked in a fix position on the screen any more and control buttons appear to help you modify the map view Action Button s Description Moving th...

Page 121: ... view in large steps or tap and hold the button to modify it continuously and smoothly Rotating left and right Changes the horizontal view angle of the map Tap the button once to modify the view in large steps or tap and hold the button to modify it continuously and smoothly Compass Tap this button to cycle between a 3D perspective and two 2D top down map view modes Location information Tap this b...

Page 122: ...owing options are available Button Description This function lets you search for a Place along your route or around your current location if there is no route calculated This button opens the Address Book This button opens the History list You can select one of your previous destinations This button opens the route editing function This button opens the route related settings This button opens the...

Page 123: ...n opens the Trip Monitor screen where you can manage your previously saved trip logs and track logs This button opens the list of manoeuvres the itinerary With this function you can save the active route for later use With this function you can replace the active route with a previously saved route With this function you can search for Places of Interest in various different ways This button opens...

Page 124: ...ker the current position on the map tap it to open the Where Am I screen x Open the Quick menu and tap the button x In the Navigation menu tap and then Information on this screen x Latitude and Longitude coordinate of the current position in WGS84 format x Altitude elevation information coming from the GPS receiver often inaccurate x Address details when available of the current position are also ...

Page 125: ...en Tap any other menu button at the top and their feature buttons appear below You have the following menus x Tap to select your destination by entering an address or selecting a place of interest a location on the map or one of your Address Book entries You can also look up your recent destinations from the History enter a coordinate or use the location saved in a photo You can also use the free ...

Page 126: ...p to get information about your current position the GPS reception or the trips you have taken or to run some additional applications x Tap to customise the way the navigation software works x Press the MAP hardware button to start navigating on the map ...

Page 127: ...hoosing your destination x Enter a full address or a part of an address for example a street name without a house number or the names of two intersecting streets page 25 x Enter an address with postal code page 32 This way you do not need to select the name of the city town and the search for street names might be faster as well x Use a built in Place of Interest as your destination page 34 x Use ...

Page 128: ...ing the name of the city town on the keyboard c Find the city town you need x The most likely city town name is always shown in the input field To accept it tap x If the desired name does not show up the names that match the string appear in a list after entering a couple of characters to open the list of results before it appears automatically tap Select the city town from the list 1 Enter the st...

Page 129: ...Tap to finish entering the address If the entered house number cannot be found the midpoint of the street is selected as the destination 5 A full screen map appears with the selected point in the middle If necessary tap the map somewhere else to modify the destination The Cursor appears at the new location Tap to confirm the destination or tap to select a different destination 6 After a short summ...

Page 130: ...t if the house number is not available 1 In the Navigation menu tap the following buttons 2 If necessary modify the country and city town as described earlier page 26 3 Enter the street name a Tap if you have selected a city town above this step is not needed b Start entering the street name on the keyboard c Find the street you need x The most likely street name is always shown in the input field...

Page 131: ...f the route parameters the map appears showing the entire route The route is automatically calculated Tap to modify route parameters or tap and start your journey 3 1 1 3 Selecting an intersection as the destination To enter an address as the destination do as follows 1 In the Navigation menu tap the following buttons 2 If necessary modify the country and city town as described earlier page 26 3 E...

Page 132: ...e number tap The midpoint of the street is selected as the destination 5 A full screen map appears with the selected point in the middle If necessary tap the map somewhere else to modify the destination The Cursor appears at the new location Tap to confirm the destination or tap to select a different destination 6 After a short summary of the route parameters the map appears showing the entire rou...

Page 133: ... the city town on the keyboard c Find the city town you need x The most likely city town name is always shown in the input field To accept it tap x If the desired name does not show up the names that match the string appear in a list after entering a couple of characters to open the list of results before it appears automatically tap Select the city town from the list 4 Instead of entering the str...

Page 134: ...the city town name Find below an example with a full address 1 In the Navigation menu tap the following buttons 2 If necessary modify the country as described earlier page 26 3 Enter a new city town using its postal code a Tap b Start entering the postal code c Find the city town you need x The most likely postal code is always shown in the input field To accept it tap x If the desired number does...

Page 135: ...r on the keyboard To enter symbols tap b Tap to finish entering the address If the entered house number cannot be found the midpoint of the street is selected as the destination 6 A full screen map appears with the selected point in the middle If necessary tap the map somewhere else to modify the destination The Cursor appears at the new location Tap to confirm the destination or tap to select a d...

Page 136: ...nter PI A to obtain Pine Avenue and skip all Pine Streets and Pickwick Roads x You can also search in postal codes As postal codes consist of only a few characters this is usually faster than entering the name of the city town 3 1 2 Selecting the destination from the Places of Interest You can select your destination from the Places of Interest included with your software Using the same screen you...

Page 137: ...need to reorder the list tap 5 Browse the list if necessary and tap one of the list items A full screen map appears with the selected point in the middle The name and address of the Place is displayed at the top of the screen 6 optional Tap to see the details of the selected Place Tap to return to the map 7 If necessary tap the map somewhere else to modify the destination The Cursor appears at the...

Page 138: ...osition is not available either no GPS signal they are searched around the last known position x x If an active route exists parking lots are searched around the destination of the route x If there is no active route destination is not selected they are searched around the current position x If the current position is not available either no GPS signal they are searched around the last known posit...

Page 139: ...om the destination or by the length of the necessary detour If you need to reorder the list tap 5 Browse the list if necessary and tap one of the list items A full screen map appears with the selected point in the middle The name and address of the Place is displayed at the top of the screen 6 optional Tap to see the details of the selected Place Tap to return to the map 7 If necessary tap the map...

Page 140: ...n The result list will be ordered by the distance from the centre of the selected city town x Tap to search for a place around the destination of the active route The result list will be ordered by the distance from the destination x Tap to search along the active route and not around a given point This is useful when you search for a later stopover that results in a minimal detour only such as se...

Page 141: ...ted location or along the route 8 Finally the results appear in a list 9 optional The Places in the list are ordered by their distance from the current or last known position from the selected city town from the destination or by the length of the necessary detour If you need to reorder the list tap 10 Browse the list if necessary and tap one of the list items A full screen map appears with the se...

Page 142: ... the Navigation menu tap the following buttons 2 Tap 3 Select the area around which the Place should be searched for x Tap to search around the current position or if it is not available around the last know position The result list will be ordered by the distance from this position x Tap to search for a place within a selected city town The result list will be ordered by the distance from the cen...

Page 143: ... 5 Select one of the main Place categories e g Accommodation to search in or tap to search among all Places 6 Select one of the Place subcategories e g Hotel or Motel to search in or tap to search in the selected Place category 7 Tap if you have not done it before 8 Using the keyboard start entering the name of the Place ...

Page 144: ...sary and tap one of the list items A full screen map appears with the selected point in the middle The name and address of the Place is displayed at the top of the screen 12 optional Tap to see the details of the selected Place Tap to return to the map 13 If necessary tap the map somewhere else to modify the destination The Cursor appears at the new location Tap to confirm the destination or tap t...

Page 145: ...nd roadside assistance services x Medical and emergency services x Police stations x Petrol stations 4 Tap any of the quick search buttons to get an instant list of that type of Places 5 optional The Places in the list are ordered by their distance from the current or last known position from the selected city town from the destination or by the length of the necessary detour If you need to reorde...

Page 146: ...earch for an address a Place an Address Book entry or a History item is to use the free form search Do as follows 1 In the Navigation menu tap 2 Open the menu and tap 3 In the left field enter the name you are looking for It can be a street address just the street name or both the street and the house number the name of a Place a previous destination or an Address Book entry 4 If you are searching...

Page 147: ...ct a different destination 8 After a short summary of the route parameters the map appears showing the entire route The route is automatically calculated Tap to modify route parameters or tap and start your journey 3 1 4 Selecting a map location as the destination 1 In the Navigation menu tap the following buttons 2 Locate your destination on the map move and scale the map as needed 3 Tap the loca...

Page 148: ... to the Address Book is described on page 58 1 Access the Address Book x If you are on the Map screen tap and then tap x If you are in the Navigation menu tap and then tap 2 The Address Book is displayed 3 Tap the entry that you want to set as your destination If necessary browse down to see more of the list or tap and enter a few letters from the name of the entry 4 A full screen map appears with...

Page 149: ...en tap x If you are in the Navigation menu tap and then tap 2 The list of recent destinations appears Smart History promotes three destinations to the first page based on your previous routes most likely destinations The rest of the destinations are ordered by time they were last selected If necessary scroll the list to see earlier destinations 3 Select a destination from the list 4 A full screen ...

Page 150: ...ion by entering its coordinate Do as follows 1 In the Navigation menu tap 2 Open the menu and tap 3 You can enter the latitude and longitude values in any of the following formats decimal degrees degrees and decimal minutes or degrees minutes and decimal seconds 4 optional If necessary tap then and enter the coordinate in UTM format 5 When finished tap 6 A full screen map appears with the selected...

Page 151: ...picture as your destination Do as follows 1 In the Navigation menu tap 2 Open the menu and tap 3 The list of picutres stored on the microSD card appears Select one picture from the list 4 A full screen map appears with the selected point in the middle If necessary tap the map somewhere else to modify the destination The Cursor appears at the new location Tap to confirm the destination or tap to se...

Page 152: ...an also build your route destination by destination from the Route menu 1 In the Navigation menu tap 2 Tap 3 There is only one line in the list of route points the start point of the route normally the current GPS position 4 Tap to select the destination 5 The Destination menu appears and you can select the destination of the route the same way as described in the previous sections 6 When the new ...

Page 153: ...following pieces of information are displayed x The name and or address of the destination x Warning icons if any They provide extra information about your route e g unpaved roads or toll roads to be taken x The total time of the route x The total length of the route x Estimated delay calculated from traffic events on your route 3 You have the following options on this screen for detailed instruct...

Page 154: ...ute New Route Waypoint or Final Destination If you already have a recommended route and you select a new destination as described in the above sections the application will ask you whether to start a new route add a new waypoint intermediate destination to the route or append the newly selected destination at the end of the current route x Tap to plan a new route to the newly selected location The...

Page 155: ...der to check future routes simulate them or see their length in time and distance you can turn off the GPS receiver Then you can set the starting point of the route to a different location than the current GPS position 1 In the Navigation menu tap 2 If you already have a route tap If you are starting a new route tap 3 The first line is the start of the route normally the current GPS position Tap a...

Page 156: ...rting from the selected location 7 To return to normal navigation tap 3 4 3 Editing the list of destinations Edit Route You can edit the route by modifying the list of destinations You can add or remove destinations modify the start position or reorder the list 1 In the Navigation menu tap 2 Tap 3 You have the following options x Tap to add a new destination x Tap to delete a destination x Tap to ...

Page 157: ...il all waypoints are deleted x In the Navigation menu tap and then tap The active route is deleted with all its waypoints 3 4 5 Checking route alternatives To recalculate the active route with a different route planning method you can modify the Route settings There is another way to do this and to compare different route alternatives with the same route planning method Do as follows 1 In the Navi...

Page 158: ...calculates the route The orange line now shows the new recommended route 3 4 6 Changing the vehicle used in route planning To recalculate the active route for a different vehicle do as follows These changes can also be made in Settings 1 On the Map screen tap and then tap 2 Tap and then tap one of the following x x x x 3 The software recalculates the route optimised for the new vehicle type The or...

Page 159: ...where you can purchase a pass or vignette to use the road for a longer period of time They can be enabled or disabled separately from toll roads x The software includes toll roads pay roads where there is a per use charge in the routes by default If you disable toll roads your software plans the best toll free route x The software includes ferries in a planned route by default However a map does n...

Page 160: ...ribed earlier 1 Select a destination as described before It can be an address a Place any location on the map a previously used destination from History a coordinate or a location where a photo was taken 2 When the full screen map appears with the selected location in the middle tap 3 Tap 4 optional Using the keyboard you can change the name offered for the Address Book entry 5 Tap to save the loc...

Page 161: ... a speed camera or a railway crossing 1 Browse the map and select a location The red Cursor appears there 2 Tap 3 Scroll down the list and tap 4 On the newly opened screen select the type of the alert point the direction from which you expect the alert and if applicable the speed limit for this alert point 5 Tap to save the location as a new alert point ...

Page 162: ...a railway crossing 1 Browse the map and select the alert point to edit The red circle appears around the alert point 2 Tap 3 Scroll down the list and tap 4 On the newly opened screen modify the type of the alert point the direction from which you expect the alert or if applicable the speed limit for this alert point 5 Tap to save the changes to the alert point ...

Page 163: ...he simulation starts from the starting point of the route and using a realistic speed it leads you through the whole recommended route 1 optional You have the following controls during the simulation x Jump to the next route event manoeuvre x Pause the simulation x Jump to the previous route event manoeuvre x Tap to increase the speed of the simulation to 4 8 or 16 times faster Now tap again to re...

Page 164: ...ALPINE INE S920E INE Z928E 68 21057Z31 A EN 62 2 Tap to stop the simulation ...

Page 165: ...he start point or a destination waypoint or final destination is the same as described at on road navigation The only difference is that route points are linked to form a route with straight lines regardless of the road network and traffic regulations 4 2 Navigating in off road mode The real difference between the on road and off road modes is the navigation itself When you are on the Map screen w...

Page 166: ...tware calculates the route based on your preferences x Route planning methods x Gives a quick route if you can travel at or near the speed limit on all roads Usually the best selection for fast and normal cars x Gives a route that has the smallest total distance of all possible routes It can be practical for slow vehicles x Gives a quick but fuel efficient route based on the fuel consumption data ...

Page 167: ... Roads are used only if access for buses is allowed x Private roads resident only roads and walkways are excluded from routes x x Manoeuvre restrictions and directional constraints are taken into account when planning a route x Roads are used only if access for taxis is allowed x Private roads resident only roads and walkways are excluded from routes x Road types used or avoided in route calculati...

Page 168: ...ute with low fuel consumption and CO2 emission With a vehicle type where green routing is selectable whichever route planning method is selected the Green details are also shown when you confirm the route If the selected route planning method is not Green and you have allowed the application to show the green alternative the price fuel consumption and CO2 emission differences between your selected...

Page 169: ...broadcasting real time traffic and weather information Using traffic information is enabled by default in the software Note TMC is not a global service It may not be available in your country or region Ask your local dealer for coverage details Your device contains the TMC receiver that is needed to receive Traffic events If public Traffic data is broadcast at your location the software automatica...

Page 170: ...e full count of traffic events in the categories Tap any of the even types to open the list of traffic events or tap the first line to show all events Now tap any of the list items to see its details and to display the affected road segment in its full length on the map 5 2 Information menu The Information menu provides you with various options and additional applications In the Navigation menu ta...

Page 171: ... Tap this button to access additional functions See the list below Access travel applications the unit converter helps you convert between various different international units for temperature speed area or pressure etc Access travel applications the clothing size converter helps you convert between various different international size units for men s or women s cloth types and shoes The scientifi...

Page 172: ...lude speed limits on different road types the maximum blood alcohol level and any compulsory equipment you need to show when stopped by the police 5 3 Settings menu You can configure the program settings and modify the behaviour of the software In the Navigation menu tap The Settings menu has several options Tap or scroll with your finger to see the full list ...

Page 173: ... the blue arrow to a 3D car model show or suppress 3D buildings turn track logging on or off and manage you Place visibility sets which Places to show on the map Adjust how the software helps you navigate with different kinds of route related information on the Map screen These settings allow you to customise the application for your local language measurement units time and date settings and form...

Page 174: ...n to adjust the enhanced TTS features The following settings are available x You can set the feature to read out traffic messages x Whenever a route is calculated the software can read out the quick summary of the route x When you cross country borders the application can read out the information about the country you have just entered x All system messages can also be announced Street names sound...

Page 175: ...it If you prefer to see the speed limit sign on the map all the time normally it is shown only if your speed exceeds it you can set it here Maps may contain driver alert information Tap this button to turn on or off these warnings and to set the distance from the hazard to receive the warning at These can be set individually for the different warning types You can control the volume of the followi...

Page 176: ...ines how your software uses the received real time traffic information in route calculation When calculating a new route or when recalculation becomes necessary based on the received Traffic events your software avoids traffic events if it makes sense You can also set the minimum delay that triggers route recalculation and you can instruct the application if you want to confirm every recalculation...

Page 177: ...u are driving a slow car or you are towing another vehicle Charge roads are pay roads where you can purchase a pass or vignette to use the road for a longer period of time They can be enabled or disabled separately from toll roads The software includes toll roads pay roads where there is a per use charge in the routes by default If you disable toll roads your software plans the best toll free rout...

Page 178: ...r travel cost calculation The currency can be set in Regional Settings Set the maximum speed you travel with the vehicle Vehicle types When creating a new vehicle profile select one of the below vehicle types x x Manoeuvre restrictions and directional constraints are taken into account when planning a route x Roads are used only if access for cars is allowed x Private roads and resident only roads...

Page 179: ...rely practical for normal vehicles Gives a quick but fuel efficient route based on the fuel consumption data given in Route settings page 74 Travel cost and CO2 emission calculations are estimations only They cannot take elevations curves and traffic conditions into account Results in a route with fewer turns and no difficult manoeuvres With this option you can make your software to take for examp...

Page 180: ...ou can select separate icons for different vehicle types selected for route planning Separate icons can be used for car and the other vehicles Show or suppress 3D landmarks 3D artistic or block representations of prominent or well known objects Show or suppress 3D city models 3D artistic or block representation of full city building data containing actual building size and position on the map Turn...

Page 181: ... feature on or off If you are approaching a motorway exit or a complex intersection and the needed information exists the map is replaced with a 3D view of the junction You can turn this feature on or let the map be displayed for the whole route When entering tunnels the surface roads and buildings can be disturbing This feature shows a generic picture of a tunnel instead of the map A top down ove...

Page 182: ...ass them with the help of the software When enabled the device will switch back from split screen or from Audio screen to full screen map mode during voice guidance announcements After the voice instruction the previous screen returns 5 3 7 Regional settings These settings allow you to customise the application for your local language measurement units time and date settings and formats as well as...

Page 183: ...ou can let the application save them automatically for you Track logs the sequence of the positions given by the GPS receiver can be saved together with trip logs They can later be displayed on the map You can let the application save the track log whenever it saves a trip 5 4 Trip monitor If you save your trip logs when you arrive at some of your destinations or let the application automatically ...

Page 184: ...ger cities it is one of the important intersections GPS accuracy Several factors have impact on the deviation between your real position and the one given by the GPS device For example signal delay in the ionosphere or reflecting objects near the GPS device have a different and varying impact on how accurately the GPS device can calculate your position Map The software works with digital maps whic...

Page 185: ...replaced with any other given point Heading up map orientation In this mode the map is rotated so its top always points in the current driving direction This is the default orientation in 3D map view mode Vehimarker The current position is shown with a blue arrow on the map by default The direction of the blue arrow shows the current heading This position marker can be replaced with different 3D v...

Page 186: ...bject to change without prior notification This manual may not in whole or in part be reproduced or transmitted in any form either electronically or mechanically including photocopying and recording without the express written consent of Alpine Electronics Inc 2011 Alpine Electronics Inc 2011 NAVTEQ All rights reserved ...

Page 187: ...EN About the Rules of Bluetooth Electromagnetic Radiation Regulation Country Rules of Electromagnetic Radiation Regulation Thailand This telecommunication equipment conforms to NTC technical requirement 01GB00INE S920E book Page 103 Tuesday June 12 2012 10 56 AM ...

Page 188: ...01GB06INE S920E fm ALPINE INE S920E INE Z928E 68 21057Z31 A EN 01GB00INE S920E book Page 104 Tuesday June 12 2012 10 56 AM ...

Reviews: