background image


34 

Electronic Lock Cylinders of the PegaSys Series 


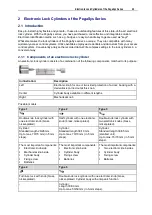
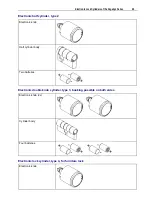
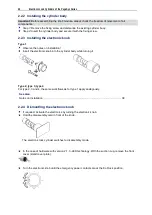
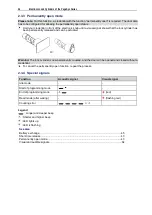
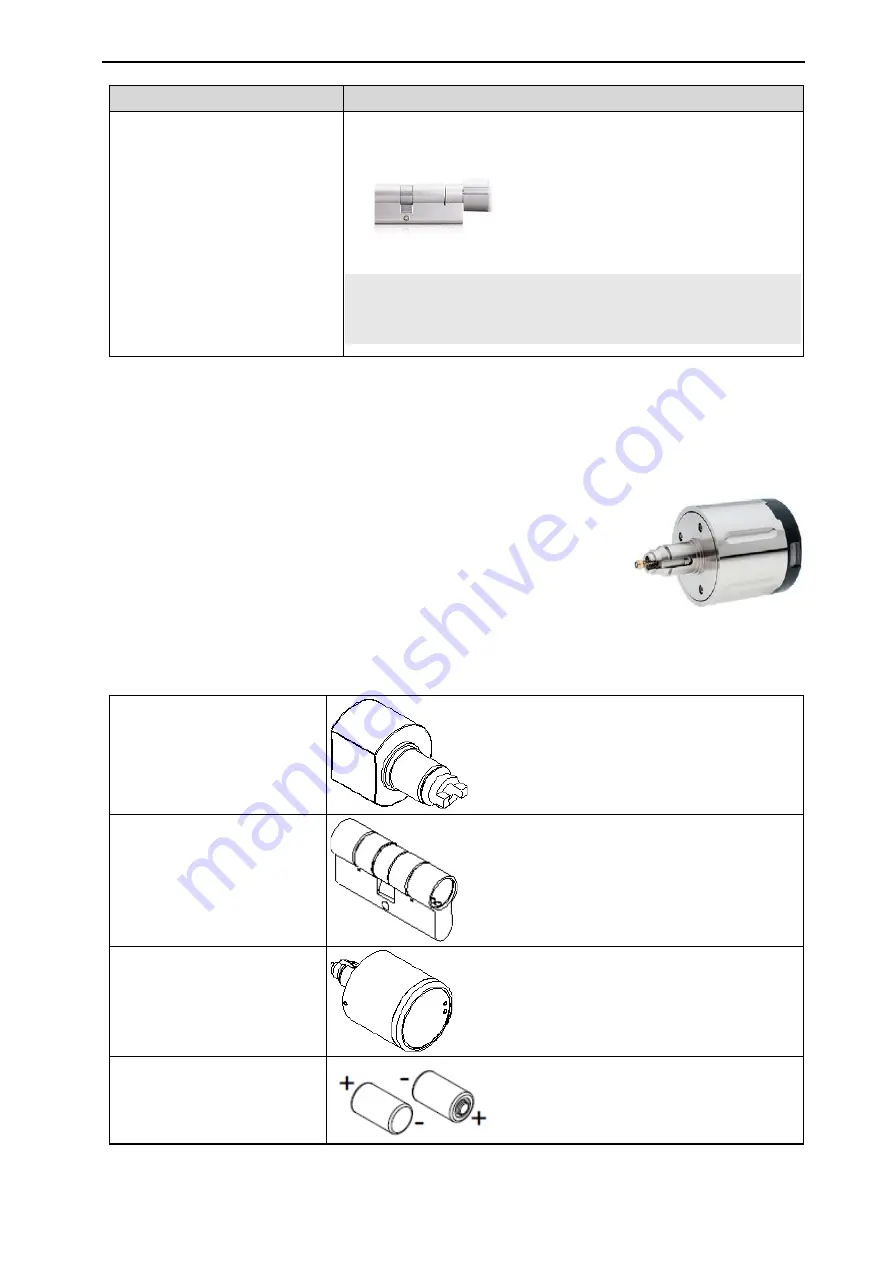
Type 4 


Type 5


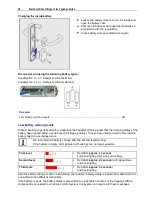
The most important components:   

§


Electronic knob side   

§


Furniture lock adapter   

The most important components:   

§


Cylinder body with permanently mounted mechanical knob. 


§


Fixing screw   

The knob is permanently mounted on one cylinder side and 
cannot be transferred to the other cylinder side. Please note when 
ordering! 


"Swiss, Round" model 

For Switzerland, there are type 

1 CH

 to 

3 CH

 models with 

round

 lock cylinders, which correspond to type 1 

to 3 in their other properties. 


Outdoor variant 


For use in protected outdoor areas, there is a special outdoor variant of the 
lock cylinder with the following properties: 

§


Operation in the temperature range -20 °C to 65 °C. 

§


Protection category: IP 66 


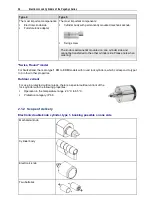
2.1.2  Scope of delivery 

Electronic double knob cylinder, type 1, booking possible on one side 


Mechanical knob   


Cylinder body   


Electronic knob   


Two batteries   


Summary of Contents for PegaSys

Page 1: ...PegaSys Intelligent Access Control System Technical Manual Assembly and Operating Instruction for all PegaSys Components Part 1 ...

Page 2: ......

Page 3: ...n characteristics Disposing of the product Dispose of the product in accordance with the laws and regulations that apply in your country Disposing of batteries Dispose of the batteries in accordance with the laws and regulations that apply in your country Dispose of the batteries yourself at a collecting point or send the battery to the supplier of the product with the battery contacts insulated a...

Page 4: ......

Page 5: ... Series 33 2 1 Introduction 33 2 1 1 Components of an electronic lock cylinder 33 2 1 2 Scope of delivery 34 2 1 3 Technical data 38 2 2 Installation dismantling 39 2 2 1 Notes on installation 39 2 2 2 Installing the cylinder body 40 2 2 3 Installing the electronic knob 40 2 2 4 Dismantling the electronic knob 40 2 2 5 Installing the electronic knob for a furniture lock 41 2 2 6 Dismantling the el...

Page 6: ... 3 Teach in PIN Code operating mode 61 4 4 Teach in P 100 operating mode 61 4 4 1 Configuring the PegaSys Offline component for Teach in 62 4 4 2 Opening doors 64 4 4 3 Visual and audible signals 64 4 5 NetworkOnCard P 200 P 300 operating mode with an access control system 65 4 5 1 Recommended procedure for setting up a new access control system 65 4 5 2 Single door authorization Group authorizati...

Page 7: ...Installation Instructions for PegaSys Electronic Door Fittings ...

Page 8: ......

Page 9: ... that you are authorized to enter by means of a valid credential Exception PegaSys PIN code This variant of an electronic door fitting is run exclusively with codes that you enter on the built in keypad You can program the door fitting with codes and assign a certain function to each code During operation you can then for instance enter a certain code for door lock release You can find more detail...

Page 10: ...ittings of the Office series are supplied with door handles from the 291 1291 281 and 1281 series 1 1 1 Design of the Office series Design of the electronic door fitting of the Office Series Right side Electronic door fitting battery case and lock box Left side Interior fitting 1 2 Technical data 1 2 1 Technical data PegaSys 2 1 General data Housing material Solid housing made of high grade steel ...

Page 11: ...attery case and outdoor kit 1 2 2 Technical data of the Office series General data Material Exterior fitting and interior fitting Cast metal housing with top quality powder coating glass front and fixed pivot handle made of stainless steel Total weight Approx 2600 grams External dimensions including electronics HxWxD 295 mm x 52 mm x 30 mm Internal dimensions excluding electronics HxWxD 295 mm x 5...

Page 12: ...nd operating modes Battery warning Visual and audible optional low battery warning battery status is reported to control software Environmental conditions Operating temperature 0 C to 40 C Large temperature fluctuations will reduce the battery life Protection category IP 20 Humidity 95 non condensing 1 2 3 Dimensions PegaSys door fitting PegaSys door fitting Wide version PegaSys door fitting Narro...

Page 13: ...lectronic Door Fittings of the PegaSys Series 9 1 2 4 Dimensions Interior fittings Interior fittings Version 230 mm Version 195 mm Interior fittings for doors with tubular frames Office interior fitting ...

Page 14: ...dle series Door handle series for wide door fittings 181 series 191 series 281 series 291 series Door handle series for doors with tubular frames 1171 series 1182 series 1282 series 1292 series Door handle series for Office series 281 series 291 series 1282 series 1292 series ...

Page 15: ...the following reading technologies for the credentials MIFARE Classic MIFARE DESFire LEGIC Prime LEGIC Advant Hitag1 availability depends on the type of PegaSys Offline component 1 3 Assembly and installation 1 3 1 Preparations for installation Configure the PegaSys Offline devices before installing them at their final location ...

Page 16: ...s screw driver Torx screw driver Drill 7 mm Square hole from left 2 Optional tools Drilling template long plate Germany Drilling template long plate France Drilling template short plate rose fitting Mounting cylinder Flexible square hole 3 mm available from specialized retailers Flexible Torx screw driver with cover plate lifter from left 3 Mounting block and Toolkit ...

Page 17: ...be min 28 mm A diameter of 28 mm is required for screw on mounting on doors with tubular frames as well as for exterior fittings without a key hole Min diameter 23 mm Scribing templates The following scribing templates are included in the scope of delivery PegaSys B 2 x PZ 72 mm PZ 92 mm PegaSys B 2 x PZ 78 88 mm KABA 74 78 mm Long plate Germany PZ 72 78 88 92 mm RZ 22 KABA 78 mm ...

Page 18: ...14 Electronic Door Fittings of the PegaSys Series PegaSys S 2 x PZ 92 mm PegaSys B 2 x Long plate France PegaSys B 2 X ASSA 105 Scandinavia Office fitting ...

Page 19: ...holes using the hole gage This is the preferable method for installing a large number of fittings Always drill from both sides Preparations for installation Checking the length of the screws Use the following table to check the screw length Screw length mm Door thickness mm Screw length mm Door thickness mm 45 37 41 75 67 71 50 42 46 80 72 76 55 47 51 85 77 81 60 52 56 90 82 86 65 57 61 95 87 91 7...

Page 20: ...ting on the left in the illustration and by at least 8 12 mm at the interior fitting on the right in the illustration The maximum the cylinder may jut out is 23 mm on the outside on the left in the illustration or 12 mm on the inside on the right in the illustration For Back to Back mounting and mounting with inside battery case Variant 1 self locking For these installation types the profile cylin...

Page 21: ... on the inside or on the outside of the door Check whether you can drill through the door leaf or whether you have to use the screw on mounting method If you can drill through the door leaf the PegaSys door fitting on the outside is bolted to the rose fitting or bottom part of the plate on the inside When the screw on mounting method is used the PegaSys door fitting is hooked onto a mounting plate...

Page 22: ...for rose fitting 4 Set the hole gage in acc with the corresponding operating instructions Insert the hole gage into the mortise lock Align the hole gage by means of a water level and fasten it with a quick clamp Drill 7 mm hole from both sides Drill 4 holes for rose fittings Drilling door leaf for short plate Set the hole gage in acc with the corresponding operating instructions Insert the hole ga...

Page 23: ...oor leaf for long plate France Set the hole gage in acc with the corresponding operating instructions Insert the hole gage into the mortise lock Align the hole gage by means of a water level and fasten it with a quick clamp Drill 7 mm hole from both sides Drill 2 holes for long plate See also Notes on Outdoor Installation 23 Inserting the square spindle for the lever handle Insert the square spind...

Page 24: ...plied screw set loosely screw on the bottom parts of the rose or plate With the mounting cylinder align the door fitting The mounting cylinder has to move easily Now tighten the screws Screw tight the set screw in the interior door handle make sure that it is flush Clamp on rose or plate covering ...

Page 25: ...te proceed analogously as applicable Set the hole gage in acc with the corresponding operating instructions Insert the hole gage into the mortise lock Align the hole gage by means of a water level and fasten it with a quick clamp Drill 7 mm hole from both sides 2 drill Further installation 1 Loosen screws 2 Remove base plate from exterior fitting 3 Position interior fitting against the door leaf a...

Page 26: ...ting Drilling for oval rose If no threaded holes are available yet center the scribing templates or mounting plate in the lock follower by means of the centering gage Align the scribing template Mark the drill holes and drill the holes You can use the existing fastenings for the interior fitting Important When mounting this type of fitting to doors with tubular frames always use press fit sleeves ...

Page 27: ...r intrusion Align the outer edge of the seal to the edge of the door and center the punch outs Stick the seal onto the door Install the PegaSys door fitting Weatherproof cover A weatherproof cover is also available as a separate accessory When using the weatherproof cover stick the seal to the side underneath the roof projection Mounting with inside battery case Variant 1 self locking for outdoor ...

Page 28: ...kes electronic access control possible on both sides PegaSys Back to Back with wide door fittings PegaSys Back to Back with narrow door fittings Special bolted joints are included in the scope of delivery From the inside tighten both mounting plates onto each other Align mounting plates with mounting cylinder Shorten the square spindle from the pin side door thickness 3 mm Insert shortened square ...

Page 29: ...ith the supplied screw set screw on the bottom parts of the rose fitting or plate until they are hand tight Screw tight the set screw in the interior door handle make sure that it is flush Clamp on rose or plate covering Attach the battery case cover below the interior fitting Single sided narrow PegaSys door fitting Drill holes into the door leaf Align the mounting plate of the exterior fitting a...

Page 30: ...ponents Check whether the gap between front metal and striking plate is 2 to 5 mm With the key check the security function In a lock the security function means that the latch bolt can be retracted from the outside of the door by means of the key This function is e g important if no door handle is used on the outside of the door but instead a rigid knob The latch actuation function thus switches f...

Page 31: ...ng Insert the battery exchange tool and remove the battery case Remove old batteries and insert new batteries in accordance with the regulations Push the battery case back in until it clicks into place Battery change at the tubular frame fitting Insert the battery exchange tool and remove the battery case Remove old batteries and insert new batteries in accordance with the regulations Push the bat...

Page 32: ...low a certain level 3 stage signaling Thus you are informed well in time that the battery has to be exchanged soon We recommend a battery change after the second level warning If the battery is empty LED signals and bookings are no longer possible First level Red LED approx 1 second and booking flag only with service flag Second level Red LED approx 2 seconds with signal tone and booking flag Thir...

Page 33: ... on the steel surface It is there where the surface begins to corrode Professional installation and the use of adequate fasteners prevent natural atmospheric exposure corrosion Do not use screws that were made of or anodized with less noble metals as fasteners Stainless steel products have to be cleaned at regular intervals if you want to prevent impurities or rust depositing on the surface Simply...

Page 34: ......

Page 35: ...Installation Instructions for PegaSys Electronic Lock Cylinders ...

Page 36: ......

Page 37: ...ob for one or two sided protection of a door booking with a credential is carried out at this knob Center Cylinder body available in different lengths Right Mechanical knob Possible models Type 1 Type 2 Type 3 Double knob lock cylinder with one electronic knob brass nickel plated Half cylinder with one electronic knob brass nickel plated Double knob lock cylinder with two electronic knobs brass ni...

Page 38: ...e Please note when ordering Swiss Round model For Switzerland there are type 1 CH to 3 CH models with round lock cylinders which correspond to type 1 to 3 in their other properties Outdoor variant For use in protected outdoor areas there is a special outdoor variant of the lock cylinder with the following properties Operation in the temperature range 20 C to 65 C Protection category IP 66 2 1 2 Sc...

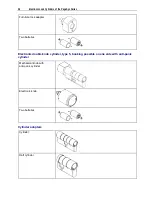
Page 39: ...onic half cylinder type 2 Electronic knob Half cylinder body Two batteries Electronic double knob cylinder type 3 booking possible on both sides Electronic knob 2x Cylinder body Four batteries Electronic lock cylinder type 4 for furniture lock Electronic knob ...

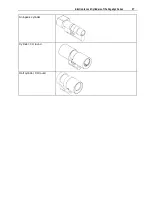
Page 40: ...eries Furniture lock adapter Two batteries Electronic double knob cylinder type 5 booking possible on one side with anti panic cylinder Mechanical knob with anti panic cylinder Electronic knob Two batteries Cylinder adapters Cylinder Half cylinder ...

Page 41: ...Electronic Lock Cylinders of the PegaSys Series 37 Anti panic cylinder Cylinder CH round Half cylinder CH round ...

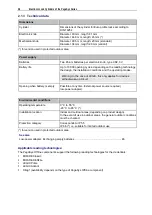
Page 42: ...C this only applies for devices without wake up circuit Opening when battery is empty Possible at any time External power source required low power adapter Environmental conditions Operating temperature 0 C to 55 C 20 C to 65 C Installation location Indoor and outdoor areas depending on product design In the event of use in outdoor areas the general outdoor conditions must be checked Protection ca...

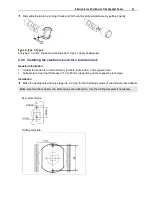
Page 43: ... 2 2 1 Notes on installation Note The cylinder body may not jut out more than 1 to 3 mm from the closely adjoining protection fitting Do not flush mount the cylinder in the fitting Do not strain the cylinder body when installing it in the door Check the free movement of all components after securing the fixing screw and before mounting the electronic knob Pour one or two drops max 0 1 ml of resin ...

Page 44: ...rt the electronic knob into the cylinder body while turning it Type 2 type 3 type 4 For type 2 3 and 4 the same workflows as for type 1 apply analogously See also Notes on installation 39 2 2 4 Dismantling the electronic knob If required Activate the electronics by turning the electronic knob Hold the disassembly card in front of the knob The electronic lock cylinder switches to disassembly mode I...

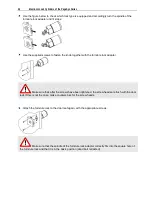
Page 45: ...tronic knob for a furniture lock General information Usually the knob fits on all customary furniture locks with a 7 mm square hole Suitable for a door leaf thickness of 13 to 20 mm depending on the respective lock type Installation Make the appropriate drill holes approx 3 2 mm for the fastening screws of the furniture lock adapter Make sure that the required min dimensions are adhered to Use the...

Page 46: ... with the furniture lock adapter Make sure that after the screws have been tightened the screw heads are flush with the door leaf If this is not the case make countersinks for the screw heads Attach the furniture lock to the door leaf again with the appropriate screws Make sure that the spindle of the furniture lock adapter correctly fits into the square hole of the furniture lock and that it is i...

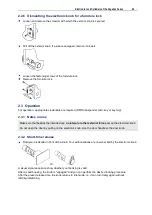
Page 47: ...ey tag 2 3 1 Notes on use Make sure that besides the intended use no lateral or other external forces act on the electronic knob Do not open the door by pulling on the electronic knob Use the door handle or the door knob 2 3 2 Short time release Hold your credential in front of the knob Your authorizations are now checked by the electronic knob Or A visual signal sequence show whether your booking...

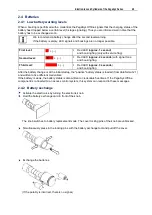
Page 48: ...y released and can be actuated Or Warning The lock cylinder is now permanently coupled and the door can be opened and closed without a credential To cancel the permanently open function repeat the process 2 3 4 Special signals Function Acoustic signal Visual signal Idle mode Start of programming mode End of programming mode red Read mode after waking flashing red Coupling error Legend Longer and d...

Page 49: ...booking flag Third level Red LED approx 3 seconds and booking flag After the battery change or at the initial startup the positive battery status is loaded from data format 2 1 and written to five different credentials If the battery is weak the battery status is also written to credentials five times If the PegaSys Offline component is connected to an access control system this system can respond...

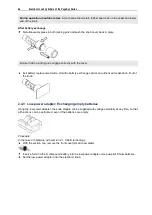
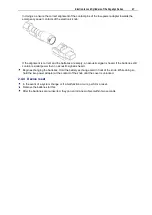
Page 50: ... battery exchange card or an authorized credential in front of the knob 2 4 3 Low power adapter Exchanging empty batteries Using the low power adapter the knob module can be supplied with voltage externally at any time so that all functions can be performed even if the batteries are empty Procedure In the case of hardware with version 2 1 3 LED technology With the suction cup remove the front cove...

Page 51: ...s heard If the batteries still contain residual power then no acoustic signal is heard Begin exchanging the batteries Hold the battery exchange card in front of the knob While doing so hold the low power adapter at the contact of the knob until the cover is unlocked 2 4 4 Device reset In the event of a system change or if a malfunction occurs perform a reset Remove the batteries for this After the...

Page 52: ......

Page 53: ...Installation Instructions for PegaSys Electronic Locker Locks ...

Page 54: ......

Page 55: ... use Scope of delivery Upon receiving them check that the goods are complete Package contents Locker lock Fastening screw 3 6 V battery Battery exchange tool The locking lever with the fastening kit has to be ordered separately due to design reasons and is not included in the scope of supply Intended use The locker lock is used to lock and unlock locker and cabinet doors Any other use is not in ac...

Page 56: ...door as shown on the left 3 4 Initial operation Proceed in the following order Insert the battery Configure the locker lock After the initial startup you can release and block the locker lock and thus the respective door with credentials that have the appropriate authorization Important Start with the configuration immediately after inserting the battery 3 4 1 Prerequisites Battery exchange tool T...

Page 57: ...e battery exchange tool into the intended hole Remove the battery holder 3 4 3 Inserting the battery When inserting the battery observe the correct polarity An incorrectly inserted battery can damage the device Insert the battery lithium battery type AA 3 6 V Push the battery holder back into the battery case until it snaps into place After it has snapped in a short acknowledgment signal sounds fu...

Page 58: ...mode 61 Visual and audible signals 64 3 5 Opening and closing the locker lock Hold the credential in front of the reader pictogram 2 Check the colored indicator 3 Green means that the locking lever has been released and can be turned Red means that the credential is not authorized for releasing locking the lock The locking lever stays locked As soon as the colored indicator 3 lights up in green Im...

Page 59: ...imes If the PegaSys Offline component is connected to an access control system this system can respond to these messages 3 7 Resetting the locker lock If there are malfunctions in the electronic system or if you want to re initialize the product completely you have to perform a reset To do so you need the facility or master card depending on the mode of operation Proceed as follows Remove the batt...

Page 60: ...he following accessories and spares parts is listed below Locker lock PegaSys Mifare Battery 3 6 V lithium battery Locking lever type 2 straight Locking lever type 3 2 2 mm angled Locking lever type 4 6 5 mm angled Locking lever type 2 straight Locking lever type 3 2 2 mm angled ...

Page 61: ...PegaSys Locker Locks 57 Locking lever type 4 6 5 mm angled ...

Page 62: ...ime of the batteries Protection category Corresponds to IP 20 Installation location Indoors Humidity 10 C to 90 C non condensing Not suitable for changing rooms with integrating washing and shower facilities Other Dimensions W H D in mm 44 6 148 4 35 9 Cylinder Thread M18 thread length 22 mm Credentials MIFARE or LEGIC depending on the order Signaling Visual and audible signals Locking lever 10 mm...

Page 63: ...PegaSys Teach In or NetworkOnCard Operation Valid for all PegaSys offline components ...

Page 64: ......

Page 65: ...e Teach in PIN Code operating mode all settings are configured by entering codes at the integrated keypad Properties The door fitting can recognize up to 100 codes Using programming codes you can teach in or delete new codes adjust the door open time Security If an incorrect code is entered three times the door fitting is blocked for an adjustable period PegaSys Offline component signals when the ...

Page 66: ...rollment mode starts Within this period hold a credential in the read area to enroll it To confirm an enrolled credential with standard functions the LED flashes green once and a single signal tone sounds Subsequently you have 10 seconds to enroll the next credentials Enrolling a credential with permanently open function If you enroll a credential a second time or hold it in the read area longer t...

Page 67: ...h of the orange LED increases the door open time by one second After the desired number of orange flashes remove the master card Example If you remove the card after the first orange flash the new door open time is one second If you remove the card after the second signal the door open time is two seconds Enrolling a new master card If you have lost the master card you can order a new card To admi...

Page 68: ...ng another booking Furthermore you can deactivate the permanently open mode again Activating the permanently open mode If you hold the credential that is equipped with the permanently open function in front of the read unit for more than three seconds the door is switched to the permanently open status Thereafter the door can be opened without making another booking Signaling Credential with stand...

Page 69: ...control Issuing of various lists 4 5 1 Recommended procedure for setting up a new access control system The following procedure has proven itself for setting up a new access control system details and descriptions depend on the software that is used Definition of door groups combination of doors definition of local booking authorizations Definition of time models definition of temporal booking aut...

Page 70: ...4 148 4 170 1024 8 156 4 178 1024 16 172 4 194 Format 2 1 or 3 1 MIFARE and LEGIC Door groups Single doors Required bytes Required sectors Segment size 216 256 2 48 1 70 256 4 57 2 79 256 8 65 2 87 256 16 81 2 103 512 2 85 2 102 512 4 89 2 111 512 8 97 3 119 512 16 113 3 135 768 2 117 3 139 768 4 121 3 143 768 8 129 3 151 768 16 145 3 167 1024 2 149 3 171 1024 4 153 4 175 1024 8 161 4 183 1024 16 ...

Page 71: ...match between the own object code and the one of the credential Background information Several backup procedures ensure that only cards assigned to a specific object are accepted at the associated PegaSys Offline components Is there a match between one of the single door authorizations on the credential and the own door number Is there a match between one of the door groups on the credential and t...

Page 72: ...either the PegaSys Mobile program combined with an NFC device for programming and updating the offline devices using a tablet PC or notebook or different system cards like for instance door initialization cards Facility card It is important that only the credentials and PegaSys Offline components that have been assigned to a specific object actually work at this object The object specific data is ...

Page 73: ...this system card to the reading unit the booking data is transferred from the device to the card An upload card has a capacity to buffer up to 190 of the 2000 bookings 140 if MIFARE and 32 if Hitag is used i e several upload cards are needed to read all the data from the memory The bookings recorded last are transmitted first Once the booking data has successfully been written to the upload card i...

Page 74: ...ooking memory entry Door permanently open Deactivating the permanently open mode Hold the credential at the read unit of the permanently open door for more than three seconds This deactivates the permanently open mode Signaling Credential with standard function and permanently open function GREEN GREEN long RED Signaling for a credential that only has the permanently open function Long RED Booking...

Page 75: ...al recognition From PegaSys 2 1 BLUE Meaning Searching for and reading the presented card Visual and audible signals for credentials PegaSys version 2 x Valid booking PegaSys 2 0 GREEN GREEN GREEN PegaSys from 2 1 GREEN Booking memory entry Valid booking performed at a single door or at a door group Invalid booking RED RED RED Booking memory entry Card blocked invalid access authorization expired ...

Page 76: ...eaning Data transmission During the data exchange between a system card and another PegaSys Offline component the LED flashes Thereafter the PegaSys Offline component signals whether or not the read write procedure has been successfully completed No credential no card in the field RED Meaning No credential no card in the read area The electronics have been activated but could not find any credenti...

Page 77: ...y 4 RED Meaning Invalid time Remedy Create a time initialization card and hold it in front of the PegaSys Offline component 5 RED Meaning The PegaSys Offline component has not been initialized Remedy Create a door initialization card and hold it in front of the PegaSys Offline component 6 RED Meaning The facility card has not yet been presented to the PegaSys Offline component Remedy Present the f...

Page 78: ......

Page 79: ...he moving part of the door element Door leaf open Positions of the door leaf in which neither latch nor bolt can interlock with the assigned openings of the locking plate or door frame non active leaf The passageway is free The cover plate is for example only visible in the status Open door status Opposite Closed Door Status Door status Locked A door also a full height turnstile or other locking d...

Page 80: ...ctivate the permanently open mode leaves the room the PegaSys Offline device toggles back to the not released mode Now the door can only be opened by means of a positive booking The toggle can also be time controlled Plate A door lock cover plate on the door leaf Contains e g openings for doorknobs and locking cylinders Release door When a door is released the door handle and the lock mechanism ar...

Page 81: ...ncy opening 46 F facility card 68 fitting 5 75 flashing signal 44 64 furniture lock 35 41 43 H half cylinder 35 hole gage 15 humidity 58 I initial operation locker lock 52 installation cylinder body 40 door fitting 11 17 electronic lock cylinders 39 furniture lock 41 locker lock 52 58 intended use 51 J janitorial 29 55 L leaf 75 LED 44 lever handle 10 75 76 lock locker door 54 locked door status 7...

Page 82: ...al 45 short description 51 short time release 43 signal 44 signal transmitter 44 signaling 64 square spindle 5 75 76 striking plate 75 76 T technical data 38 58 temperature 38 58 template 13 tubular frame door 17 22 U unsecured status 75 ...

Page 83: ......
Page 84: ...r more visit www allegion com NORMBAU Briton NORMBAU Beschläge und Ausstattungs GmbH Schwarzwaldstraße 15 77871 Renchen Germany Phone 49 7843 704 0 Fax 49 7843 704 43 www pegasys allegion com 3050132 400 ...

Reviews: