18
Electronic Door Fittings of the PegaSys Series
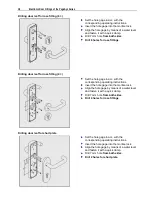
Drilling door leaf for rose fitting (6 ×)
Set the hole gage in acc. with the
corresponding operating instructions.
Insert the hole gage into the mortise lock.
Align the hole gage by means of a water level
and fasten it with a quick clamp.
Drill 7 mm hole
from both sides
.
Drill 6 holes for rose fittings
.
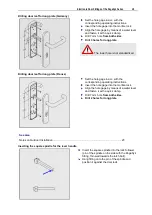
Drilling door leaf for rose fitting (4 ×)
Set the hole gage in acc. with the
corresponding operating instructions.
Insert the hole gage into the mortise lock.
Align the hole gage by means of a water level
and fasten it with a quick clamp.
Drill 7 mm hole
from both sides
.
Drill 4 holes for rose fittings
.
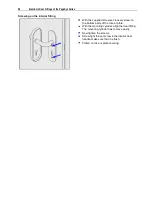
Drilling door leaf for short plate
Set the hole gage in acc. with the
corresponding operating instructions.
Insert the hole gage into the mortise lock.
Align the hole gage by means of a water level
and fasten it with a quick clamp.
Drill 7 mm hole
from both sides
.
Drill 2 holes for short plate.
Summary of Contents for PegaSys
Page 2: ......
Page 4: ......
Page 7: ...Installation Instructions for PegaSys Electronic Door Fittings ...
Page 8: ......
Page 34: ......
Page 35: ...Installation Instructions for PegaSys Electronic Lock Cylinders ...
Page 36: ......
Page 52: ......
Page 53: ...Installation Instructions for PegaSys Electronic Locker Locks ...
Page 54: ......
Page 61: ...PegaSys Locker Locks 57 Locking lever type 4 6 5 mm angled ...
Page 63: ...PegaSys Teach In or NetworkOnCard Operation Valid for all PegaSys offline components ...
Page 64: ......
Page 78: ......
Page 83: ......


