


Installing the GC
1
Agilent Intuvo 9000 GC Installation
37
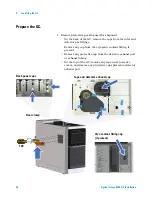
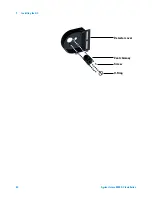
Figure 4
Remove exterior protective packaging
2
Loosen the captive screws in the shipping door clamp and
remove the clamp. See
above.
3
Remove the detector tail brace.
a
Use a T20 Torx driver to remove the screws that secure
the MSD frame cover and remove the cover.
b
Slide the detector tail brace out of the side of the GC.
c
Reinstall the MSD frame cover.
•
If installing a 7693A tray assembly, you can skip this step
and install the MSD frame cover after installing the tray
mounting hardware.
•
If installing an MSD or D2 assembly, skip this step.
4
Assemble the Intuvo Torque Driver and attach it to the GC
front door. The calibrated torque driver handle (8710-2790)
Summary of Contents for Intuvo 9000
Page 1: ...Agilent Technologies Agilent Intuvo 9000 Gas Chromatograph Installation and First Startup...
Page 6: ...6 Agilent Intuvo 9000 GC Installation...
Page 25: ...Installing the GC 1 Agilent Intuvo 9000 GC Installation 25 3 Reinstall the GC covers...
Page 27: ...Installing the GC 1 Agilent Intuvo 9000 GC Installation 27 Turn on the GC...
Page 29: ...Installing the GC 1 Agilent Intuvo 9000 GC Installation 29...
Page 84: ...84 Agilent Intuvo 9000 GC Installation 1 Installing the GC 8 Close the GC front door...
Page 114: ...Agilent Technologies...


