


Installing the GC
1
Agilent Intuvo 9000 GC Installation
13
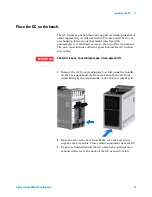
Place the GC on the bench.
The GC requires a bench that can support its weight plus that of
other equipment you will use with it. The area must be free of
overhanging obstructions that might interfere with
autosamplers, or that limit access to the top of the instrument.
The area must include sufficient space behind the GC to allow
for cooling.
1
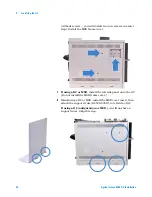
Remove the GC from its shipping box. Lift using the handle
on the back panel and the flat area beneath the GC front.
Avoid lifting by the door handle or the front air intake grill.
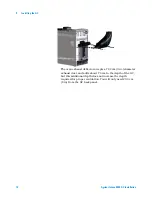
2
Place the GC on the bench top. Make sure gas and power
supplies are accessible. Place related equipment near the GC.
3
If space is limited behind the GC, attach the optional oven
exhaust deflector to the back of the GC as shown below.
WARNING
The GC is heavy. To avoid injury use a two-person lift.
Summary of Contents for Intuvo 9000
Page 1: ...Agilent Technologies Agilent Intuvo 9000 Gas Chromatograph Installation and First Startup...
Page 6: ...6 Agilent Intuvo 9000 GC Installation...
Page 25: ...Installing the GC 1 Agilent Intuvo 9000 GC Installation 25 3 Reinstall the GC covers...
Page 27: ...Installing the GC 1 Agilent Intuvo 9000 GC Installation 27 Turn on the GC...
Page 29: ...Installing the GC 1 Agilent Intuvo 9000 GC Installation 29...
Page 84: ...84 Agilent Intuvo 9000 GC Installation 1 Installing the GC 8 Close the GC front door...
Page 114: ...Agilent Technologies...


