Solares
TM
Smart Spa Parts Manual
CD0039
14
Rev:1121
5.
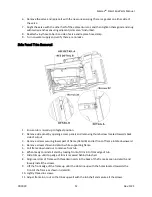
Disconnect M8 cable from part #5.
6.
Disconnect M12 cable from part # 6.
7.
Use two wrenches to disconnect union on the bottom of the assembly.
8.
Loosen nuts (part #4).
9.
Lift Rada assembly up to slide it out of frame.
10.
Remove nuts (part #4) all the way.
11.
Assemble nuts and screws (part #3 & 4) loosely onto new manifold.
12.
Position Rada assembly above frame and slowly lower it so that carriage bolts make their way
into the slots.
13.
Verify that the backflow preventer’s gasket is still in place and connect the union. Be sure to use
two wrenches when tightening to prevent loosening of the adjacent fitting.
14.
Tighten nuts (part #4) until valve is adequately secure.
15.
Connect M8 & M12 cables to parts #5 and #6 respectively.
16.
Connect fill hoses to Rada assembly ensuring that the cold line is attached to the right and the
hot line to the left.
17.
Verify correct assembly of the valve by running the tub fill for a while and verifying that it is able
to reach and maintain the temperature shown on the screen.
18.
Replace side panel trim and side panels.
Part #2
–
Radatherm Cartridge; Rada 222
1.
Turn off hot/ cold water supply.
2.
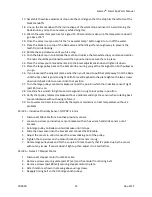
Loosen set screw on underside of large pulley using 2mm allen wrench.
3.
Loosen 4mm screw on other side of pully using 2.5mm allen wrench.
4.
Lift large pulley off of valve. You may need to loosen the screws on the top of the adjacent plate
to create some play.
5.
Remove screw fastening down brass adjustment knob.
6.
Remove both white clips from Rada assembly.
7.
Remove black cap and brass adjustment knob.
8.
Twist off top piece of brass assembly.
9.
Pull Rada out of brass assembly. (It may help to briefly open one of the valves a bit to allow the
water pressure to push out the valve.)
10.
Remove new valve from its packaging and apply included silicone lubricant to the gaskets.
11.
Insert the new valve into the assembly ensuring that the side marked with a large H is aligned
with the left side of the assembly.
12.
Thread the top brass assembly back onto the valve.
13.
Turn water supply back on.
14.
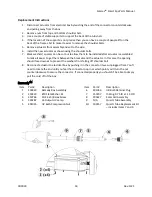
Go to the maintenance screen on the tub per the operations manual and push “Max Temp”
button. Water should start to enter the tub. Note: The following process will be easier if you
have a second person av
ailable to read off the water temperature for you as you won’t be able
to see it while adjusting the valve.
15.
Adjust the grey knob on the Rada clockwise until the water temperature drops to the
neighborhood of 100°f.
16.
Turn grey knob counterclockwise until te
mperature is 105°f (If you can’t get 105°f at the tub
then adjust it just beyond the point you reach the highest temperature you can.)


