Solares
TM
Smart Spa Parts Manual
CD0039
29
Rev:1121
12.
Remove the HMI from its packaging. It’s easiest and safest to just slide it out from under the
plastic wrap then to cut it.
13.
Remove the two pieces of foil covering the two connectors on th
e backside of the HMI. (They’re
the connectors towards the top of the Old HMI that the two modules on the back plugged in to.
14.
Put the new HMI in the tub from the front ensuring that the USB/ Ethernet connectors are
facing downwards.
15.
Secure the HMI using th
e clamps removed from the old unit. It’s best to just get each one
started before tightening any all the way down. You should tighten the clamps until the gasket
on the back of the HMI is fully compressed.
16.
Connect power plug, USB cable, ethernet cable, and serial cable to bottom of HMI.
17.
Attach HMI modules by putting the hooks in the bottom slots and then tilting them in until the
connector goes into the port at the top of the HMI. (The one you should have removed the foil
from.)
It’s easiest to just reinsta
ll the original modules of they are working correctly as this
eliminates the need to migrate connector and reduced the risk of mixing up connections.
a.
If replacing the modules as well,
then you’ll need to transfer the black connectors over
to the new modules. Note: It is critical that they connectors get installed into the same
slots! Failure to install connectors in the same slots could result in failure of tub
operations.
18.
Tighten down the screws to fully secure the modules.
19.
Connect the other end of the USB cable to the USB port on the right side of the enclosure. (You
may need to pull on the side of the enclosure a bit depending on the thickness of the tub shell.)
20.
Replace the back cover of the HMI enclosure.
21.
It’s recommended that you plug in the tub and ve
rify correct operation before pushing it back
against the wall.
22.
Once you’re sure that everything is operating correctly you can move the tub back into position
and reconnect the drain and fill hoses.
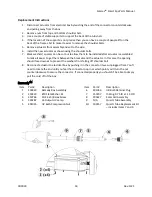
Tilt Switch
Item
Part #
Description
Item
Part #
Description
1
330394
Roller; Mini-Micro Switch
3
350698
#8 Flat Washer
2
350613
PH Mach Screw; 8-32 x 1 1/4
4
350438
8-32 Coarse Thread Nylock Nut

