Solares
TM
Smart Spa Parts Manual
CD0039
17
Rev:1121
Replacement Instructions
Part #1
–
24VDC Sealed Rotary Latch
1.
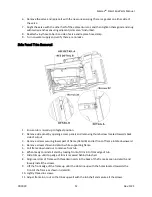
Disconnect latch from latch cable.
2.
Remove bolts and pull latch off of frame.
3.
Use 1/8” drill bit to drill out
rivets (part #7) securing plastic (black) release assembly to back of
latch.
4.
Place black assembly onto new latch ensuring ball from cable assembly sits in front of small
release lever.
5.
Rivet Cable assembly to latch using 2 1/8 x 0.4” aluminum rivets (Part #7).
6.
Use previously removed hardware to mount new latch on frame.
7.
Reconnect electronics and verify correct operation.
Part #6
–
Proximity Sensor; 8mm x 40mm
1.
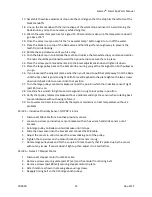
Disconnect M8 cable from back of sensor.
2.
Remove lock nut from front of sensor.
3.
Thread sensor out of the back of the frame.
4.
Thread new sensor
into frame so that tip is ~0.56” from the front of the frame.
5.
Thread lock nut onto front of sensor to secure it in position.
6.
Reconnect M8 cable.
7.
Verify correct installation of sensor by docking carrier. Sensor light should be off when carrier is
not connected but should light up when carrier is docked. There should also be a small air gap
between the sensor and the carrier if installed correctly to prevent the sensor from being
damaged.
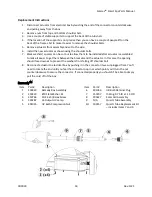
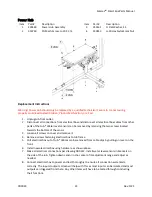
Linear Actuator
Item
Part #
Description
Item
Part #
Description
1
330284
Actuator W/ Connector
3
350749
M10 X 2.5mm Washer, Blk
2
350722
10mm Shoulder Bolt x 40mm
4
350719
M8 x 1.25mm Nylock Nut


