Solares
TM
Smart Spa Parts Manual
CD0039
6
Rev:1121
Replacement Instructions
Part # 3
–
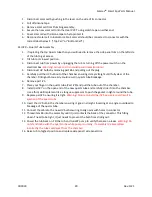
TRX Jet
1.
Rotate jet counterclockwise until it stops rotating.
2.
Force jet to continue rotating counterclockwise until it pops out of the body.
3.
Place new jet in place and apply pressure while rotating clockwise until jet snaps into place.
Part # 4/7
–
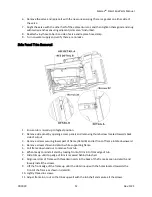
LH/RH Transfer Beam
1.
Remove screws and pull rail off of tub.
2.
Place Gasket (Item 8) into matching holes on the back side of the new rail.
3.
Carefully place rail on tub ensuring none of the gaskets fall out of place.
4.
Replace screws through rail and tub shell.
5.
Apply anti-seize to screws and replace star washer and nut to end of screw.
6.
Tighten until snug.
Part # 5
–
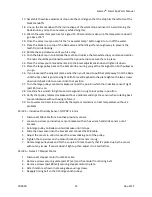
94GPM Suction Cover; BN
1.
Remove screw from center of suction cover.
2.
Remove old suction cover.
3.
Place new suction cover with edge of part ensuring tab on backside of part lines up with the
notch in the top of the fitting. Note: it is critical that the section of the cover without any holes is
facing up as to ensure optimal drainage.
4.
Replace screw in center of part.
Part # 6
–
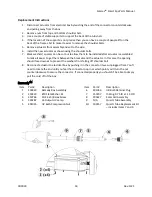
Momentary Switch; Push Button
1.
Remove right side panel and right-side panel trim.
2.
Switch off tub power using power switch on electrical box or unplug tub from wall.
Warning!
Failure to do so could result in electric shock!
3.
Use small chancel locks or pliers to remove nut on underside of switch.
4.
Pull button up and out of tub to expose contacts on the bottom.
5.
Use screwdriver to loosen screws and remove wires from switch.
6.
Attach wires to terminals of new switch and tighten down screws ensuring there are no loose
strands. Which wire goes to which terminal isn’t important, they just need to go
in separate
terminals and have no jumpers between them.
7.
Drop switch back into tub and replace nut.
8.
Tighten nut until switch is secure.
9.
Power on unit and verify correct operation of button in input section of maintenance screen per
operations manual. Scree
n should indicate switch is “HIGH” when pushed in and “LOW” when
released. resecure connections if this is not the case.
10.
Replace side panel trim and side panels.


