Solares
TM
Smart Spa Parts Manual
CD0039
19
Rev:1121
Replacement Instructions
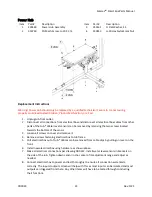
Part # 1
–
Remedy Box Assembly
1.
Disconnect tub from power by unplugging the tub or turning off the power switch on the
electrical box.
Warning! Failure to do so could result in electrocution!
2.
Disconnect Remedy box from main electrical box. (Disconnect M12 cable leading to other box.)
3.
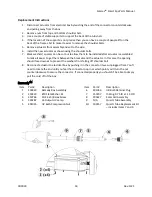
Disconnect box from UV bulbs by removing part #6 from each side of the plumbing assembly
and pulling out the plug. Note: hold part #5 steady to prevent it from loosened when removing
part # 6. Failure to do so could result in a leak. Never attempt to fill tub without part #5 being
secured.
4.
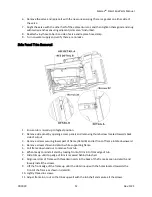
Remove the 4 hex bolts securing the box to the frame using a ratchet.
5.
Remove the old remedy box and replace it with the new one.
6.
Thread hex screws into the bottom of the remedy box to secure it to the frame as shown above.
7.
Connect bulb cables to each bulb ensuring to align pins with holes in connector.
8.
Thread item 6 into the assembly until it becomes snug
. This fitting doesn’t need to be
tight; it
just needs to prevent the bulb from sliding out of the chamber.
9.
Connect the M12 cable from the remedy box to the main electrical box. The correct port will be
labeled “Remedy” above the connector.
10.
Power the tub back on and raise it to the highest position so it is ready for the next bath.
11.
Fill tub and run whirlpool motor to verify chamber holds water.
Warning! Do not stand inline
with the quartz tube while pump is running. If assembly is reassembled incorrectly the tube
could eject from the chamber!
Part # 4
–
High Output UV Bulb
1.
If replacing the top UV bulb then you will need to remove the side panel trim on the left side of
the tub to get access.
2.
Tilt tub to its lowest position.
3.
Disconnect tub from power by unplugging the tub or turning off the power switch on the
electrical box.
Warning! Failure to do so could result in electrocution!
4.
Disconnect UV bulbs by removing part #6 and pulling out the plug. Note: secure part #5 while
loosening part #6 as accidental loosening may cause leakage.
5.
Carefully pull the UV bulb out of the chamber ensuring it stays straight until fully clear of the
chamber. Tilting bulb too early could result in quartz tube breakage.
6.
Insert the new UV bulb in the chamber ensuring it goes in straight. Inserting at an angle could
lead to breakage of the quartz tube.
7.
Connect the cable to the new UV bulb ensuring to align pins with holes in connector.
8.
Thread item #6 into the assembly until it just contacts the back of the connector. This fitting
doesn’t need to be
tight; it just needs to prevent the bulb from sliding out.
9.
Power the tub back on and raise it to the highest position so it is ready for the next bath.
10.
Fill tub and run whirlpool motor to verify chamber holds water.
Warning! Do not stand inline
with the quartz tube while pump is running. If assembly is reassembled incorrectly the tube
could eject from the chamber!
Part # 8
–
Solar Cell Assembly


