


3 - 57
INSP
ADJ
REPLACING THE HEADLIGHT BULBS/
ADJUSTING THE HEADLIGHT BEAMS
REPLACING THE HEADLIGHT BULBS
1. Remove:
• Headlight
Refer to “SEAT, FUEL TANK AND SIDE
COVERS” section in the CHAPTER 4.
2. Remove:
• Headlight bulb holder cover
1
3. Detach:
• Headlight bulb holder
1
4. Remove:
• Headlight bulb
2
WARNING
Since the headlight bulb gets extremely hot,
keep flammable products and your hands
away from the bulb unit it has cooled down.
5. Install:
• Headlight bulb
Secure the new headlight bulb with the
headlight bulb holder.
CAUTION:
Avoid touching the glass part of the head-
light bulb to keep it free form oil, otherwise
the transparency of the glass, the life of the
bulb and the luminous flux will be
adversely affected. If the headlight bulb
gets soiled, thoroughly clean it with a cloth
moistened with alcohol or lacquer thinner.
6. Attach:
• Headlight bulb holder
7. Install:
• Headlight bulb holder cover
8. Install:
• Headlight
Refer to “SEAT, FUEL TANK AND SIDE
COVERS” section in the CHAPTER 4.
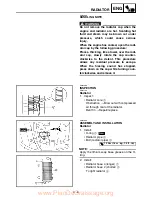
ADJUSTING THE HEADLIGHT BEAMS
1. Adjust:
• Headlight beam (vertically)
T
R
.
.
7 Nm (0.7 m · kg, 5.1 ft · lb)
Adjusting steps:
• Turn the adjusting screw
1
in direction
a
or
b
.
Direction
a
Headlight beam is raised.
Direction
b
Headlight beam is lowered.
New
www.PlanDeGraissage.org
Содержание WR250FR 2002
Страница 1: ...LIT 11626 16 48 WR250FR 5UM 28199 10 OWNER S SERVICE MANUAL www PlanDeGraissage org...
Страница 2: ...www PlanDeGraissage org...
Страница 5: ...www PlanDeGraissage org...
Страница 12: ...MEMO www PlanDeGraissage org...
Страница 118: ...3 53 INSP ADJ BATTERY INSPECTION AND CHARGING Charging method using a variable voltage charger www PlanDeGraissage org...
Страница 119: ...3 54 INSP ADJ BATTERY INSPECTION AND CHARGING Charging method using a constant voltage charger www PlanDeGraissage org...
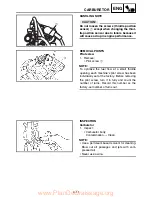
Страница 143: ...4 21 ENG 9 Install Clamp 1 Refer to CABLE ROUTING DIAGRAM section in the CHAPTER 2 1 CARBURETOR www PlanDeGraissage org...