background image

3 - 9

REFERENCE

Chapter 3   DISK Mode

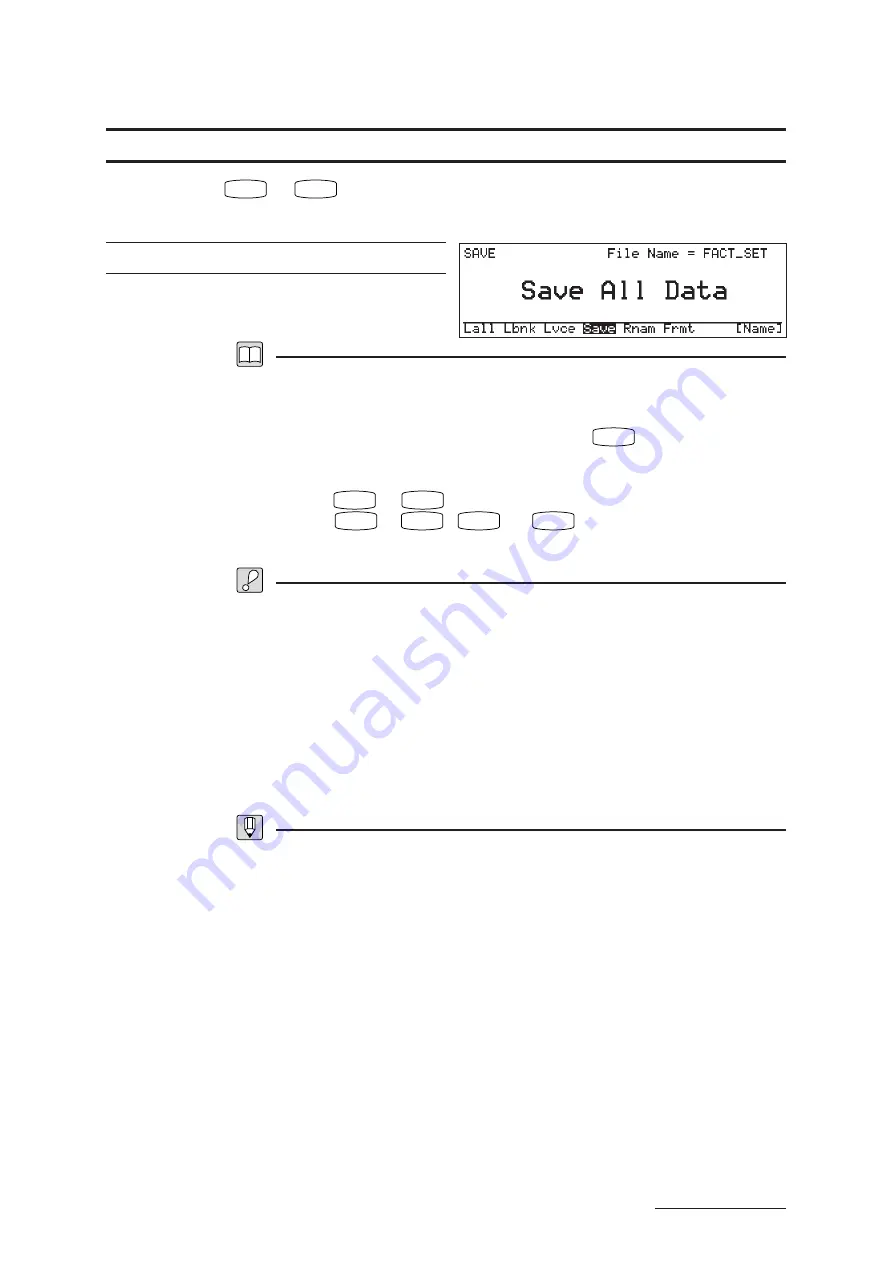
SAVE ALL DATA

Insert the disk 


DISK


F4

: Save

Saves all internal data to floppy disk.

Filename (if necessary): Eight characters or less

Description

This operation saves all internal data — 64 voices and SYSTEM-mode settings  —

into a single large file on the floppy disk.

You can set or change the filename by pressing 

F8

:[Name], then entering a

name of up to eight characters.

Press 

EXIT

 or 

PLAY

 to return to PLAY mode.

Press 

F1

 ~ 

F3

F5

, or 

F6

 to change to another DISK-mode

function.

Important

A single floppy disk can store only one save file (64 sets of voice data, together

with one set of system data).  If you store to a disk that already contains a save file,

the new save file will overwrite the old one.

If you do not explicitly set a filename, the VP1 reuses the name of the existing file

on the disk.  If the disk is newly formatted, the VP1 uses the name “NEW-FILE” .

You cannot save to an unformatted disk.  If necessary, format the disk using the

FORMAT function. (

 REFERENCE: 3-12)

You cannot save to a disk if the disk’s write-protect tab is set to “protect”.  The tab,

located at the lower-right corner on the rear side of the disk casing, is in “protect”

position when it is pushed downward so that the window is open.

FYI

Filenames cannot start with a space.  If you enter a space in the middle of a filename, the

space is automatically converted to an underscore character. (If you enter the name as a

string of spaces, the name automatically converts to “------”.

DISK Functions

Содержание VP1

Страница 1: ......

Страница 2: ...arked with the letter N or coloured BLACK The wire which is coloured BROWN must be connected to the terminal which is marked with the letter L or coloured RED Dette apparat overholder det gaeldende EF...

Страница 3: ...izer The VP1 s revolutionary VA sound system offers a range of sounds and performance features not available from ordinary synthesizers Please read through this manual to familiarize yourself with the...

Страница 4: ...analogous to the combination of the guitar s string fret and bridge The VP1 fine tunes the properties of each of these modules to produce a virtual instrument with an extremely realistic sound You can...

Страница 5: ...more You can set these effects separately for each voice Professional Features Professional Parallel Output The VP1 processes effects internally to produce high quality stereo output You are also free...

Страница 6: ...ontrollers and other features REFERENCE The REFERENCE section offers detailed explanations of the VP1 s different functions It describes in detail the various methods for implementing performance voic...

Страница 7: ...t An important note or precaution intended to help you avoid loss of data or other major inconvenience Always read these notices carefully FYI For your information Reference information indirectly rel...

Страница 8: ...10 Connecting Amplifiers or Mixer B 1 12 MIDI Connection B 1 14 The Floppy Disk B 1 16 MIDI B 1 17 Chapter 2 Trying It Out First Try B 2 2 Checking the Sound Output B 2 2 Trying Some Voices B 2 3 Usin...

Страница 9: ...uick Edit B 3 17 Storing Results B 3 17 Quick Edit Parameters B 3 18 MIDI Quick Edit Control B 3 20 Voice Categories B 3 21 Category Listing B 3 21 Modes B 3 22 PLAY Mode B 3 22 SYSTEM Mode B 3 22 DIS...

Страница 10: ...ICE SETUP Key Assign Mode R 1 20 VOICE SETUP Volume R 1 22 VOICE SETUP Detune R 1 23 VOICE SETUP Note Shift R 1 24 VOICE SETUP Pan Range R 1 25 VOICE SETUP Note Limit R 1 27 VOICE SETUP Microtuning R...

Страница 11: ...R 2 12 MISCELLANEOUS SETTINGS R 2 13 Chapter 3 DISK Mode Outline R 3 2 DISK Functions R 3 3 LOAD ALL DATA R 3 4 LOAD 1 BANK R 3 5 LOAD 1 VOICE R 3 7 SAVE ALL DATA R 3 9 RENAME R 3 11 FORMAT R 3 12 Ap...

Страница 12: ...BASICS PART...

Страница 13: ...Setting It Up 1 1 Chapter 1 Setting It Up This chapter introduces the VP1 s various controls and connectors and explains how to connect everything up Users unfamiliar with the VP1 should read this ch...

Страница 14: ...ance The actual effect differs for each voice 4 MODULATION 2 wheel Controls one voice parameter during performance where the actual effect depends on the voice Unlike the MODULATION 1 wheel this wheel...

Страница 15: ...slider Adjusts the output volume Note that this slider has no effect on the output levels at the ELEMENT jacks 10 CS1 and CS2 Continuous sliders These sliders provide real time control of voice parame...

Страница 16: ...e of the currently selected voice together with various status information Characters may be displayed black on white or white on black REFERENCE 2 13 The screen s contrast level may change slightly o...

Страница 17: ...XIT button Use this button to exit from the currently displayed screen submode returning the LCD to the next higher level screen 23 ENTER button Press this button to select or execute a function 24 A...

Страница 18: ...four elements comprising the voice Each element is output in stereo the L MONO jack outputs the left channel and the R jack outputs the right channel For monaural output use the L MONO jack 4 OUTPUT j...

Страница 19: ...is jack accepts connection to an FC7 or FC9 foot controller The connected controller operates as a volume pedal 8 SCENE jack This jack accepts connection to an FC7 or FC9 foot controller The connected...

Страница 20: ...Connects to standard stereo headphones Headphone impedance should be between 8 and 150 ohms Yamaha recommends the use of model HPE 170 headphones 5 Breath controller jack This jack connects to a BC2 o...

Страница 21: ...Be sure the power is off before making any connections Amplifiers or speakers may suffer damage if connections are made while power is on Connecting the Power Cord Connect the supplied power cord to...

Страница 22: ...ollers into the appropriate jacks on the rear panel Recommended Alternative Connecting the System Rear panel FOOT CONTROLLER 1 FOOT CONTROLLER 2 YAMAHA MODELVP1 ACINLET POWER ON OFF ELEMENT 4 R L MONO...

Страница 23: ...supports the use of FC7 and FC9 foot controllers and FC4 and FC5 foot switches Connecting the System YAMAHA MODELVP1 ACINLET POWER ON OFF ELEMENT 4 R L MONO ELEMENT 3 R L MONO ELEMENT 2 R L MONO ELEME...

Страница 24: ...he channel connected to the R jack becomes the right pan Note that you can make the same kind of connection to an MTR CMX series cassette deck or similar such audio device Connecting the System OUTPUT...

Страница 25: ...g to a mixer set the mixer channels for line input Remember that the VOLUME slider effects settings and equalizer settings do not affect output coming from the VP1 s ELEMENT jacks Quick Edit effects d...

Страница 26: ...hesizer or MIDI module from the VP1 Connecting the System MIDI THRU OUT IN Rear panel MIDI OUT MIDI IN SY85 YAMAHA MODELVP1 ACINLET POWER ON OFF ELEMENT 4 R L MONO ELEMENT 3 R L MONO ELEMENT 2 R L MON...

Страница 27: ...MENT 4 R L MONO ELEMENT 3 R L MONO ELEMENT 2 R L MONO ELEMENT 1 R L MONO OUTPUT R L MONO FOOT CONTROLLER 2 1 PORTAMENTO SUSTAIN FOOT VOLUME SCENE MIDI THRU OUT IN To record to or play back from a sequ...

Страница 28: ...ENCE 3 4 FYI The floppy disk supplied with the VP1 contains system settings together with data defining 64 voices The VP1 supports MF2HD type floppy disks only A single disk can store one sound file o...

Страница 29: ...or THRU connector of one device to the IN connector of another device Channels A single MIDI cable can carry up to 16 channels of performance data with each channel originating from a different devic...

Страница 30: ...2 1 BASICS Chapter 2 Trying It Out Chapter 2 Trying It Out This chapter guides you through a trial run with the VP1 and explains how to play the built in demo selections...

Страница 31: ...ator LEDs on the amplifiers come on 3 Adjust the amplifier volume 4 Raise the VOLUME slider on the VP1 5 Check that the LED above the PLAY button is on If the LED is off press the PLAY button once the...

Страница 32: ...een voices in the same bank you do not need to press the bank button 3 Press the INC YES button The voice number increases by 1 In the same way pressing the DEC NO decreases the voice number by 1 Noti...

Страница 33: ...nges to the display illustrated below indicating that the selected voice is A02 WaterBell 3 Play on the keyboard Familiarize yourself with the sound of the voice 4 Press SCENE2 The SCENE1 LED goes off...

Страница 34: ...s foot controllers and foot switch By combining these controller effects you can obtain a remarkable range of variation for the voice Each voice allocates parameters to controllers in its own way each...

Страница 35: ...4 Play on the keyboard with your right hand while moving the second quick edit slider QS2 up and down The slider does not become effective until it moves past the midpoint on the scale For details abo...

Страница 36: ...fferent voice Important Using a Quick Edit slider to increase the EQ gain may in some cases overload the volume resulting in output distortion One way to correct this problem is to lower the volume se...

Страница 37: ...FYI Demo playback does not affect currently stored voice and system data Procedure 1 While holding down the PLAY button press the SYSTEM button The following screen appears 2 Press F7 RUN The demo st...

Страница 38: ...SICS Chapter 3 Learning the Basics Chapter 3 Learning the Basics This chapter describes the principles of VP1 sound production and explains the basics of controllers scenes quick editing and other fea...

Страница 39: ...owed string instruments FYI F VA and S VA systems are fundamentally different and incompatible Data and parameters cannot be moved from one system to another Physical Characteristics of Struck String...

Страница 40: ...freely vary the ratio at which the vibrational impulse reflects off the fixed ends of the string In a real acoustic instrument this reflection ratio is always less than 100 By setting the level above...

Страница 41: ...t parameters and up to thirteen other parameters assigned to the various controllers The set of controllable parameters is different for each voice The VP1 transmits data about keyboard and controller...

Страница 42: ...mory stores up to 64 voices organized into four banks with 16 voices 01 to 16 each Bank A 01 to 16 Bank B 01 to 16 Bank C 01 to 16 Bank D 01 to 16 Each voice is uniquely identified by its voice number...

Страница 43: ...ncludes keys pointing to the relevant table entries Voice Data The Voice Data area stores data defining each of the voice elements It also stores general voice information such as voice s name and its...

Страница 44: ...s room enough to store only one such file Loading from disk The VP1 supports three different loading methods Load All Data Copies all system and voice data from the floppy disk Load Bank Copies the se...

Страница 45: ...reedom to rearrange some of the controller assignments as suggested by the illustration on the next page REFERENCE 1 10 Each controller has a corresponding controller LED that indicates its status The...

Страница 46: ...n ball REFERENCE 2 10 Continuous sliders You are free to change the controller numbers used to identify these sliders REFERENCE 2 10 Controllers Controllable parameter Controller Elements 1 to 4 Param...

Страница 47: ...But you can add vibrato to the sound at any time by increasing your pressure on the key FYI The following table shows the controllers supported by the VP1 Controller Possible controller numbers Defau...

Страница 48: ...The VP1 allows you to store up to three scenes In this case let s assume that you store this configuration as Scene 3 Now that you have stored the scene you can proceed to operate the controllers any...

Страница 49: ...n the SCENE CONTROLLER continuously changes the various controller settings as illustrated in the figure on the next page When the SCENE CONTROLLER knob is in the position shown the effective controll...

Страница 50: ...uch Scene switch to select whether or not the scene controller operates on aftertouch data REFERENCE 2 4 Scene LEDs The LED above each SCENE button indicates how close you are to that scene You can se...

Страница 51: ...ate jump from the internal controller setting to the physical controller setting This can cause a sudden and in some cases jarring change in sound Note also that vibration from the keyboard or speaker...

Страница 52: ...ved it past the setting for at least one other of the voice s elements Remember that a single voice consists of up to four elements and the controller operates independently for each element GREEN A G...

Страница 53: ...band equalization 4 EQ HIGH High band equalization 5 AT FOLLOW Aftertouch following 6 VEL SENS Velocity sensitivity 7 POR TIME Portamento time 8 EF DEPTH Effect depth 9 LFO DEPTH LFO oscillation ampl...

Страница 54: ...slider The physical slider does not become effective until it moves past this red LED FYI The voice s parameter settings determine which line on the Quick Edit panel lights up first Pressing the selec...

Страница 55: ...ng the slider all the way forward fixes the velocity at 96 velocity cannot change so there are no velocity related sound changes If the slider is at the center position the VP1 uses the voice s elemen...

Страница 56: ...voice s element s envelope generator Raise the slider to slow down the sound change EG SUSTN Adjusts the sustain level of the voice s element s envelope generator Raise the slider to increase the leve...

Страница 57: ...control change number You are free to reassign these change number allocations as described in the REFERENCE section REFERENCE 2 10 FYI With the exception of the EF DEPTH parameter and the four EQ pa...

Страница 58: ...le Piano Electric piano MKey Misc Kbd Misc keyboard AGtr Aco Guitar Acoustic guitar EGtr Ele Guitar Electric guitar MGtr MiscGuitar Misc guitar Bass Bass Bass Eth Ethnic Ethnic CPrc ChromPerc Chromati...

Страница 59: ...e system wide settings common to all voices and operation For example you use SYSTEM mode to set up the tone generator the keyboard MIDI operation and controller number allocation You also use it to r...

Страница 60: ...to select a voice with a lower voice number Note that selection can move smoothly across bank boundaries proceeding directly from A16 to B1 for example Use the INC YES and DEC NO buttons Press INC YES...

Страница 61: ...ntheses The function will remain on only while you hold the function button down Brackets The function invokes a submode Curly brackets The function executes some action Returning to Previous Screen P...

Страница 62: ...ue by 1 or hold it down to decrement continuously Changing Multiple Choice Settings To set a multiple choice item you move through the possible selections until you reach the one you want The followin...

Страница 63: ...to move the top cursor in the voice name on the second line of the display to the letter that you want to set or change In the example above the cursor is at the first character position Entering a s...

Страница 64: ...ied on disk then customize the accessible settings to change its sound When you have finished editing you can store the result as a new voice with its own voice name and number The general process is...

Страница 65: ...the Store function to copy an existing unedited voice to a different voice number Select the voice you want to copy then store it to the other voice number without making any changes You will then hav...

Страница 66: ...enter a comment If you do not need to change the comment jump to Step 9 The NOTES entry screen appears You can now enter the contents of the comment that will appear whenever the voice is selected 8 E...

Страница 67: ...k Edit and Compare functions to achieve dynamic sound changes during live performance First use the Quick Edit functions to change the sound of the voice then toggle the Compare function on and off to...

Страница 68: ...arameter for element 3 ELEMENT ON OFF 9 E1 10 E2 11 E3 12 E4 You can use these buttons to temporarily switch off the sound for specific elements This allows you to isolate the sound of a single elemen...

Страница 69: ...REFERENCE PART...

Страница 70: ...LAY Mode 1 1 Chapter 1 PLAY Mode This chapter describes all PLAY mode functions The first part of the chapter describes the functions you use to select and play voices The second part describes the vo...

Страница 71: ...the PLAY button remains ON while the VP1 is in PLAY mode When you enter or return to PLAY mode the LCD displays the main PLAY mode screen illustrated below The large letters at the center of the scree...

Страница 72: ...The F1 F2 F3 and F8 functions do not perform any editing Pressing these function keys will not cause an mark editing mark to appear in front of the voice name on the display Performance and Status Fu...

Страница 73: ...he voice refer to the BASICS section BASICS 3 23 Use controllers to control the selected voice s characteristics pitch and volume BASICS 3 8 Use the scene buttons and SCENE CONTROLLER to dynamically c...

Страница 74: ...element is effective The values to the left and right of the bar indicate the keys at the low and high end of the range To return to the initial PLAY screen press F1 Info EXIT or PLAY You can continue...

Страница 75: ...Breath controller AT Aftertouch QS1 Quick Edit slider 1 QA2 Quick Edit slider 2 QA3 Quick Edit slider 3 QS4 Quick Edit slider 4 The displayed values change in response to controller movements To retu...

Страница 76: ...ssentially a system parameter you can make the same setting using the SYSTEM mode s MIDI SETTINGS screen REFERENCE 2 8 The PLAY mode function described here has been included to allow you to change th...

Страница 77: ...s will appear on the screen If the displayed bank is different from the currently selected bank the bank button LED the cursor and the screen s Bank display will all flash To select a voice from the d...

Страница 78: ...o retain editing results you must use the Store function to store the results into memory REFERENCE 1 54 SYSTEM PLAY MODE SYSTEM MODE DISK MODE Information Display Controller Value View Keyboard Trans...

Страница 79: ...o long to fit on the LCD Use the and cursor buttons to scroll vertically through the list as necessary To make an assignment move the cursor to the appropriate parameter and element then choose the co...

Страница 80: ...If you assign an already assigned controller the previous assignment automatically switches to off You cannot change the controller assigned to the velocity parameter You cannot assign controllers to...

Страница 81: ...r takes when the controller is at its center position controller value 64 For example the MODULATION 2 wheel takes this value when at its click stop position Min The value the parameter takes when the...

Страница 82: ...name appears on the screen After setting the Max and Min values you can press F7 Nrml to automatically set the Center value to Max Min 2 Press F8 Init to restore values to their factory defaults Max...

Страница 83: ...ene for an element Refer to the next page for details no change Select no change if you do not want to change the current scene setting Press EXIT or PLAY to return to the main PLAY mode screen To swi...

Страница 84: ...cancel and return to Step 1 press DEC NO or EXIT Recording Current Controller Positions 1 Set controllers into the positions you want to store for the scene 2 Select the scene you want to store to cu...

Страница 85: ...2 or F3 to scroll back or ahead by one page four lines You can use the F1 ECpy function to copy an element from another voice into the voice that you are working on REFERENCE 1 38 As you scroll throug...

Страница 86: ...ny other VOICE SETUP settings for it All subsequent parameter entry spaces for that element will appear as blank lines You cannot copy an element unless the destination element s Element Switch settin...

Страница 87: ...is value the VP1 automatically decrements settings starting from Element 4 and working backward as necessary to keep the total at 16 The window at the right of the screen displays the current MaxNotes...

Страница 88: ...rical settings 1 16 when you want to allocate specific MIDI channel s to specific elements This allows you to have different channels driving different elements The window at the right of the screen l...

Страница 89: ...lections are available 0 normal Newest played note is sounded 1 lo on Lowest note is sounded regardless of order in which notes are played 2 hi on Highest note is sounded regardless of order in which...

Страница 90: ...t setting for each element If the element is off the setting is listed as Important You cannot set an element whose Element Switch is off REFERENCE 1 17 FYI You can use the 1 4 buttons to switch among...

Страница 91: ...an element whose Element Switch is off REFERENCE 1 17 FYI The signal going to the VP1 s OUTPUT jacks is adjusted first according to the volume setting described here When the signal reaches the mixer...

Страница 92: ...ements that are off are indicated as Important Detuning has no effect on single element voices You cannot set this value for elements whose Element Switch is off REFERENCE 1 17 FYI To produce a chorus...

Страница 93: ...re indicated as Important For some elements extreme settings may produce disagreeable results the pitch may sound incorrect or the element may become inaudible You cannot set a note shift value for el...

Страница 94: ...eft channel output PanRngR Sets positioning of right channel output Positive values denote positions to the right negative values denote positions to the left The center position is 0 The normal setti...

Страница 95: ...ally Elements that are off are indicated as Important You cannot set the pan range for an element whose Element Switch is off REFERENCE 1 17 FYI Note that this function changes the range over which pa...

Страница 96: ...NtLmtHi the notes between the two settings will not produce the element while the other notes will In other words you get a gap in the middle where the element will not sound If NtLmtHi is set to C2 a...

Страница 97: ...rrected third 37 to 48 Pythagorean C to Pythagorean B Classical Greek tuning system later used in Rome and then by Gregorian chanters and medieval minstrels 49 Werckmeister 50 Kirnberger 51 Vallotti a...

Страница 98: ...d for each element Elements that are off are indicated as Important Pitch calculations for some microtuning patterns are unstable and may in some cases produce incorrect or inappropriate pitch output...

Страница 99: ...y if you hit the second note while still holding down the first note The portamento switch has no effect 1 fulltime Portamento is always applied The window at the right of the screen indicates the cur...

Страница 100: ...in full note major second increments 4 400cent The pitch changes in two note major third increments The window at the right of the screen indicates the current resolution setting for each element If...

Страница 101: ...ves The window at the right of the screen displays the current settings graphically Elements that are off are indicated as Important If you have set the PBCurve see next page to 5 6 or 7 you will not...

Страница 102: ...n 4 In the upward direction the pitch change rate increases as the wheel s deflection increases in the downward direction the rate decreases as deflection increases Changing the deflection simulates t...

Страница 103: ...tion is limited to a small fraction of the range established by the PBRange setting You cannot set the PBCurve of an element whose Element Switch is off REFERENCE 1 17 FYI You can use the 1 4 buttons...

Страница 104: ...ighest notes No effect is applied unless at least three notes are being played 4 spl_hi Aftertouch effect applies only at or above the split point See next page 5 spl_lo Aftertouch effect applies only...

Страница 105: ...ffect only to notes from the split point up If ZneATMode is set to spl_lo the VP1 applies aftertouch effect only to notes from the split point down The window at the right of the display graphically i...

Страница 106: ...the VP1 ignores the operation of the sustain switch If the setting is on depressing the sustain switch footswitch produces the normal sustain effect The window at the right of the screen lists the nam...

Страница 107: ...r copying The word Org flashes to indicate that the VP1 is set to produce the original sound When you copy an element between source and destination voices that have different initial scenes the SYSTE...

Страница 108: ...t for extreme oscillation Scene 3 Extremely low droning sound If you copy the above element into Element 2 of the destination voice using no swap the resulting scene arrangement will probably be inapp...

Страница 109: ...ve after the copy is complete While Audi is flashing you can press F8 Org to change back and forth between the new sound and the destination voice s original sound The word Org on the display flashes...

Страница 110: ...low Send Sets the level for each element s send to effects signal the signal going into the effects block The knobs along the top of the displayed graphic reflect the current settings Drct Sets the le...

Страница 111: ...anger or Aural Exciter sound effect effects 22 and 29 see next page so as to avoid phase cancellation caused by slight phase differences between direct and effects processed outputs Aural Exciter is a...

Страница 112: ...REFERENCE 1 50 Press F3 Type to move the cursor to the Effect Type line Press F8 EQ to advance to the equalizer setup screen REFERENCE 1 51 Press EXIT or PLAY to return to the main PLAY mode screen T...

Страница 113: ...center Feedback echo independent settings for left and right channels Two stage pitch change effect Pitch change effect separate settings for left and right channels Three stage pitch change effect D...

Страница 114: ...b Time 0 3 30 0 sec Reverb attenuation time 02 High 0 1 1 0 High range attenuation rate 03 Diffusion 0 10 Reverb diffusion 04 Initial Delay 0 1 200 0 ms Interval before early reflection 05 Width 0 5 3...

Страница 115: ...0 1 1360 0 ms Feedback 1 delay 04 FB2 Delay Time 0 1 1360 0 ms Feedback 2 delay 05 FB Gain 99 99 Feedback level 06 FB1 High control 0 1 1 0 High range characteristics for Feedback 1 07 FB2 High contro...

Страница 116: ...es for pitch change 2 07 2 Fine 100 100 Fine adjustment of pitch change 2 08 2 Delay 0 1 650 0 ms Effect delay for pitch change 2 09 2 FB Gain 99 99 Feedback level pitch change 2 10 2 Level 0 100 Effe...

Страница 117: ...n phase 06 Rch Mod Delay 0 1 100 0 ms Right channel s modulation delay 07 Rch FB Gain 0 99 Right channel s modulation feedback gain 08 Rch Phase 0 330 deg Right channel s modulation phase 23 Chorus 24...

Страница 118: ...om APHEX Systems Ltd 30 Rotary Speaker No Parameter Name Allowable Range Description 01 Mid Speed 0 05 40 0 Hz Middle rotation speed 02 Depth 0 100 Effect depth 03 Transition Time 2 22000 ms Transitio...

Страница 119: ...oice that you want to copy from You can move the cursor using the dial the cursor buttons the program buttons 1 16 or the INC YES and DEC NO buttons 3 Press F1 Audi to enter audition mode The word Aud...

Страница 120: ...al frequency for the equalizer band Gain Sets the gain applied to the frequency specified by Freq Q Sets the bandwidth relative to the center frequency over which gain is applied Bandwidth decreases a...

Страница 121: ...may produce explosive sounds or other undesirable noise You can correct the problem by lowering the Q value or gain value or by adjusting the frequency FYI The Quick Edit EQ functions operate relative...

Страница 122: ...ove the cursor to the voice whose equalizer settings you want to copy You can move the cursor using the dial the cursor buttons the program buttons 1 16 or the INC YES and DEC NO buttons 3 Press F1 Au...

Страница 123: ...TEM or DISK mode You cannot execute storage if the SYSTEM mode s Memory Protect setting is on REFERENCE 2 13 FYI You can use the Store function to copy an existing unedited voice to a different voice...

Страница 124: ...rmation about categories 7 Press F5 Notes to enter a comment If you do not need to change the comment jump to Step 9 The comment entry screen appears 8 Enter a comment Enter a comment of up to 32 char...

Страница 125: ...d the cursor shape changes to an underline Important Editing functions are disabled during comparison The Compare function will not operate if you have not yet edited the voice FYI You can combine Qui...

Страница 126: ...Mode Chapter 2 SYSTEM Mode SYSTEM mode functions affect the sound and operation of the entire system Use these functions to set up the tone generator keyboard action MIDI parameters control numbers a...

Страница 127: ...SYSTEM then select the desired function by pressing the appropriate function button F1 F6 Each function button switches you a different display screen as illustrated below F1 TG Tone generator setting...

Страница 128: ...gs into memory SYSTEM Functions REFERENCE 2 4 REFERENCE 2 6 REFERENCE 2 8 REFERENCE 2 10 REFERENCE 2 12 REFERENCE 2 13 SYSTEM PLAY MODE SYSTEM MODE DISK MODE Information Display Controller Value View...

Страница 129: ...plies the physical controller settings each time you select a new voice Controller Hook Determines how physical controllers become effective after a scene change If the setting is off each physical co...

Страница 130: ...an expected Vibration from the keyboard or a speaker may occasionally cause a controller to shift slightly If Controller Hook is off this shift may cause the controller to become effective producing a...

Страница 131: ...llustrations on the next page normal Velocity increases in proportion to striking force soft 1 soft 2 Light action produces loud sound relative to striking force Suitable for performers with light key...

Страница 132: ...rtant The Velocity Curve setting is meaningful only if Fixed Velocity is set off If you set Fixed Velocity to an unusually low value some voices may become inaudible FYI The Keyboard Transpose Velocit...

Страница 133: ...erator so that playing at the keyboard produces sound from the VP1 If the setting is off the internal connection between the keyboard and tone generator is broken the keyboard cannot produce local sou...

Страница 134: ...hen the RCh setting is used regardless of the Basic Receive Channel setting FYI Set Local to off when you want to use the VP1 as the master keyboard for driving an external device or as a sound source...

Страница 135: ...033 119 Scene Controller 001 031 033 119 Description Use this function to assign MIDI control numbers to the eleven assignable controllers listed above The display is not large enough to show the ent...

Страница 136: ...1 and Foot Controller 1 cannot be changed FYI These settings also affect the control change control number data that the VP1 outputs through the MIDI OUT connector Factory settings for assignable con...

Страница 137: ...onal significance But you can also use the greeting message as a sort of data identification tag as described immediately below If you frequently reload different groups of voices from different flopp...

Страница 138: ...display Use the contrast knob to adjust the contrast as necessary Memory Protect Set this on to disable all load and store operations thereby protecting the current contents of internal memory agains...

Страница 139: ...K Mode This chapter explains the various floppy disk operations supported by the VP1 You can use these functions to save voice and system data to disk to load some or all data from disk into internal...

Страница 140: ...the desired function by pressing the appropriate function button F1 F6 Each function button switches you to the corresponding display screen as illustrated below F1 Lall Load all data from disk F2 Lbn...

Страница 141: ...uter to store and process your data files DISK Functions SYSTEM PLAY MODE SYSTEM MODE DISK MODE Information Display Controller Value View Keyboard Transmit Channel Controller Assign Table Scene Voice...

Страница 142: ...overwrites all data currently existing in the VP1 s internal memory If you want to retain this original data you must save it to a different floppy disk REFERENCE 3 9 before starting the load operatio...

Страница 143: ...cessary See next page Source File Bank Selects the voice bank copied from the floppy disk If you need to change the selection press F8 SRC to move the cursor to this item then change the bank setting...

Страница 144: ...tion bank by pressing the appropriate bank button A D rotating the dial or pressing the INC YES or DEC NO button 5 Press ENTER The screen displays the Are you sure query 6 To proceed press INC YES If...

Страница 145: ...cessary See next page Source File Voice Selects the voice copied from the floppy disk If you need to change the selection press F8 SRC to move the cursor to this item then change the voice setting as...

Страница 146: ...tion voice by pressing the appropriate bank and program buttons A D 1 16 or by using the cursor buttons the dial or the INC YES or DEC NO button 5 Press ENTER The screen displays the Are you sure quer...

Страница 147: ...a disk that already contains a save file the new save file will overwrite the old one If you do not explicitly set a filename the VP1 reuses the name of the existing file on the disk If the disk is n...

Страница 148: ...ering filenames refer to the BASICS section BASICS 3 26 4 Press ENTER The screen displays the Are you sure query 5 To proceed press INC YES If you do not want to proceed press DEC NO or EXIT to cancel...

Страница 149: ...is pushed downward so that the window is open Filenames cannot start with a space If you enter a space in the middle of a filename the space is automatically converted to an underscure character If yo...

Страница 150: ...disk if its write protect tab is set to protect The tab located at the lower right corner on the rear side of the disk casing is in protect position when it is pushed downward so that the window is op...

Страница 151: ...App 1 REFERENCE Appendix Appendix...

Страница 152: ...REFERENCE 1 7 F4 Controller Assign Table Assigns controllers to parameters REFERENCE 1 10 F1 Control Range Determines how parameter values change in response to controller movement REFERENCE 1 12 F5...

Страница 153: ...int for zoned aftertouch REFERENCE 1 36 Sustain Enables or disables Sustain switch operation for each element REFERENCE 1 37 F1 Element Copy Copies an element from any voice to the currently selected...

Страница 154: ...age Sets the greeting message REFERENCE 2 12 F6 Miscellaneous Settings Sets the display mode and scene copy mode and switches memory protection on or off REFERENCE 2 13 DISK DISK MODE F1 Load All Data...

Страница 155: ...ontroller combinations can produce unexpected sound or even total silence If normal sound returns when you move the controllers you may have made an inappropriate scene or controller setting Try chang...

Страница 156: ...the setting to all REFERENCE 2 8 Keys don t produce the expected pitch Check the setting of the Keyboard Transpose parameter REFERENCE 2 6 Check the setting of the Master Tune parameter REFERENCE 2 4...

Страница 157: ...settings correct REFERENCE 1 41 Keys don t produce the expected pitch Is an element s Detune parameter set to a value other than 0 REFERENCE 1 23 Is an element s NoteShift parameter set to a value ot...

Страница 158: ...ood finish generally requires replacement of the entire panel unit Because all panels have a unique appearance the color and grain of the replacement unit will be somewhat different from the original...

Страница 159: ...cement Disk not ready There is no floppy disk in the drive Insert a disk and try again Illegal file The disk file is not a VP1 file Illegal format The floppy disk is unformatted or has been formatted...

Страница 160: ...anual VSC protocol error Problem in communication between the tone generator board and the main CPU This may be a hardware failure Please consult of your Yamaha dealer or one of the authorized distrib...

Страница 161: ...4 band equalizer Memory Internal memory 64 voices 4 banks 16 voices Disk 3 5inch 2HD File holds all initial factory settings 64 voices system data Three download modes all data selected bank selected...

Страница 162: ...240 64 dot backlit graphic LCD LEDs Program Change 16 Red Bank Select 4 Red Play 1 Red System 1 Red Disk 1 Red Store 1 Red Compare 1 Red Scene 1 3 3 Red Green Controller 12 Red Green Quick Edit Value...

Страница 163: ...ut 4 0 dBm 2dBm 10 under load Headphone output 6 5 dBm 2dBm 150 under load Power 74W 120V 220 240V Dimensions and Weight Dimensions 1322W x 456D x 143H mm Weight 28 4kg Accessories Power cable 1 FC7 f...

Страница 164: ...Receiving conditions RCh RCh NOTE OFF 8n NOTE ON 9n CONTROL CHANGE Bn xx PROGRAM CHANGE Cn CH S AFTER TOUCH Dn PITCH BENDER En ACTIVE SENSING CLOCK FE SWITCH REMOTE F0 43 1n RCh Element Receive Channe...

Страница 165: ...65 Poratamento Switch 0 127 Also Modulation Wheel 2 Foot Controller 2 Modulation Ball Scene Controller Continuous Sliders 1 2 Quick Edit Sliders 1 2 3 4 Data for these controllers is output using con...

Страница 166: ...Volume 0 127 64 Sustain Switch 0 127 65 Poratamento Switch 0 127 Also Modulation Wheel 2 Foot Controller 2 Modulation Ball Scene Controller Continuous Sliders 1 2 and Quick Edit Sliders 1 2 3 4 Data...

Страница 167: ...to omni or keyboard If the Element Receive Channel is set to basic and the Basic Receive Channel is set to keyboard the element can be played only through the keyboard it will not respond to incoming...

Страница 168: ...000 F0 01000011 43 0001nnnn nnnn don t care 01000001 41 00000000 00 00000000 00 00000000 00 0ppppppp ppppppp N2 See Table 1 00000000 00 0vvvvvvv vvvvvvv Data Value 11110111 F7 You can use the above ty...

Страница 169: ...PSW 7 SCENE3 41 29 PSW42 QED_SEL_DOWN 7 07 PSW 8 RESERVED 42 2A PSW43 PLAY 8 08 PSW 9 PGM1 43 2B PSW44 SYSTEM 9 09 PSW10 PGM2 44 2C PSW45 DISK 10 0A PSW11 PGM3 45 2D PSW46 COMPARE 11 0B PSW12 PGM4 46...

Страница 170: ...s o o Pitch Bender o o 0 12 semi 7 bit resolution 1 o o M Wheel 1 2 o o Breath cont 4 o o Foot cont 1 Control 7 o o Main volume 64 o o Sustain Change 65 o o Portamento SW 1 31 33 119 o o Assignable 1...

Страница 171: ...Index 1 VP1 OWNER S MANUAL Index...

Страница 172: ...EDs B 3 15 CONTROLLER VALUE VIEW R 1 6 Controllers B 3 8 Copying B 3 30 Cr R 1 12 CS1 and CS2 B 1 3 current R 1 15 Cursor button B 1 5 D DEC NO B 1 5 Detune R 1 23 Dial B 1 5 Direct B 3 4 DISK Mode B...

Страница 173: ...ax Notes R 1 18 Memory Configuration B 3 6 Memory Protect R 2 13 Microtuning R 1 28 MIDI B 1 7 B 1 17 MIDI Data Format R App 14 MIDI Implementation Chart R App 20 MIDI Quick Edit Control B 3 20 MIDI S...

Страница 174: ...oscillating VA B 3 2 Send R 1 41 Send to effects B 3 4 STORE B 1 3 R 1 54 Storing B 3 28 String B 3 2 B 3 3 SUSTAIN B 1 7 Sustain R 1 37 Swapping Scenes R 1 15 Switching the Mode B 3 23 System Data B...

Отзывы: