


33
The Crosspoint grid shows the system sources (horizontal axis) and
system destinations (vertical axis) along with icons indicating connected
signals in an XY grid. The signal name colors match the device colors in
the System Dock. These can be changed using the Blade Preferences
section of the System > Preferences tab.
Connected audio signals are shown by small round dots. The dot colors
indicate signal level (purple = no or low signal, green = normal level
signal, red = high level signal). A single dot indicates a mono connection.
Two dots at a 45° angle indicate a stereo
source connected to a stereo destination.
If there are two dots stacked vertically the
source is mono but the destination is
stereo. Likewise, two horizontal dots
indicate a stereo source connected to a
mono destination.
A square indicates a logic-only
crosspoint. A horizontal red line indicates
that destination is locked which indicates a
default system connection or a signal
connected to a channel that’s currently on.
Connecting Signals
As you mouse over the grid, purple X-Y
crosshairs point to a source and a
destination so you can easily identify
which signals will be connected if you click
once on a crosspoint in the grid. Clicking
on a crosspoint adds an icon to indicate
that connection is now active. To
disconnect a signal, click on an active
crosspoint to silence the destination on an
audio connection or turn off the logic on a
logic crosspoint. As a safeguard, to
prevent accidental connections or
disconnections, you can require that the
CTRL key be pressed when clicking to
make or break a connection. This is set in
the General section of the System >
Preferences tab.
Destinations with a horizontal red line
across the grid indicate they’re locked
from change since they’re actively in-use.
However, a locked signal can be unlocked
by right-clicking on the Destination name
and selecting Unlock Signal from the
context menu.
Note: Use caution when unlocking fader channel destinations.
Locking indicates those channels are currently turned on.
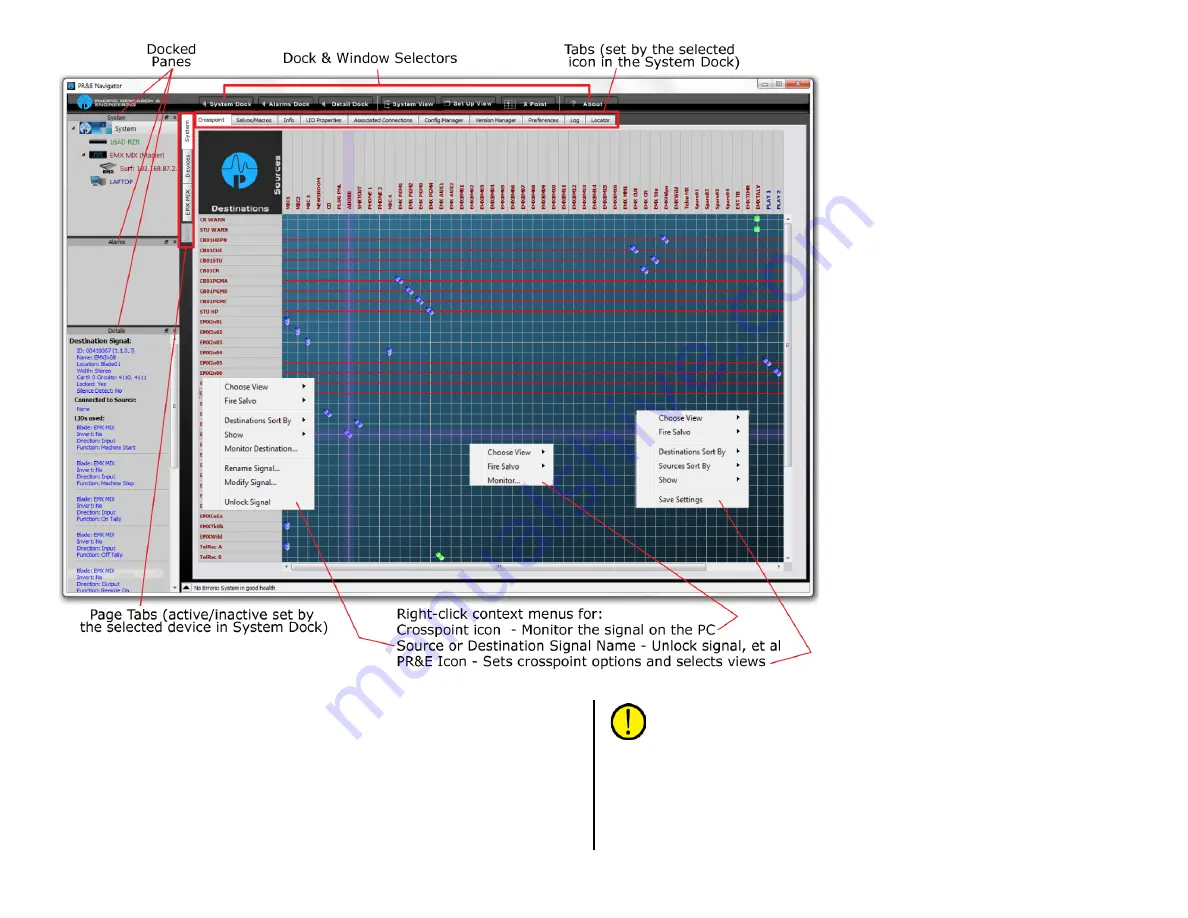
Monitoring the Audio
Right-clicking on an active crosspoint connection; on a source name; or
on a destination name, brings up a context menu (shown in Figure 3-16).
Selecting Monitor, Monitor Source, or Monitor Destination opens a pop-up
Monitor window (Figure 3-17 on page 34) which shows the Source levels
Figure 3-16 PR&E Navigator Controls Overview


