20
3 – PR&E APPS AND EMX CONFIGURATION
he EMX console’s factory-default settings allow it to be
powered up and used straight out of the box. These
default settings are edited, to configure the console for a
specific application, using the PR&E apps on the USB
flash drive that came with the console. These apps can
also be downloaded from this site:
https://wheatstone.box.com/s/bsvjtuie7xpsth3ppaq4nles8ixke945
The three apps: EMX Surface Setup; PR&E Navigator; and PR&E System
Configuration Tool can be installed on any Windows 10, 8, 7, or XP SP3 PC
(henceforth called the “admin PC”). Prior to installing the apps, set that PC
to a fixed IP address in the 192.168.87.0 subnet so that it will be able to
communicate with the EMX console and other PRE-IP devices.
Note: Even though the EMX and the other PRE-IP devices could all
be changed to another Class C subnet, we recommend leaving the
EMX on the default subnet (192.168.87.0) to simplify adding new
PRE-IP devices since all devices use that subnet by default.
We recommend setting the admin PC to 192.168.87.20 with a subnet
mask of 255.255.255.0. This puts it on the same subnet as the PR&E Mix
Engine (default IP address = 192.168.87.101) and the EMX Surface
(default IP address = 192.168.87.201). Connect the admin PC to Port 1,
2, or 3 on the Mix Engine’s Ethernet switch (see Figure 2-3 on page 12 for
the location). The Mix Engine and Surface should already be powered up at
this point and connected to Ports 4 and 5 on the Ethernet switch.
To insure that each application is properly installed, right-click on the
installer icon or its file name and select “Run as Administrator” to install
each app. Accept the default installation settings. Each app adds a shortcut
icon to the desktop. In the Start menu, the apps are located in a
Wheatstone PR&E folder.
EMX SURFACE SETUP APP
The EMX Surface Setup app is used to configure the EMX
Surface. Double-click its desktop icon (shown at right) to start
the app. The app opens displaying the Device Properties tab.
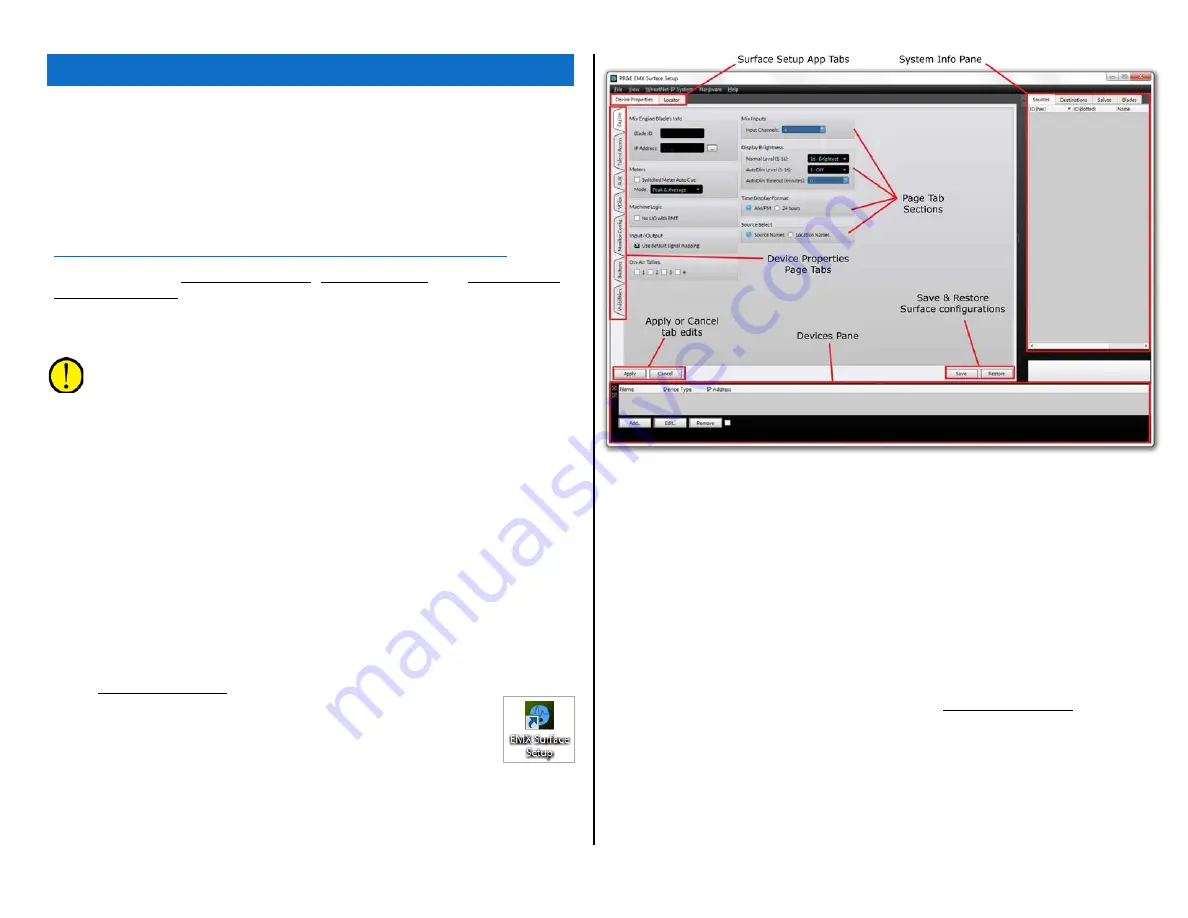
Figure 3-1 shows this tab and identifies the main features of
the app including: the two tabs and seven page tabs; the page
tab sections; the Apply or Cancel and Save or Restore buttons;
and the two additional panes (Devices Pane and System Info Pane) which
can be hidden or displayed, as required, using settings in the View menu
item.
Figure 3-1 EMX Surface Setup app, initial view
Click on the Locator tab to view that tab (shown in Figure 3-2 on page
21). The Locator tab lists every PRE-IP device (EMX and DMX Surfaces,
PR&E Mix Engines, Razor I/O Interfaces, M4IP-USB Blades, and any PCs
running the WNIP audio driver) that are networked with that Mix Engine’s
Ethernet switch. For a new EMX console, only two devices should appear:
the Mix Engine and the Surface, as shown in Figure 3-2.
If no devices are listed, confirm the admin PC, Mix Engine, and Surface
are all plugged into the Mix Engine’s Ethernet switch. Verify that the
correct IP address (192.168.87.20) is shown above the Select NIC…
button. If the app is using the wrong NIC, click Select NIC… to open the
Network Setup window. Click Set NIC… to view the NICs on the admin
PC. Select the correct NIC then click Okay twice to close the window. If the
NIC is changed you must close and reopen the EMX Surface Setup app.
To refresh the Locator’s list of devices, click Refresh. This clears the list
and re-queries the network to display the detected devices.
Clicking on a device row in the Locator pane (the Mix Engine is selected
in Figure 3-2) shows the details for that device in the Set Selected Device
Properties pane. The default settings for each device could be manually
edited, by advanced users, who wish to use a different subnet and assign
their own IP addresses for networking multiple EMX consoles together.
T


