29
Direct Out Pre On
When enabled for the same channel numbers as set in the Bus-Minus /
Direct Out section, the direct out audio is not affected by the channel
on/off status. The audio is always feeding the Direct Out unless Direct Out
Pre Fader is also unchecked, then the channel fader affects the level going
to the Direct Out. When unchecked the Direct Out audio follows the
channel on/off status.
Monitor Config Page Tab
The Monitor Config page tab settings affect the Control Room (CR OUT),
Studio (STU OUT), and Headphone (HDPN OUT) monitor outputs on the
Mix Engine. The Headphone setting also affects the headphone jack on the
Surface. Each output has independent settings for Cue Defeat and Level
Locked. Typical settings are shown in Figure 3-12 where cue feeds the
headphones but no other output and all outputs are controlled by the
Monitor Control panel level controls.
Figure 3-12 Monitor Config Page Tab, Typical Settings
Cue Defeat - When checked, cue does not affect that output. Normally this
is checked for the Control Room and Studio and unchecked for the
Headphones. When unchecked, and cue is active, stereo cue replaces the
selected monitor audio in the Control Room and Studio. When Cue Defeat
is unchecked in the Headphones, cue feeds that output in stereo if the
Split Cue button on the Monitor Control panel is unlit. When that button is
lit (Split Cue mode) cue is summed in the left ear and the selected monitor
source is summed in the right ear.
Level Locked - When checked, and Apply is clicked, the current level
setting for that output (CR fader, HDPN fader, or Studio encoder) is fixed
at that output level. The Monitor Control panel control no longer affects
the output level.
The Level Locked setting is not typically used on the Control Room. Level
Locked would be used for a Studio if the studio host has their own level
control for the studio speakers. Level Locked would be used on the
Headphone output when an external headphone amp is connected and
there are cabinet-mounted headphone jacks and level control for the board
operator and guests. In this case the Surface headphone jack would not be
used since it would also be at a fixed level.
Buttons Page Tab
The Buttons page tab is used to assign a function to the Soft Buttons
on each fader channel and the Spare Buttons on the Monitor Control
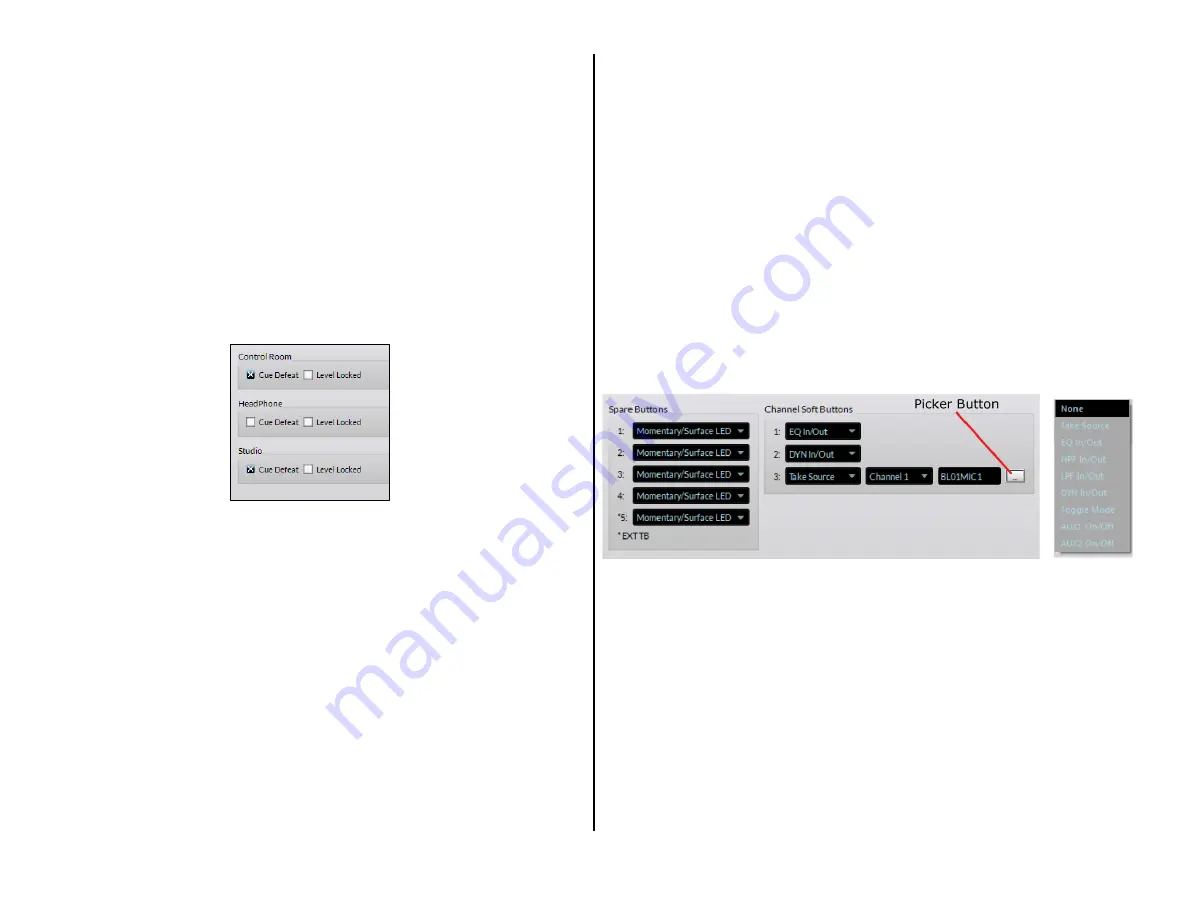
panel. Figure 3-13 shows the various settings that can be assigned to each
Spare and Soft button. The default setting for the Spare and Soft buttons
is None (no action) so these buttons have no function until assigned on
this page tab.
Channel Soft Button Settings
The three Soft Buttons on the fader channels have one setting applied
across all channels except for the Take Source setting, which has a
unique setting for each channel. Typically, the top two buttons (Soft 1 and
Soft 2) are assigned to toggle two Advanced Channel Features in/out or
on/off, while Soft 3 is often set as a “Hot Source Selector.” But, all three
buttons could be set as Hot Source Selectors or all three could be set to
control three Advanced Channel Features.
Figure 3-13 Buttons Page Tab Assignments
Each Soft button selection box has a drop-down list (displayed in Figure
3-13, right) to select its function. Setting a Soft button to any selection,
other than Take Source, assigns that function to every channel. In Figure
3-13, Soft 1 is assigned to toggle EQ In/Out. Soft 2 is set to control
another Advanced Channel Feature in/out while Soft 3 is set for Take
Source, which on channel 1 will take Mic 1 to that channel when pressed.
When Take Source is the selected action, a Channel Select drop-down
list box; a source name display; and a Picker button appear in-line with
Take Source. Select a channel then click the Picker icon to open the
Source Picker window (shown in Figure 3-10 on page 27). Double-clicking
a source name in the Picker window sets it as that channel’s “Hot Source
Selection.” Its name then appears in the source name display, replacing
the default NoSource setting. Repeat this process for each channel that
needs a hot source assigned.


