31
visible. On fader channels with a “regular source” that might not be used
very often, like a CD player, assigning a handful of alternate sources to be
visible adds flexibility to those fader channels.
Most users will typically set up two or three fader channels (often the
ones closest to the Monitor Control panel) with every source visible that
might need to feed to air or need to be recorded. Of course, this would still
exclude signals like the PGM buses, bus-minus signals, logic signals, off-air
tuners, and any processed pre-delay monitor signals.
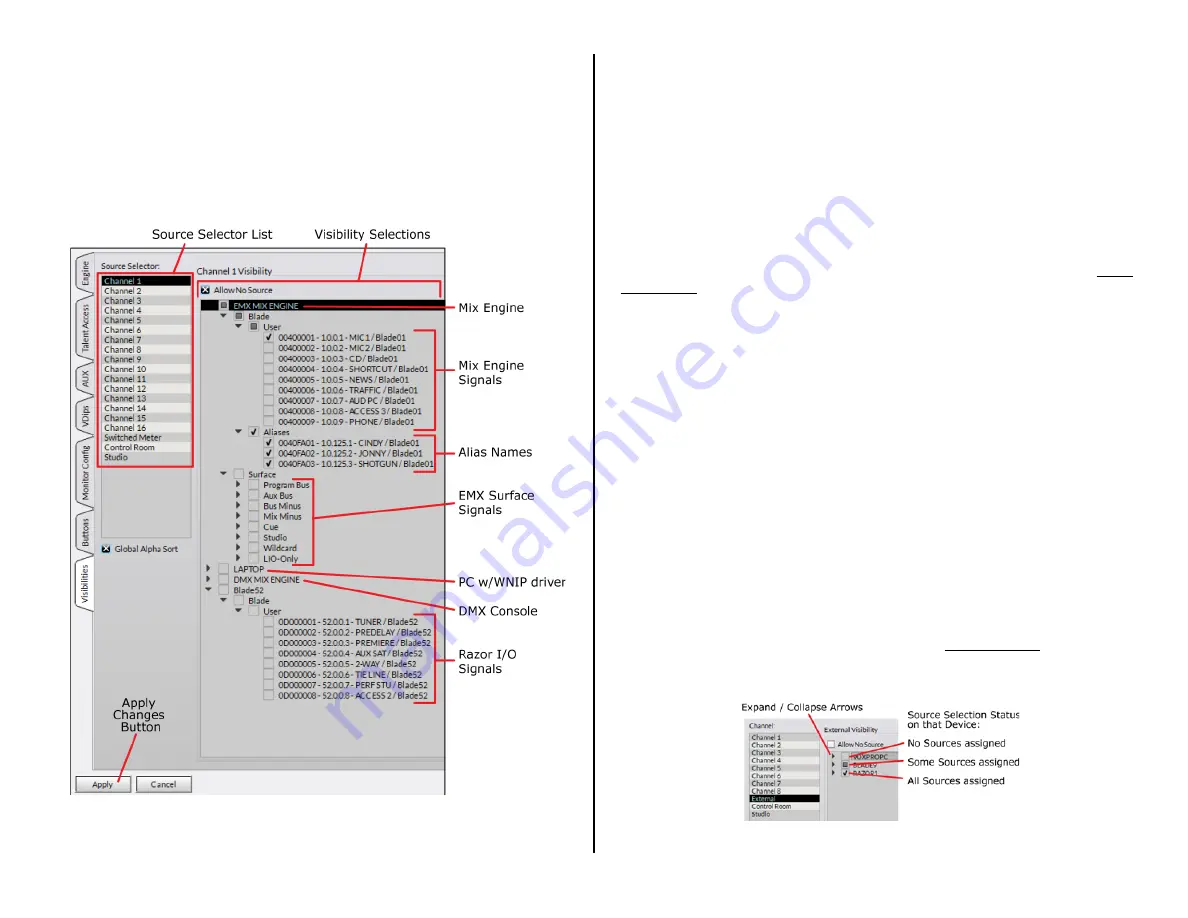
Figure 3-14 Visibilities Page Tab Settings
Telco Device Visibilities
Every fader channel creates a bus-minus signal which means any
channel can have multiple Telco devices set as visible, and any Telco
device could be set visible on multiple or even all channels. In practice
however you’ll still want to limit the visibility of your Telco devices (phone
hybrids, codecs, etc.) to either dedicated or to appearing on just a few
channels. This will make life easier since there will be less chance of those
devices getting the wrong return feed connected to them.
When the board operator takes a Telco device on a channel, the From
Network audio is connected to the channel. But the To Network return
audio must still be connected from that channel’s bus-minus to the Telco
device. This can be done manually using Screenbuilder to create an on-
screen Mix-Minus selection screen; by using a button panel; by using PR&E
Navigator’s Crosspoint grid; or by using a salvo to set the bus-minus to
Telco connection. But it can also be done automatically by creating
Associated Connections for that Telco device so that no matter which fader
it connects to it will always get the correct mix-minus signal. See page 35
about using Associated Connections with Telco devices.
Setting the Source Visibility List
In the Source Selector List click on a channel or on one of the three
monitor selectors (Switched Meter, Control Room, or Studio) to view the
current settings for that source selector in the Visibility Selection list. The
Visibility list title adds the active channel/monitor/meter selector name.
When first opened, all devices are shown collapsed with boxes indicating
whether any sources are selected on that device (Figure 3-15). An empty
box means no signals are selected; a filled box indicates at least one signal
is selected; and a checked box indicates that all signals are selected (the
default setting for a new EMX console). Clicking on a right-facing arrow
expands that device (the arrow then points down). Sub-categories (Blade,
User, Surface, etc.) are expanded in like manner until you reach the
source names, as shown in Figure 3-14. The sub-categories and devices
can be selectively collapsed by clicking their down-facing arrows, which
then point right again. The current view is maintained when selecting a
different channel or monitor selector—until the Surface Setup app is
closed. Reopening the app will again show all devices as collapsed like in
Figure 3-15.
Figure 3-15 Visibilities Controls


