Warning:
To prevent burn injuries, set the column temperature to Off, and then allow
the column compartment and its components to cool for 60 minutes before touching
them. Monitor the column compartment's internal temperature to ensure that all
components are cool.
Warning:
To avoid personal contamination with biologically hazardous or toxic compounds,
wear clean, chemical-resistant, powder-free gloves when performing this procedure.
Warning:
To avoid eye injury, use eye protection when performing this procedure.
Required tools and materials
• Chemical-resistant, powder-free gloves
• Protective eyewear
• #1 Phillips screwdriver
• 1/4-inch open-end wrench
• 1/2-inch open-end wrench
• Column gripping tool
• Replacement column stabilizer assembly
To replace the column-stabilizer assembly:
1.
Stop any running mobile phase.
2.
Open the fluidics compartment door of the sample manager.
3.
Use the 1/4-inch open-end wrench to disconnect the column-stabilizer-inlet tubing from
port 6 of the sample manager's injection valve.
4.
After allowing sufficient time for cooling, open the column compartment door.
5.
Remove the column from the column-stabilizer assembly.
Note:
For instructions on removing the column, see
Removing a column connected to a
.
6.
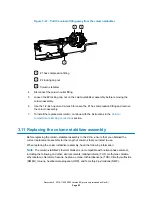
Use the #1 Phillips screwdriver to loosen the two screws that fasten the column-stabilizer
assembly to the trough.
7.
Remove the assembled column stabilizer.
8.
Set aside the column-stabilizer assembly for discarding.
9.
Unpack the new column-stabilizer assembly.
10. Remove the O-ring retainer from the inlet end of the column-stabilizer-inlet tubing and
connect the inlet tubing to port 6 of the sample manager injection valve.
December 4, 2019, 715005052 Version 02 (previously released as Rev.B)
Page 83

