To replace the APH assembly:
1.
Stop any running mobile phase.
2.
Open the fluidics compartment door of the sample manager.
3.
Using the 1/4-inch open-end wrench, disconnect the long, flat compression-screw end of
the APH assembly from port 6 of the sample manager injection valve.
4.
After allowing sufficient time for cooling, open the column compartment door.
5.
Gently pull the APH assembly from its retainer and remove the assembled APH assembly,
column (or column and in-line filter), and column-outlet tubing in their entirety from the
compartment.
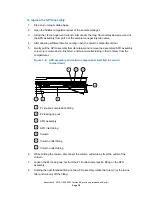
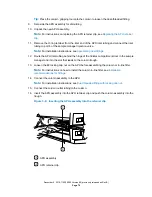
Figure 3–8: APH assembly and column components installed in column
compartment
#1 knurled compression fitting
#2 locking cap nut
APH assembly
APH inlet tubing
Column
Column outlet fitting
Column outlet tubing
6.
While holding the column, disconnect the column outlet tubing from the outlet of the
column.
7.
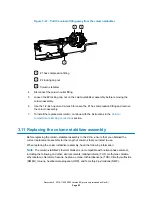
Loosen the #2 locking cap nut from the #1 knurled compression fitting on the APH
assembly.
8.
Holding the dual-threaded fitting on the APH assembly, rotate the column (or the in-line
filter and column) off the fitting.
December 4, 2019, 715005052 Version 02 (previously released as Rev.B)
Page 78


