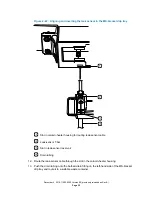
Figure 2–3: Securing the CH-A to the sample manager
Sample manager's rear panel studs extended through slots in the CH-A back plate
Opening in the CH-A back plate aligned with the threaded opening in the center of
the sample manager's rear panel
9.
From the CH-A start-up kit, obtain the TORX screw with nylon washer.
10. Insert the TORX screw with nylon washer through the CH-A back plate and into the
threaded opening in the sample manager's rear panel.
11. Using the T20 TORX driver, tighten the screw to secure the CH-A chassis to the sample
manager's rear panel.
Result:
The CH-A chassis is firmly secured to the sample manager's chassis and is
placed so that any leakage from the column compartment drains from left to right into the
sample manager's upper drip tray.
Tip:
For column-compartment leak detection when the CH-A is installed onto the system
stack, you must install the leak sensor in the sample manager's upper drip tray and insert
the leak-sensor cable connector into the upper-leak-sensor receptacle in the front of the
sample-manager chassis.
2.2 Extended column compartment installation
For an extended column compartment installation, the CH-A module's rear enclosure is secured
to the sample manager's chassis. The column heater is installed in a separate housing, mounted
on an extension bracket that places the column heater on the right-hand side of the system stack,
in proximity to the mass spectrometer inlet. To reconfigure a standard column compartment
installation to an extended column compartment installation, perform these tasks:
December 4, 2019, 715005052 Version 02 (previously released as Rev.B)
Page 21


