67
BarcodeGuy.com® - UnionNet SP2100 User’s Guide
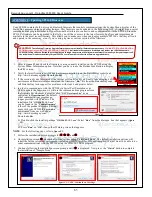
Device is Ready to Use
” (
figure F5
). To check if you’ve missed the message, click on the arrow on the System
Tray. If the driver installed correctly, you’ll see the USB icon with a checkmark next to it not the moving green
ball on the computer which means Windows is still searching / installing the driver (
figure F5
).
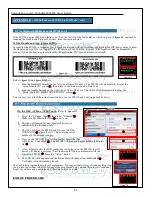
9.3 Before continuing, press the “start” icon on the PC and type “Device Manager” into the search bar and start
Device Manager. Find the “Ports” icon in the System Tree and click on it. Verify the COM port assigned to the
”
AT91 USB to Serial Converter
” entry and make a note of the port number (
figure F5
) . You will need it when
you run the
SIMPLE TERM
program installed in
Step 7
.
2
4
3
APPENDIX F
-
Updating SP2100 Firmware, con’t
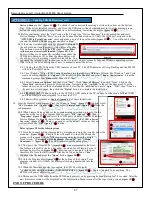
figure F6
9.4 If the driver installed successfully, proceed to
Step 10
.
If
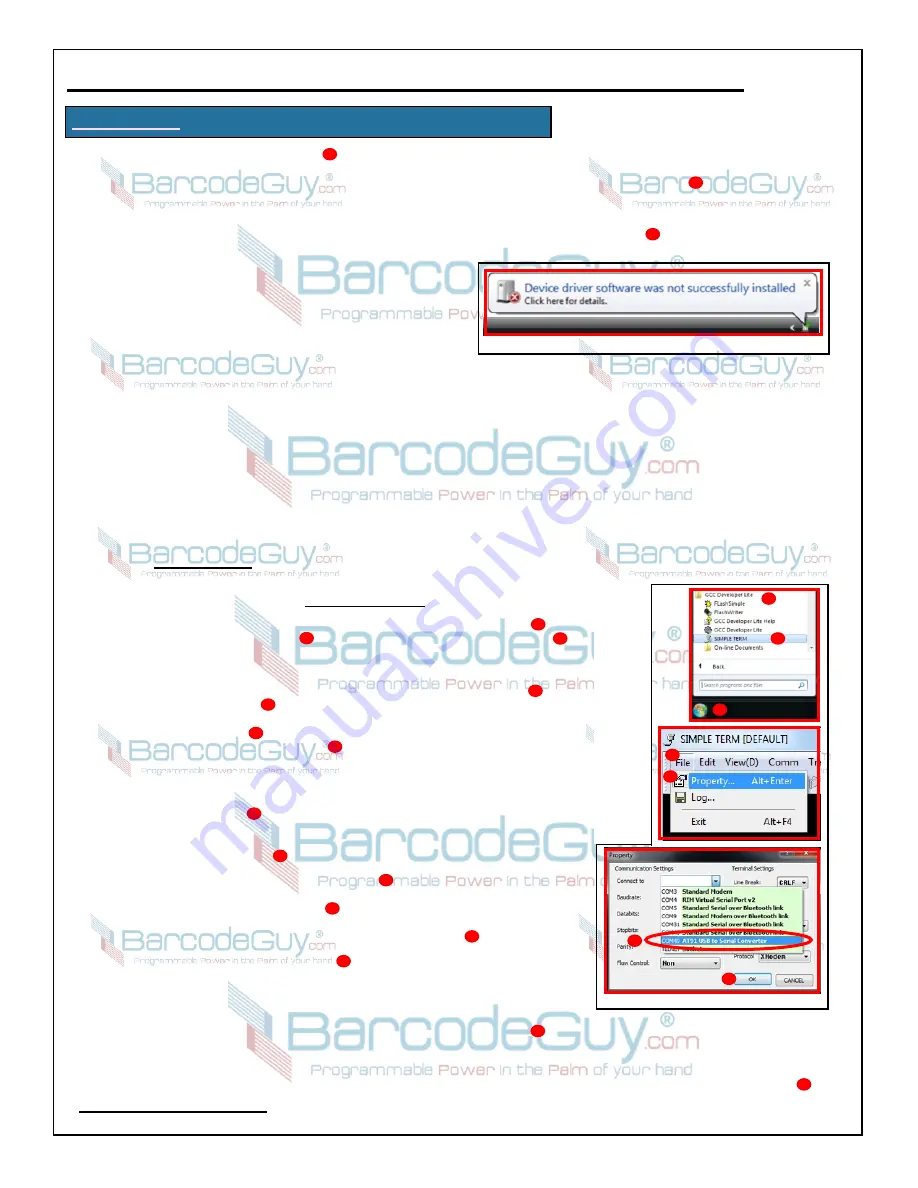
the driver did not install properly, you will see a System
Tray balloon down by the clock that says “
Device driver
software was not successfully installed
”
(
figure F6
). The
driver will have to be manually installed from either the
SP2100 kits Resouce CD or from the BarcodeGuy web
site at http://www.barcodeguy.com/Downloads.htm. You
can check the internet to get instructions on how to install a driver manually for your Windows operating system.
What follows is a brief description of how to manually install the driver.
9.4.1 Unplug the SP2100 from the USB conector of your PC. The LED indicator will stop flashing and the SP2100
will be in Power-Off mode.
9.4.2 For Windows XP, go to the Control Panel and run the Add New Hardware Wizard. For Windows 7 and Vista,
create a desktop shortcut to “
Cmd.exe
”. Then right-click the shortcut and select “
Run as Administrator
”. From the
command prompt, run “
Hdwwiz.ex
e
” then click “
Next
”.
9.4.3 Select “
Advanced Options
” and then click “
Next
”. Click “
Show all Devices
” then click “
Next
”. Click on the
“
Have Disk
” option, and press the Browse button. Navigate to the “
\sp-2100\
” folder of the Resource CD or the
folder where you stored the downloaded driver, Select the file “
6119.inf
” and press “
Open
”, “
OK
”, then “
Next
” on
the next two wizard pages, then click the “
Finish
” button to complete the installation.
9.4.4
IMPORTANT!
When you plug in the SP2100’s USB cable to the PC, be sure to either use a different USB
port than what you used originally, or reboot the PC!!!
9.4.5 Restart this procedure at
Step 8 of Appendix F
of these instructions.
figure F7
2
1
4
3
5
6
7
10. Start the Simple Term program. Press the Windows “
Start
” (
figure F7
) button, select
“
GCC Developer Lite
” (
figure F6
), then select “
Simple Term
” (
figure F7
) from the
sub-programs.
10.1
When Simple Term opens, set the communications port and protocols. On the
menu bar at the top of the program window, press “
File
” (
figure F7
), then
“
Properties
” (
figure F7
) and select the COM port you noted from the Windows
Device Manager in
Step 9.3
that will have the description ”
AT91 USB to Serial
Converter
” (
figure F7
). There is no need to set the default values, as they are
correct. Press the “
OK
” (
figure F7
) button.
Refer to
figure F8
for the following steps
10.2 Press the connect button, represented by a telephone icon in the icon bar under the
2
1
4
3
5
6
7
menu bar (
figure F8
). Simple Term will connect to the SP2100 and the
scanner will respond with the following message displayed on the Simple
Term screen: “
[Unionnet SP-2100 Bootloader Version.1.0]
” and “
<Please
Downloader.>
” (
figure F8
) The LED indicator will be solid green.
10.3 Now press the “Transfer To” (
figure F8
) icon represented as the first
file folder on the left in the icon bar under the menu bar of Simple Term. A
dialogue box will open (
figure F8
), allowing you to navigate to the new
firmware file. Note that all firmware files have a file extension of “
bin
”.
Highlight the file and press the “
Open
” button (
figure F8
).
10.4 Note the Progress Bar (
figure F8
)at the bottom of the Simple Term
program window. It will show the firmware file being transferred into the
SP2100.
10.5 When the firmware transfer is complete, the SP2100 will display
“
<COMPLETED DOWNLOADER.> <NOW POWER OFF.>
(
figure F8
). There is no need to do anything. The
SP2100 will power off on its own.
10.6 Disconnect the USB cable from the SP2100 and power it on by pressing he Scan Button for 3-5 seconds. After the
new firmware version will be displayed on the Information Menu screen after the logo startup screen (
figure F8
).
END OF PROCEDURE
2
1
4
3
5
6
7
8
Содержание SP2100
Страница 64: ...64 BarcodeGuy com UnionNet SP2100 User s Guide APPENDIX E Android UniLinker and SP2100 in SPP Mode ...
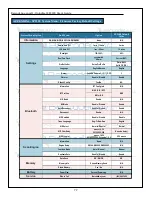
Страница 69: ...69 BarcodeGuy com UnionNet SP2100 User s Guide APPENDIX G SP21001D Scan Engine Symbology Default ...
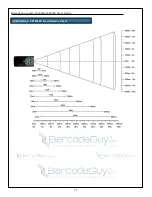
Страница 71: ...71 BarcodeGuy com UnionNet SP2100 User s Guide APPENDIX I SP21001D Scan Distance Chart ...

