Note:
Strike the circumference of the ring gear both sides with a copper hammer by turning the ring gear
manually,and check to see that the backlash remains unchanged.The backlash should be checked at
four points 90 degrees apart to each other.
ⅲ
ⅲ
ⅲ
ⅲ
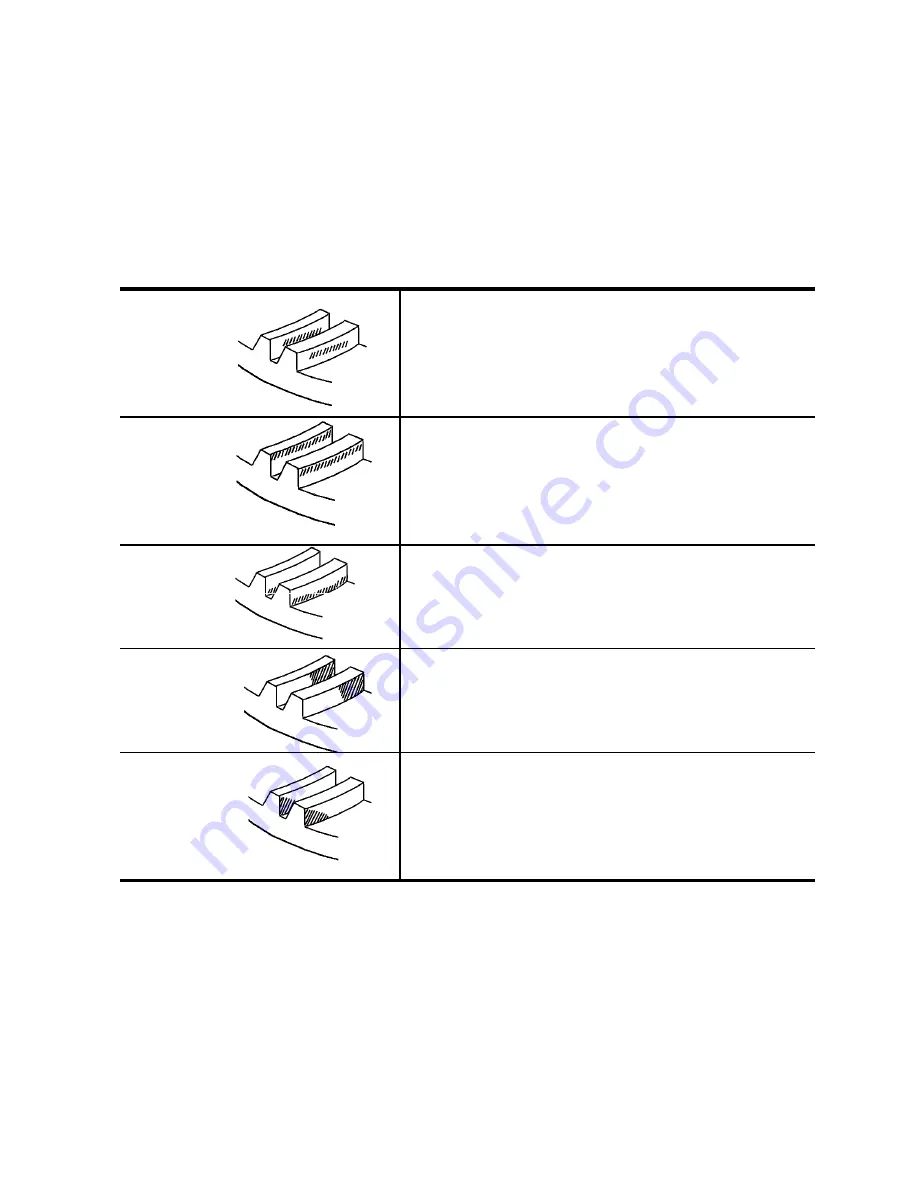
.inspection of the tooth bearing
Apply an even coat of oil-dissolved minimum on the drive pinion teeth and turn the drive pinion on
the ring gear to check the tooth bearing by observing the bearing traces on the ring gear.
Correct Contact
When drive pinion and ring gear are meshed correctly
with each other and their backlash is within specified
range,contact is in middle of ring gear tooth and is
approximately
75% of total
tooth width.
Tip contact
Excessive backlash.Move differential case and shims
from right side to left side.See”Assembly and
installation”.
Root contact
Inadequate backlash.Move differential case shims from
left side to right side.See”Assembly and installation”.
Toe contact
Too little engagement.Remove some drive pinion support
shims.See Transmission:REAR TRANSMISSION
ASSEMBLY-Setting cone center.
Heel contact
Too much engagement.Add some drive pinion support
shims.See TRANSMISSION:”REAR TRANSMISSION
ASSEMBLY-Setting cone center.”
INSTALLATION OF A NEW PAIR OR RING GEAR AND DRIVE PINION
1.use a new pair of ring gear and drive pinion delivered from the manufacturer.Never mix its
components with those of other pairs.
Note:
Every ring gear-dive pinion pairs is adjusted and inspected for tooth contact individually at factory.
2.Adjust the backlash between the ring gear and drive pinion to be 0.1-0.2mm(0.004-0.008 in) by
shimming the drive pinion metal and right and left dif-case metal and make sure that their tooth
contact is proper
5-22
Содержание T233 HST
Страница 14: ...1 11...
Страница 15: ...1 12...
Страница 22: ...SECTION 3 GEAR TRAIN DIAGRAMS FIG 1 3 GEAR TRAIN DIAGRAM 1 19...
Страница 33: ...SECTION 2 OPERATION CHART FOR DISASSEMBLY AND REASSEMBLY BY MAJOR BLOCKS 2 4...
Страница 60: ...3 HST main pump case 4 5...
Страница 64: ...6 Hydrostatic system schematic 4 8...
Страница 100: ...3 Rear transmission case 5 15 Fig 5 23...
Страница 121: ...Power Train Diagram Fig 5 60 5 36...
Страница 210: ...SECTION 6 WIRING DIAGRAM 10 12...


