background image

2 PRINTING FROM WINDOWS

42    Setting Up Print Options

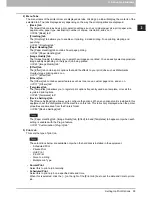
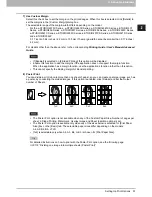
7) Number of Copies

This sets the number of printed copies.

The selectable range of the number of copies differs depending on the model.
- For the e-STUDIO6570C Series, e-STUDIO6550C Series, e-STUDIO857 Series and e-STUDIO856 

Series Series
1 copy to 9,999 copies 

- Other models

1 copy to 999 copies

8) Orientation

This sets the paper printing direction.

-

Portrait

 — The document is printed in the portrait direction.

-

Landscape

 — The document is printed in the landscape direction.

9) Color

This sets whether a print job is printed in the color or black mode.

-

Auto

 — Select this to determine the color mode automatically. When a print job is a black and white 

document, the system automatically prints the document in the black mode. When a print job is a color 
document, it prints the document in the color mode.

-

Color

 — Select this to print a document in the color mode.

-

Black and White

 — Select this to print a document in the black mode.

-

Twin Color

 — Select this to print a document in the twin color mode. When this is selected, click 

[Details] to specify the color that the non-black part of document will be printed in. You can select either 
[Red], [Green], [Blue], [Cyan], [Magenta], [Yellow], or [White].

For instructions on how to print color images with the [Black and White] or [Twin Color] setting, see the 
following page:

 P.110 “Printing color documents in gray scale”

 P.111 “Printing color documents in twin colors”

The setting contents in [Color] are enabled only when your equipment is a multifunctional digital color 
system (color MFP).

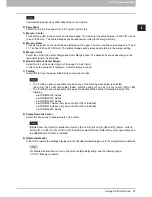
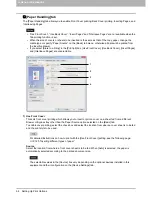
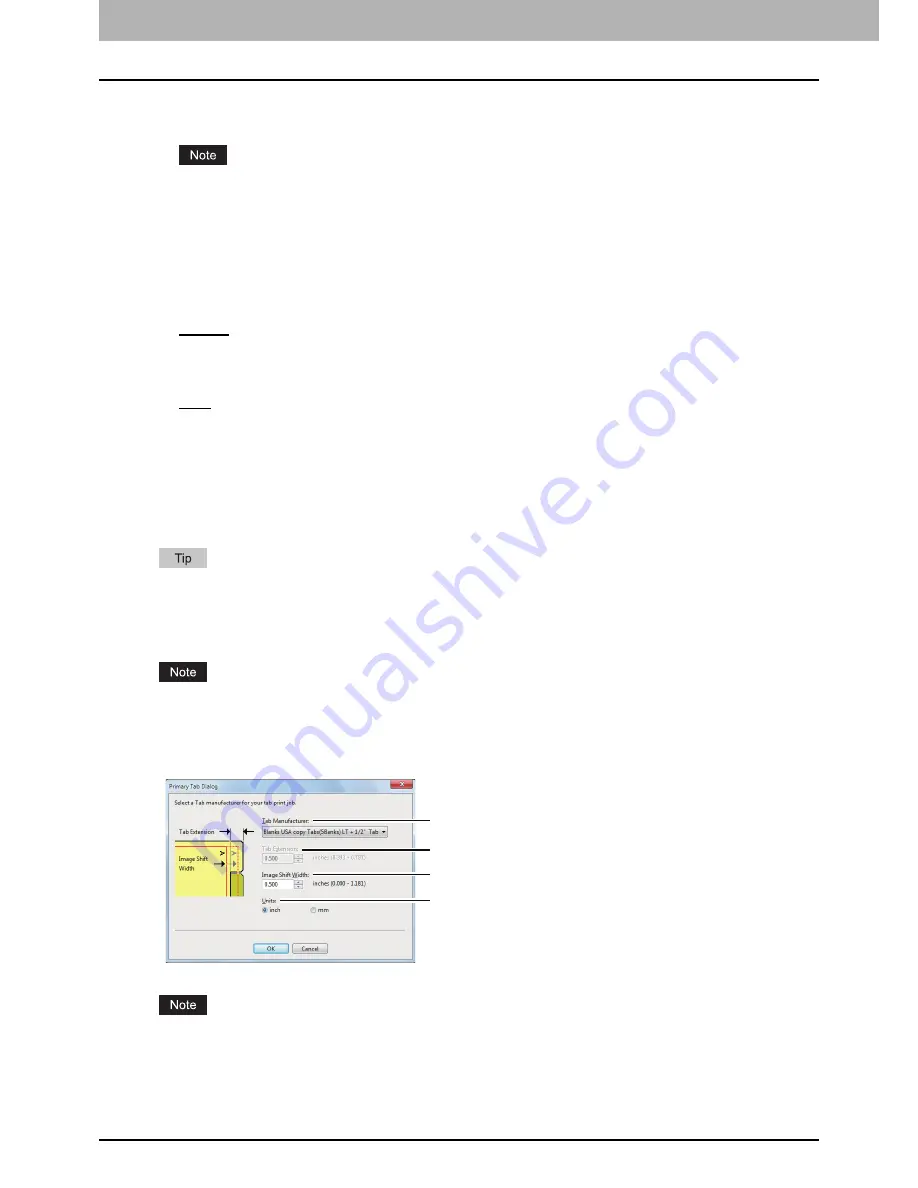
Primary Tab Dialog

Tab printing is not available to some models.

3

4

2

1

Содержание e-STUDIO305CP

Страница 1: ...MULTIFUNCTIONAL DIGITAL COLOR SYSTEMS PRINTER Printing Guide ...

Страница 2: ... 2014 TOSHIBA TEC CORPORATION All rights reserved Under the copyright laws this manual cannot be reproduced in any form without prior written permission of TTEC ...

Страница 3: ...n how the equipment is used such as the status of the installed options the OS version and the applications If you use Windows Server 2008 R2 refer to the operation procedure for Windows 7 though the screens or the menu names etc may differ In this manual the screens and the operation procedures in Macintosh are described for Mac OS X 10 6 x and Mac OS X 10 8 x The details on the screens may diffe...

Страница 4: ...rks of Microsoft Corporation in the US and other countries Apple AppleTalk Macintosh Mac Mac OS Safari iPhone iPod touch and TrueType are trademarks of Apple Inc in the US and other countries AirPrint AirPrint logo and iPad are trademarks of Apple Inc IOS is a trademark or registered trademark of Cisco in the U S and other countries and is used under license Adobe Acrobat Reader and PostScript are...

Страница 5: ...all copies DISCLAIMER OF WARRANTY Software is provided AS IS without warranty of any kind either express or implied including but not limited to the implied warranties of merchantability fitness for a particular purpose title and non infringement TTEC disclaims any warranty relating to the quality and performance of Software If Software proves defective You and not TTEC shall be responsible for th...

Страница 6: ...to work with only genuine toner and or ink cartridges and developer components in the case of a laser printer made by the manufacturer of this printer for the life of the patented printer Under license of this printer you agree to 1 use only genuine toner and or ink cartridges made by the manufacturer of this printer with this licensed printer except as otherwise provided below 2 if the patented p...

Страница 7: ...rmation regarding the availability of these regular cartridges Fuser Imaging Unit License Single Use Please read before opening Opening this package the patented fuser and or imaging unit inside confirms your acceptance of the following license agreement The patented fuser and imaging unit are each sold at a special price subject to a patent restriction that each be used only once Following the in...

Страница 8: ......

Страница 9: ... Printing From Application 23 Considerations and limitations 23 How to print 23 Setting Up Print Options 27 How to set up 27 Print options 34 Printing With Best Functions for Your Needs 97 Printing various print job types 97 Layout and finishing options in Basic tab menu 109 Layout and finishing options in Finishing tab menu 111 Finishing options in Paper Handling tab menu 120 Finishing options in...

Страница 10: ...8 CONTENTS ...

Страница 11: ...1 OVERVIEW This section provides an overview of the printing functions Features and Functions 10 About Printer Drivers 12 ...

Страница 12: ... sort group fold and staple your documents including saddle stitching and punch binding holes Available functions differ from model to model Sophisticated Document Layout and Assembly Options You can choose whether to print your document as you have set it up in the application or to impose printer driven document layout options such as printing in Book Format or printing Multiple Pages per Sheet ...

Страница 13: ...Draft and Original Several watermarks have been pre defined for use with your documents or you can create and save your own custom watermarks Watermarks consist of text Image Overlays can be any combination of text graphics or other document elements Printing watermarks consumes fewer resources than using Image Overlays so you should use watermarks wherever possible particularly when printing spee...

Страница 14: ...1 OVERVIEW 12 About Printer Drivers About Printer Drivers Printer driver is included in the Install Disc For instructions on how to install it refer to the Software Installation Guide ...

Страница 15: ...to print 23 Setting Up Print Options 27 How to set up 27 Print options 34 Printing With Best Functions for Your Needs 97 Printing various print job types 97 Layout and finishing options in Basic tab menu 109 Layout and finishing options in Finishing tab menu 111 Finishing options in Paper Handling tab menu 120 Finishing options in Effect tab menu 123 Using various types of paper 128 Switching equi...

Страница 16: ...ode before printing Notice for e STUDIO305CS Series e STUDIO385S Series e STUDIO525P users Only the Universal Printer 2 PCL6 printer driver is supported The Universal Printer 2 PostScript Universal PS3 and Universal XPS printer drivers are not supported TopAccess is not available Select Generic Model on the Device Settings tab When Generic Model is selected the following functions of Universal Pri...

Страница 17: ...setting you can obtain the configuration data of options automatically when the printer driver is installed If SNMP communication between this equipment and your computer is not available or you want to configure options manually see the following page P 16 Configuring options manually When SNMP communication between this equipment and your computer is enabled you can retrieve the option configura...

Страница 18: ...equipment and then click Printer properties in the File menu The printer driver properties dialog box appears For Windows Vista Windows Server 2003 Windows Server 2008 click Properties in the File menu and select the printer driver for this equipment If the File menu is not displayed press Alt If the dialog box displayed does not allow the printer driver properties to be changed follow the procedu...

Страница 19: ...er Hanging Finisher Inner Finisher Job Separator or Offset Tray is installed Hole Punch Unit This sets whether or not the Hole Punch Unit is installed External LCF This sets whether or not the External Large Capacity Feeder is installed Inserter Unit This sets whether or not the Inserter Unit is installed Automatic Duplexing Unit This sets whether or not the Automatic Duplexing Unit is installed H...

Страница 20: ... of paper that is loaded in the Large Capacity Feeder when it is installed External LCF Select the size and type of paper that is loaded in the External Large Capacity Feeder when it is installed Bypass Tray Select the type of paper that is loaded in the Bypass Tray Override Application Paper Source Settings Select this check box to use the paper source setting in the printer driver rather than th...

Страница 21: ... the steps below to access the printers folder on Windows 8 Windows Server 2012 1 Move the cursor to the upper right corner or lower right corner of the computer screen and then select Start in the menu that appears The Start screen appears 2 Right click in the blank area in the Start screen and then click All apps that appears The Apps screen appears ...

Страница 22: ...2 PRINTING FROM WINDOWS 20 Before Using the Printer Driver 3 Click Control Panel The All Control Panel Items screen appears 4 Click Devices and Printers The Devices and Printers folder appears ...

Страница 23: ... option in the Basic tab of printer driver How the equipment performs printing for an invalid department code print job for which an invalid department code is specified varies depending on the Invalid Department Code Print Job setting that can be set in the TopAccess Administrator mode and whether SNMP communication is enabled or not When SNMP communication is enabled and Invalid Department Code ...

Страница 24: ...ent code must consist of one byte characters such as numbers from 0 to 9 letters of the alphabet from A to Z both capital and small ones a hyphen an underscore _ and a period 4 Click Apply or OK to save the settings Copying the PPD file for Windows The Install Disc contains a printer description file for popular Windows applications For applications not allowing the automatic installation of PPD f...

Страница 25: ... options such as the orientation need to be set from the application For print options that can be set from both the application and the driver refer to the manual of the application The model below does not support printing from Universal PS3 and Universal XPS printer drivers but only from a Universal Printer 2 PCL6 printer driver e STUDIO2551C Series Cautionary points when using the Universal PS...

Страница 26: ... may be different depending on the application that you are using See your application s manual about displaying the printer properties dialog box 3 Setting the print options on each tab according to how you want to print Setting the print options varies depending on how you want to print a document P 34 Print options You can also set the print options using setting profiles P 28 Setting print opt...

Страница 27: ...ur user name and password before printing a document When the dialog box below appears enter your user name and password and then click OK Up to 128 characters can be entered in the User Name box and up to 64 characters in the Password box The values entered in the above boxes are not stored Therefore you must enter your user name and password every time you print a document You can make settings ...

Страница 28: ...e Server Name box on the Others tab before printing a document If you attempt to send a print job without specifying an LDAP server the Specify LDAP Server dialog box will appear to ask you to do so In this case specify the desired LDAP server in the Server Name box and click OK to send the job You can make settings for LDAP authentication on the Device Settings tab P 90 Setting up LDAP servers ...

Страница 29: ...options as initial values For operations on Windows 8 or Windows Server 2012 see the following section P 19 Accessing the printers folder on Windows 8 Windows Server 2012 How to display Windows 7 1 Click the Start menu and select Devices and Printers 2 Select the printer driver of your equipment click the File menu and select Printing Preferences If the File menu is not displayed press Alt How to ...

Страница 30: ...Saving profile Once you save a profile you can apply its settings to a print job P 29 Loading profile You can also delete unnecessary profiles P 30 Deleting profile Saving profile You can register up to 20 profiles including 5 default profiles for each printer driver You can delete the default profile or overwrite it by changing its contents and saving it under the same name 1 Configure the print ...

Страница 31: ...ile If you want to register this temporary profile delete unnecessary profiles first and then select Temporary Profile to recall this profile and click Save Profile to save it You cannot specify None for the profile name 4 The profile is saved Loading profile 1 Select a profile in the Profile box The setting options in the profile are reflected on each tab To restore the default settings after you...

Страница 32: ...M WINDOWS 30 Setting Up Print Options Deleting profile 1 Select the profile that you want to delete in the Profile box and click Delete The Confirm Delete dialog box appears 2 Click Yes to delete the selected profile ...

Страница 33: ...g box for selecting Template Buttons to appear automatically upon printing P 31 Saving a profile to the Template Button You can apply the saved profile to a print job by selecting the Template Button upon printing P 32 Printing with profiles in a Template Button You can delete a Template Button if it is no longer required P 33 Deleting a profile saved in a Template Button Saving a profile to the T...

Страница 34: ...elect a Template Button that is already registered the profile saved in this button is replaced with a new one 7 Click Save and then OK The chosen profile is saved in the selected Template Button 8 Click OK on the Template tab The saved profile is registered Printing with profiles in a Template Button 1 The Templates dialog box appears automatically when printing is started ...

Страница 35: ...he number of copies select the Number of Copies check box To print without applying profiles click Skip Deleting a profile saved in a Template Button 1 Select the Templates tab 2 Click Edit The Edit Templates dialog box appears 3 Select a Template Button whose profile needs to be deleted 4 Click Delete and then OK The profile in the selected Template Button is deleted The Template Button is left b...

Страница 36: ... select Devices and Printers The Printers folder appears For Windows Vista or Windows Server 2008 Click Start menu Control Panel Hardware and Sound and select Printers For Windows Server 2003 Click Start menu and select Printers and Faxes For Windows 8 or Windows Server 2012 see the procedures in the following section P 19 Accessing the printers folder on Windows 8 Windows Server 2012 2 Select the...

Страница 37: ...rlay Image printing and so on P 71 Effect tab Others tab The Others tab contains special features such as toner save custom pager size and so on P 77 Others tab Templates tab The Templates tab allows you to register print options frequently used as a template or recall the registered print options P 95 Templates tab Device Settings tab The Device Settings tab allows you to configure the options Wh...

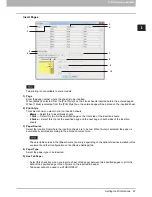
Страница 38: ...ted even if you set Proof Print In such a case print just one trial copy first and then specify the required number of copies on the touch panel display Print to Overlay File Select this to save the print job as an overlay file that is imposed on other documents When you select this click the button on the right and enter the file name For example if you want to print a master page image on the ba...

Страница 39: ...d under the current settings of the printer driver The image of a page to which the set print options are applied is displayed 5 Settings The set print options and their details are displayed in a list 6 Profile Print option settings can be saved on your hard disk You can save print option settings by clicking Save Profile and easily load a setting file by selecting a profile name in the box P 28 ...

Страница 40: ... LG 8 1 2 x 13 8 5 SQ 8 1 2 x 8 1 2 13 x 19 16K 195 x 270 mm 8K 270 x 390 mm 320 x 450 mm 320 x 460 mm Envelope Com10 4 1 8 x 9 1 2 Envelope Monarch 3 7 8 x 7 1 2 Envelope DL 110 x 220 mm Envelope Cho 3 120 x 235 mm Envelope You 4 105 x 235 mm A4 size Paper Model A4 210 x 297 mm A5 148 x 210 mm B5 182 x 257 mm Folio 210 x 330 mm A6 105 x 148mm J Post Card 100 x 148mm J Double Post Card 148 x 200mm...

Страница 41: ...om9 3 7 8 x 8 7 8 Envelope Cho 4 90 x 205 mm and Envelope C5 162 x 229mm are enabled only when the models below are used e STUDIO407CS Series e STUDIO527S Series Setup items differ depending on the model 2 Print Paper Size Select this to enlarge or reduce a page image to fit exactly in the selected paper size If you do not wish to enable enlarge or reduce printing select Same as Original Size Also...

Страница 42: ...inal are printed in A4 in a portrait direction The selectable values vary depending on the optional devices installed in this equipment and their configuration on the Device Settings tab When a paper type such as special or tab paper that needs to be fed from the bypass tray is set Bypass Tray may be automatically selected in the Paper Source box and then a confirmation dialog box may appear When ...

Страница 43: ...tter Tab is selected at the Print Paper Size box Tab will be displayed and you cannot change the paper type When Envelope is selected at the Print Paper Size box only Envelope Envelope and Envelope Back or Envelope 1 Envelope 2 Envelope 3 and Envelope 4 will be displayed and you cannot select other paper types Setup items differ depending on the model For more information about the paper types tha...

Страница 44: ... system automatically prints the document in the black mode When a print job is a color document it prints the document in the color mode Color Select this to print a document in the color mode Black and White Select this to print a document in the black mode Twin Color Select this to print a document in the twin color mode When this is selected click Details to specify the color that the non blac...

Страница 45: ...1C Series and e STUDIO5055C Series The margin between the shifted text and right edge of the tab extension must have at least 0 17 inches 4 2 mm of space because any data in this space are not printed Enter the same value in the Tab Extension box and the Image Shift Width box For the e STUDIO507 Series e STUDIO456 Series e STUDIO857 Series and e STUDIO856 Series The margin between the shifted text...

Страница 46: ... document and set the Image Shift Width correctly If misprinting occurs while multiple tab pages are printed continuously dirt may adhere to the reverse side of paper To avoid this it is recommended to print tab paper as a separate job for each page so that this equipment performs cleaning before printing the next tab paper When printing tab paper the tab paper may be caught in the exit in the inn...

Страница 47: ...ting Rotated Sort Copies cannot be selected on some models Group Copies and Rotated Sort Copies can be selected only when more than 1 copy is entered at the Number of Copies option Rotated Sort Copies can be selected only when Letter A4 B5 or 16K is selected at the Print Paper Size option When you use the Rotated Sort Copies option place copy paper of a desired size in two drawers portrait and lan...

Страница 48: ...tails This function is available only when an Automatic Duplexing Unit is installed in the equipment The 2 sided printing function is set to be used as default in the equipment for North America 2 Sided printing cannot be set when the following paper size is selected at the Print Paper Size box in the Basic tab A6 J Post Card J Double Post Card IndexCard 3x5 Envelope Com9 Envelope Com10 Envelope M...

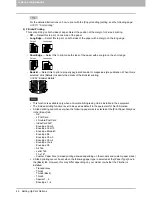
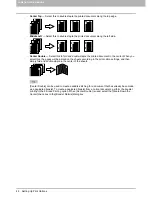
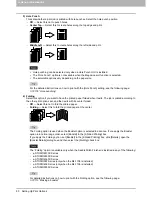
Страница 49: ...m 16 pages arranged on one sheet Direction of Print This sets how the pages are arranged on one sheet Left to Right Select this to arrange pages horizontally from the left and printed top to bottom on one sheet Right to Left Select this to arrange pages horizontally from the right and printed top to bottom on one sheet Left to Right by column Select this to arrange pages vertically from the top an...

Страница 50: ...hen you select this the pages will be printed on the sheets according to the print option settings and then simply fold and double staple in the center of the sheets Center Double can be used to create a saddle stitching for a document that has already been made as a paginated booklet To create a paginated booklet from a normal document perform the booklet printing in the 2 Sided Printing option W...

Страница 51: ...in the Basic tab A5 A6 J Post Card J Double Post Card IndexCard 3x5 305 x 457 mm Statement 12 x 18 A4 Tab Letter Tab 320 x 450 mm 320 x 460 mm 13 x 19 Envelope Com9 Envelope Com10 Envelope Monarch Envelope DL Envelope Cho 3 Envelope Cho 4 Envelope You 4 Envelope C5 Custom Paper Size Stapling cannot be set when the following paper types are selected at the Paper Type box in the Basic tab However th...

Страница 52: ...The job is printed according to the other print options set and then exits with its center folded Off Select this not to fold the printed paper Folding Select this to fold the printed paper at the center The Folding option is used when the Booklet option is selected in advance If you apply the Booklet option in a normal page order select Booklet in the 2 Sided Printing box If you apply the Folding...

Страница 53: ...to add the margins if the application does not support the margin function When the application has a margin function use the application s function rather than this option This cannot specify the binding margin for Booklet printing 8 Poster Print You can divide a print job onto more than one sheet of paper so you can create one large image such as a poster by connecting the divided images If this...

Страница 54: ...ter 1 2 LG on LG Select this to print a 1 2 Legal size booklet Every 2 pages are printed on Legal paper to fit on half a sheet 1 2 Statement on Statement Select this to print a 1 2 Statement size booklet Every 2 pages are printed on Statement paper to fit on half a sheet 1 2 Comp on Comp Select this to print a 1 2 Computer size booklet Every 2 pages are printed on Computer paper to fit on half a s...

Страница 55: ... Margin Center becomes invalid 7 Folding Select this to have the paper folded at its center when it exits The Folding option is available only when any of the finishing sizes below is selected A5 on A4 A4 on A3 B5 on B4 Letter Half on Letter LT on LD 1 2 LG on LG 16K on 8K The Folding option is available only when the Saddle Stitch Finisher is installed in any of the following e STUDIO6570C Series...

Страница 56: ...e Pages are unselectable 1 Use Front Cover This sets front cover printing which allows you to insert or print a cover on a sheet fed from a different Drawer or Bypass tray other than the Paper Source option selected on the Basic tab To enable cover printing select the check box and select the location from where a cover sheet is to be fed and the print style to be used For detailed instructions on...

Страница 57: ...ctable values in the Source box vary depending on the optional devices installed in this equipment and their configuration on the Device Settings tab Print Style This selects how you want to print a back cover Do not print on page Select this to insert a blank cover Print one side of the page Select this to print the last page image on the front side of a cover Print both sides of page Select this...

Страница 58: ... be fed When this option is enabled as well as the Use Front Cover and Use Back Cover options enabled no page is inserted after the front cover and back cover This option cannot be set when Insert Pages option is enabled For detailed instructions on how to print with the Interleave Pages setting see the following page P 122 Interleaving pages Source Select the location from where the interleaving ...

Страница 59: ...side of the insertion sheets 2 Sides Select this to print the specified page and the next page on both sides of the insertion sheets 3 Paper Source Select the location from where the insertion sheets are to be fed When Auto is selected the paper is automatically selected according to the printed document size The selectable values in the Paper Source box vary depending on the optional devices inst...

Страница 60: ...C Series e STUDIO4540C Series e STUDIO2550C Series e STUDIO2551C Series and e STUDIO5055C Series The margin between the shifted text and right edge of the tab extension must have at least 0 17 inches 4 2 mm of space because any data in this space are not printed Enter the same value in the Tab Extension box and the Image Shift Width box For the e STUDIO507 Series e STUDIO456 Series e STUDIO857 Ser...

Страница 61: ...ile 2 sided printing is performed and you enter an even numbered page printed on the back side of the paper Page 4 in the following example figure for the Page box the specified page will be blank The desired blank sheet is inserted next and the 2 sided printing continues from the next page If 1 Side is selected while 2 sided printing is performed the specified page Page 3 in the following example...

Страница 62: ...ital color system Color MFP For multifunctional digital system Black and White MFP 1 Image Quality Type This sets how colors are printed by selecting the job type The printer driver automatically applies the proper image quality for the selected job type You can select a pre defined image quality type or you can select a custom image quality type that you created The custom image quality type can ...

Страница 63: ...ng Basic tab P 67 Setting Color Balance tab P 68 Setting Image Attribute tab P 69 Setting Advanced tab This option is available only when your equipment is a multifunctional digital color system color MFP In order to create a new custom image quality setting you must access the printer driver properties from the Devices and Printers folder Windows Vista Windows Server 2008 Printer Windows Server 2...

Страница 64: ...s to print in 600 x 600 dpi 1200 dpi 1 Select this to print in 1200 x 1200 dpi 1 Images are reproduced more smoothly because jaggies on the outlines of small text or fine lines such as graphics are suppressed However 600 dpi is recommended for photos because the tone reproduction level of the image is higher Note that if the resolution is 1200 dpi it takes longer than 600 dpi to print out because ...

Страница 65: ... the Basic tab are available only when your equipment is a multifunctional digital color system color MFP The setup items differ depending on the model For setup items other than below refer to the corresponding Printing Guide User s Manual Advanced Guide Basic tab for Universal Printer 2 PCL6 Universal XPS Basic tab for Universal Printer 2 PostScript 1 8 3 6 7 4 2 5 13 1 8 10 3 5 6 4 2 12 9 7 13 ...

Страница 66: ...as default settings these default Image Quality types will not be overwritten The Image Quality Type is saved as a new custom Image Quality Type under the name you have specified Original Image Quality Type Select the image quality type to be applied as the based image quality 2 Halftone This sets how halftones are printed Auto Select this to print using proper halftone depending on the contents i...

Страница 67: ... texts This function is available only for the printer drivers below Universal Printer 2 Universal XPS 5 Distinguish Thin Lines Select this check box to print thin lines clearly 6 Pure Black Select this check box to print the black contents using black toner When this box is selected please select how this function applies in the Apply to box 7 Pure Gray Select this check box to print the gray sca...

Страница 68: ...s available only for the Universal PS3 printer driver 12 Auto Trapping Select this to enable the Auto Trapping option This is a technique where the size of objects is modified so that two colors printed next to each other overlap slightly to avoid white spaces between them These white spaces can be caused by factors such as misregistration This function is available only for the printer drivers be...

Страница 69: ...can set from 4 to 4 3 Detail Select this check box to adjust the density of each color separately in details When this box is selected click Edit to display the Color Balance Detail dialog box and specify the density of each color Color Balance Detail In the Color Balance Detail dialog box you can specify the density of low middle and high colors for each color Low Change this density to adjust th...

Страница 70: ...g Guide User s Manual Advanced Guide 1 Contrast Adjust the contrast for printing You can set from 4 lowest to 4 highest 2 Brightness Adjust the brightness for printing You can set from 4 darkest to 4 lightest 3 Background Adjustment Adjust the background adjustment for printing You can set from 4 lightest to 4 darkest 4 Saturation Adjust the saturation for printing You can set from 4 low clear to ...

Страница 71: ...to the TopAccess Guide 1 RGB Source Profile This selects the RGB source profile When you obtained color profile data from this equipment the RGB source profile data of this equipment appear 2 CMYK Source Profile This selects the CMYK source profile When you obtained color profile data from this equipment the CMYK source profile data of this equipment appear 3 Apply to Device Color Only Select this...

Страница 72: ... this equipment and update the existing color profile data This is enabled only when SNMP communication with this equipment is enabled Printer s Default is a default setting for RGB Source Profile CMYK Source Profile Destination Profile and Rendering Intent When you select Printer s Default color space conversion is performed according to the default profile that set as a default profile in the IC...

Страница 73: ... Effect tab contains print options that add effects to your print jobs such as Watermarks Overlay Image printing Rotate printing Mirror printing and Negative Positive printing Effect tab for Universal Printer 2 PCL6 Effect tab for Universal Printer 2 PostScript Universal XPS 1 2 3 1 2 3 5 4 ...

Страница 74: ... following page P 123 Printing with watermarks Add Click this to create a new watermark The Watermark dialog box appears when you click on this P 74 Add Edit Watermark Edit Select a watermark from the Watermark box and click it to edit the watermark The Watermark dialog box appears when you click on this P 74 Add Edit Watermark Delete Select a watermark from the Watermark box and click it to delet...

Страница 75: ...s an overlay file For the detailed instructions on how to print with the Overlay Image setting see the following page P 126 Printing with an overlay file Details Click this to set which overlay image is applied to which page such as changing the type of overlay image for odd pages and that for even pages or applying an overlay image only to the specified pages If you click this when Multiple Overl...

Страница 76: ...is displayed in the box The entered text is displayed as the sample image on the left 3 Font Name Select the font to be used for the watermark text 4 Style Select the font style for the watermark text Regular Select this to set the regular style to the text Bold Select this to set the bold style to the text Italic Select this to set the italic style to the text Bold Italic Select this to set the b...

Страница 77: ...Overlays or the desired overlay is selected in the Overlay Image box the Multiple Overlays dialog box appears Set which overlay image is applied to which page in this dialog box 1 Overlay Images The registered overlay images are displayed in a thumbnail Select the desired overlay image You can drag and drop an overlay image in the thumbnail to the desired overlay group Master Setting 1 2 or Settin...

Страница 78: ... Setting has priority over that of Master Setting 5 Setting 1 2 3 4 5 6 This sets pages to which the selected overlay image is applied by page number To specify more than one page delimit with commas such as 1 3 5 To specify pages in a range use a hyphen between the first and the last pages such as 6 10 Page Select this to apply the selected overlay image only to the specified pages If the specifi...

Страница 79: ...e printer driver from the Devices and Printers folder P 27 Setting initial values of print options 2 TopAccess Link Click this to start a web browser and display the TopAccess menu 3 Toner Save Select this check box to print in the toner save mode When the toner save mode is enabled printing may become lighter 4 Do not Print Blank Pages Select this check box to ignore blank pages for printing If t...

Страница 80: ...switches the equipment to be used for printing or splits one print job between two pieces of equipment Tandem Printing P 133 Switching equipment to print jobs P 134 Splitting a print job across two pieces of equipment Tandem Printing 9 Add Printer This discovers the e STUDIO Series equipment over a network and adds it on Printer Folder P 82 Add Printer 10 Custom Paper Size Click this to specify th...

Страница 81: ...ent with selecting Black and White in the Color option in the Basic tab of the printer driver If the number of the printed sheets for a print job exceeds the output limitation for the entered department code the print job is stored in the invalid department code print job list without printing When you want to print the print job perform printing from JOB STATUS on the touch panel by entering anot...

Страница 82: ... type custom paper size profiles from the printer driver How to export custom settings Click Export The Save as dialog box appears Specify a file name and a directory Then click Save In order to set and perform Export you must access the printer driver properties from the Devices and Printers folder Windows Vista Windows Server 2008 Printer Windows Server 2003 Printers and Faxes but not from the P...

Страница 83: ...e administrator privilege is necessary You must log in with the Administrator privilege and open the printer driver properties Up to 31 characters including the following symbols can be entered for the Community Name _ 3 SNMP V3 If SNMP V3 is enabled select one of the following items to set how users are authenticated User ID File Select this option when you want to use a user ID file Click Browse...

Страница 84: ...tallation site model name and status 2 Add This adds the printers selected in the Discovered Printers box to Printer Folder 3 Information This indicates the basic information of the printer selected in the Discovered Printers box You can check the availability of color printing 2 sided printing or stapling its copying speed resolution and the type of paper placed 4 Available Printer List This indi...

Страница 85: ...ter 2 Universal PS3 Universal XPS printer drivers The Custom Paper Size Paper Size List dialog box The Custom Paper Size Name dialog box 1 Paper Size List Select the custom paper size that you want to modify 2 Add Click this to display the Custom Paper Size Name dialog box 3 Delete Click this to clear and restore the default settings of the selected custom paper size that you selected in the Paper...

Страница 86: ...register a custom paper size either A Length or B Width should differ by more than 0 3 inches 7 mm from the standard paper size If not the created custom paper size is considered as the standard paper size You cannot create a custom paper size with A Length longer than B Width If you want to print such a document do so by selecting landscape for the Orientation There are some precautions when you ...

Страница 87: ... s print dialog box In order to set the Device Settings tab you must access the printer driver properties from the Devices and Printers folder Windows Vista Windows Server 2008 Printer Windows Server 2003 Printers and Faxes For detailed instructions on how to set the Device Settings tab see the following page P 16 Configuring options manually 1 Model This sets the model type Selecting Universal re...

Страница 88: ...alled Finisher Select this when a Finisher is installed Inner Finisher Select this when an Inner Finisher is installed Saddle Stitch Finisher Select this when a Saddle Stitch Finisher is installed Job Separator Select this when a Job Separator is installed Offset Tray Select this when a Offset Tray is installed 4 Hole Punch Unit This sets whether or not the Hole Punch Unit is installed None Select...

Страница 89: ...PS3 12 Version Information Click this to display the Version Information dialog box 13 Device Settings Retrieval This enables SNMP communication between this equipment and your computer to retrieve the option configuration information Update Automatically Select this check box to update the option configuration information automatically every time you open the Device Settings tab Update Now Click ...

Страница 90: ...the drawer will be selected preferentially according to the print settings 4 Override Application Paper Source Settings Select this check box to use the paper source setting in the printer driver rather than the application setting 5 Restore Defaults Click this to restore the settings displayed in the Drawer Settings dialog box to the original factory defaults Drawers selectable differ depending o...

Страница 91: ...mpted to enter your user name and password every time you print a document This option is available when any of MFP Local Authentication Windows Domain Authentication or LDAP Authentication is selected in the User Authentication box This option can be used together with any of the user authentication functions MFP Local Authentication Windows Domain Authentication LDAP Authentication 3 User Name T...

Страница 92: ...r when you print documents from applications These functions below are available only when the hard disk is installed in the equipment Private Print Restriction Hold Print Restriction Setting up LDAP servers The LDAP Server Settings dialog box allows you to register LDAP servers 1 Server Name Enter the desired LDAP server in this box if needed Up to 64 characters excluding can be entered for the S...

Страница 93: ...0 Image Quality tab 3 Effect Select this check box to enable the Effect tab P 71 Effect tab 4 Templates Select this check box to enable the Templates tab P 95 Templates tab 5 Add Printer Select this check box to enable Add Printer on the Others tab P 77 Others tab P 82 Add Printer 6 Tandem Print Select this check box to enable Output Devices on the Others tab P 77 Others tab P 133 Switching equipm...

Страница 94: ...anish Dutch English UK English US Finnish French German Italian Japanese Norwegian Nynorsk Polish Russian Spanish Swedish Hungarian Portuguese Czech Auto is selected by default When Auto is selected the most appropriate printer driver language is automatically set according to the regional and language settings in Windows OS 2 Restore Defaults Click this to restore the factory defaults on the Lang...

Страница 95: ...rsal PS3 printer driver The model below only supports PCL6 Printing is not available when PostScript is selected e STUDIO2551C Series 2 Output Format This selects an output format for PostScript printing This setting can be changed only when PostScript is selected in the Output PDL box ASCII A job is sent in ASCII format enabling PostScript code editing with a text editor or a word processor Encap...

Страница 96: ...d you can select whether e STUDIO306LP is used for printing or not 1 Selected Device Select the output device used for printing to save paper To select the device you need to add the device to the print server or client computer beforehand When you add Selected Device to the print server you need to share it Or select the Security tab on the Properties screen of the added device and select the All...

Страница 97: ...r the e STUDIO6570C Series e STUDIO6550C Series e STUDIO857 Series and e STUDIO856 Series 1 copy to 9 999 copies Other models 1 copy to 999 copies 2 Template Button Click this to apply the profile saved in a Template Button to each setting of the printer driver On the Template Button the name of the profile saved and the print image of the job appear 5 factory default profiles below are saved in a...

Страница 98: ... settings of the Template Buttons 1 Profile This selects the profile to be saved in a Template Button 2 Template Button This selects the Template Button to be edited 3 Save This saves the chosen profile in the selected Template Button 4 Delete This deletes the settings of the selected Template Button The print options registered in each profile are not deleted even if you click Delete 1 2 3 4 ...

Страница 99: ...tab menu P 128 Using various types of paper P 133 Switching equipment to print jobs P 134 Splitting a print job across two pieces of equipment Tandem Printing Printing various print job types The printer drivers provide various ways to handle such jobs as Scheduled Print Private Print Hold Print Proof Print Overlay Image file Store to e Filing and Multiple Job Type P 98 Printing scheduled print jo...

Страница 100: ...e Basic tab menu 2 Select Scheduled Print in the Print Job box 3 Click on the right of the Print Job box The Scheduled Print dialog box appears 4 Click the arrow button at the Date box to display the Calendar window and select the desired date for your print job 5 Select the Time box and click the spin button to change the time To change the hour select the hour number and click the spin button To...

Страница 101: ... display Enter a password using the alphanumeric characters and symbol characters ASCII code characters between 0x21 to 0x7E in the Password box The password must be between 1 and 63 characters When you enter this password on the touch panel display confidential documents will be printed If you forget it you will not be able to print them 6 Press the PRINT button on the control panel The print job...

Страница 102: ...he Basic tab menu 2 Select Hold Print in the Print Job box 3 Set any other print options as required and click OK 4 Click OK or Print to send the print job The print job is stored in the Hold Print job list in the touch panel display 5 Press the PRINT button on the control panel 6 Select HOLD on the touch panel 7 Select the desired user name When you enter the nickname for the User name Alias box ...

Страница 103: ... job by your application all the copies not just one copy will be printed even if you set Proof Print In such a case print just one trial copy first and then specify the required number of copies on the touch panel display Printing a proof copy 1 Display the Basic tab menu 2 Select Proof Print in the Print Job box 3 Set any other print options you require and click OK 4 Click OK or Print to send t...

Страница 104: ...rlay file and the documents on which you superimpose the overlay image must be created in the same size color mode and orientation Printing a document as an overlay file 1 Display the Basic tab menu 2 Select Print to Overlay File in the Print Job box 3 Click on the right of the Print Job box The Overlay Image Name dialog box appears 4 Enter an overlay image name and then click OK You can enter up ...

Страница 105: ...cluded in a part of the documents the printing job cannot be stored in e Filing either Custom paper Non standard size paper bypass tray TAB paper IndexCard 3x5 Executive 7 1 4 x 10 1 2 Envelope Com9 3 7 8 x 8 7 8 Envelope Com10 4 1 8 x 9 1 2 Envelope Monarch 3 7 8 x 7 1 2 Envelope DL 110 x 220 mm Envelope Cho 3 120 x 235 mm Envelope Cho 4 90 x 205 mm Envelope You 4 105 x 235 mm Envelope C5 162 x 2...

Страница 106: ...If the number of folders has reached 100 you cannot create any more 6 If you print the job as well as save it to the Public Box select the Print check box 7 Click OK 8 Click OK or Print to send the print job The print job is saved to the public box Saving a print job to a user box 1 Display the Basic tab menu 2 Select Store to e Filing in the Print Job box 3 Set any other print options you require...

Страница 107: ...name in the Box Folder box If the entered folder name is not found a new folder is created under this box Enter the folder name within 64 characters If the number of folders has reached 100 you cannot create any more 6 If you print the job as well as saving to a box select the Print check box 7 Click OK 8 Click OK or Print to send the print job The print job is saved to the specified user box ...

Страница 108: ...re printed even if you set Proof Print In this a case perform Proof Print of only one copy first and then change the number of copies on the touch panel to print the rest Documents stored in e Filing are retained with the optimal image quality for printing If you want to download them into your computer with a higher image quality scan the original documents and store them in e Filing When you sto...

Страница 109: ...you select Private Print or Proof Private Print Enter a password using the alphanumeric characters and symbol characters ASCII code characters between 0x21 to 0x7E in the Password box The password must be between 1 and 63 characters When you enter this password on the touch panel display confidential documents will be printed If you forget it you will not be able to print them 5 If you want to sto...

Страница 110: ...K or Print to send the print job If you select Scheduled Print the job is printed at the specified date and time If you select Private Print or Proof Private Print the job is stored in this equipment as a Private Print job Print this job on the touch panel P 99 Printing private print jobs If you select Hold Print or Proof Hold Print the job is stored in this equipment as a Hold Print job Print thi...

Страница 111: ...tio Printing enlarged or reduced image to fit the specified paper size 1 Display the Basic tab menu 2 Select the document size on the Original Paper Size box Then select the paper size that you want to print at the Print Paper Size box The document image is automatically enlarged or reduced depending on the original paper size and print paper size 3 Set any other print options you require and clic...

Страница 112: ... 1 4 Set any other print options you require and click OK 5 Click OK or Print to send the print job The image is printed on paper of the specified size at the specified reproduction ratio Printing color documents in gray scale This equipment can print in color as well as black and white The printer driver automatically detects whether the document uses only color or only black and white and it pri...

Страница 113: ...click OK 6 Click OK or Print to send the print job The print job is printed in the twin color mode Layout and finishing options in Finishing tab menu Using the printer driver you can set various layout options to suit your preferences In this section various printing functions enabled with the Finishing tab menu are explained P 111 Sort printing P 113 Printing on both sides of a sheet P 113 Making...

Страница 114: ...Display the Finishing tab menu 4 Select Group Copies icon at Copy Handling 5 Set any other print options you require and click OK 6 Click OK or Print to send the print job The printed documents are sorted according to the pages Sorting printed documents horizontally and vertically for each copy Rotated Sort Copies cannot be enabled on some models Rotated Sort Copies can be enabled only when printi...

Страница 115: ...print job is printed on both sides of paper in the specified direction Making a booklet You can create a document in a book or magazine style publication by selecting the Booklet option Also you can create a folded booklet by automatically stapling saddle stitching and folding the center of a printed document For example if you create a document on Letter size paper 8 x 11 inches and then print in...

Страница 116: ...INDOWS 114 Printing With Best Functions for Your Needs 2 Select the Booklet icon under 2 Sided Printing 3 Click Details The Booklet Details dialog box appears 4 Select the booklet size at the Output Document Layout box ...

Страница 117: ...Q size booklet Every 2 pages are printed on 8 5 inch SQ paper to fit on half a sheet 32K on 16K Select this to print a 32K size booklet Every 2 pages are printed on 16K paper to fit on half a sheet 16K on 8K Select this to print a 16K size booklet Every 2 pages are printed on 8K paper to fit on half a sheet 1 2 13 5LG on 13 5LG Select this to print a 1 2 13 5 inch LG size booklet Every 2 pages are...

Страница 118: ...J 1106 is installed 8 If you want to double staple the center select the Staple Down the Center check box Staple Down the Center is available only when the Saddle Stitch Finisher is installed and configured on the Device Settings tab 9 Click OK to close the Booklet Details dialog box 10 Set any other print options you require and click OK 11 Click OK or Print to send the print job The print job is...

Страница 119: ...ages arranged on one sheet 6 pages Select this to print images from 6 pages arranged on one sheet 8 pages Select this to print images from 8 pages arranged on one sheet 9 pages Select this to print images from 9 pages arranged on one sheet 16 pages Select this to print images from 16 pages arranged on one sheet 3 Select how the pages are arranged on one sheet in the Direction of print option Left ...

Страница 120: ... printed document in the center The selectable options vary depending on the model paper size and orientation Center Double can be selected only when the Saddle Stitch Finisher is installed and configured on the Device Settings tab 3 Set any other print options you require and click OK 4 Click OK or Print to send the print job The output is stapled for each copy Hole punching Select this to punch ...

Страница 121: ...c tab The selectable paper sizes differ depending on the models A4 A3 LT LD Performing Poster Print 1 Display the Finishing tab menu 2 Select the Poster Print check box and then click Details The Poster Print dialog box appears 3 Select the number of sheets on which the image is printed and then click OK 1x2 Select this to divide the image into 2 sheets 2x2 Select this to divide the image into 4 s...

Страница 122: ...he Use Front Cover check box and select the drawer where the cover paper is loaded at the Source box Then select whether you are inserting a blank cover or printed front cover at the Print Style box Do not print on page Select this to insert a blank front cover Print one side of the page Select this to print the first page of the document on a front side of a cover Print both sides of page Select ...

Страница 123: ... appears Up to 50 pages can be inserted 5 Enter the page numbers to which you want to insert the sheet in each Page box and select the Print Style Paper Source and Paper Type options as you require 6 Set any other print options you require and click OK The available print options vary depending on the models 7 Click OK or Print to send the print job A front cover and back cover are inserted into t...

Страница 124: ...he drawer where the desired paper is loaded at the Source box When Auto is selected in the Source box the paper is automatically selected according to the printed document size To insert thick paper select Bypass Tray and set Thick for Paper Type for Bypass Tray in the Drawer Settings dialog box of the Device Settings tab in the printer driver 3 To print the previous page on interleaved sheets sel...

Страница 125: ...everal predefined watermarks or you can create and save your own custom watermarks Watermarks are text only To add graphics or other document elements use image overlays instead Printing a watermark 1 Display the Effect tab menu 2 Select the watermark to be printed at the Watermark box You can create a new watermark if there is none you want to apply on the box P 124 Creating or editing a watermar...

Страница 126: ...ion of the watermark in Position Select the desired icon for the position 4 Select a font for the watermark at the Font Name box 5 Select a font style for the watermark at the Style box 6 Enter the font size in the Font Size box You can enter any integer between 6 and 300pt in units of 1pt 7 Select a color for the watermark at the Color box If your preferred color is not listed in the box click Br...

Страница 127: ...a solid type of watermark Draw as Outline Select this to print an outline type of watermark Transparency Select this for a transparent watermark Set the transparent ratio from 0 to 100 in units of 1 You can also set the transparent ratio using the scroll bar 10 Click OK to save the watermark settings The watermark is added or edited Deleting a watermark You can delete the default watermarks Howeve...

Страница 128: ...e Print on Each Page check box in Overlay Image on the Effect tab P 71 Effect tab Both the overlay file and the documents on which you superimpose the overlay image must be created in the same size color mode and orientation Printing an overlay image as a print job 1 Display the Effect tab menu 2 Select the overlay image name to be used in the Overlay Image box If you use different overlay images ...

Страница 129: ...unctions for Your Needs 127 2 PRINTING FROM WINDOWS Deleting an overlay image 1 Select an overlay image that you want to delete at the Overlay Image box 2 Click Delete The Confirm Delete dialog box appears 3 Click Yes The overlay image is deleted ...

Страница 130: ...r tray Tab printing is not available to some models Only Letter sized or A4 sized paper can be used for tab printing If misprinting occurs while multiple tab pages are being printed continuously toner may adhere to the reverse side of the second and subsequent sheet of paper To avoid this it is recommended to print tab paper as a separate job for each page so that this equipment performs cleaning ...

Страница 131: ...pace are not printed Enter the same value in the Tab Extension box and the Image Shift Width box For the e STUDIO507 Series e STUDIO456 Series e STUDIO857 Series and e STUDIO856 Series The margin between the shifted text and right edge of the tab extension must have at least 0 08 inches 2 0 mm of space because any data in this space are not printed Enter the same value in the Tab Extension box and...

Страница 132: ...ifted text and right edge of the tab extension must have at least 0 17 inches 4 2 mm of space because any data in this space are not printed Enter the same value in the Tab Extension box and the Image Shift Width box For the e STUDIO456 Series and the e STUDIO856 Series The margin between the shifted text and right edge of the tab extension must have at least 0 08 inches 2 0 mm of space because an...

Страница 133: ...rties of the printer driver and select the custom paper size in Print Paper Size of the Basic tab menu before starting printing 2 Set any other print options you require and click OK 3 Click OK or Print to send the print job 4 Place paper longer than the standard sizes on the bypass tray Refer to the following notes when you use long custom size paper P 132 When the paper is being fed into the equ...

Страница 134: ...uipment while you are holding it Printing is done at 300 dpi if the custom paper size is longer than the maximum standard paper size for example the maximum custom size is 12 34 x 47 24 inches 313 4 x 1200 mm e STUDIO527S Series Printing is done at 600 dpi if the custom paper size is longer than the maximum standard paper size the maximum custom size is 8 50 x 52 00 inches 215 9 x 1320 8 mm Even i...

Страница 135: ...s In this case the same number of copies is printed from all of the pieces of equipment you selected When you select the equipment in the Selected Devices boxes make sure to select that which supports features enabling all the print options of the job Select equipment which enables stapling if the job needs that Select equipment which enables hole punching if the job needs hole Select equipment wi...

Страница 136: ...gnized on it Department Management for this print job is not performed Splitting a print job across two pieces of equipment Tandem Printing This feature splits one print job across two pieces of equipment to print it by means of copies If you have to print documents with a large number of pages in a large number of copies for example you can have two pieces of e STUDIO Series equipment on a networ...

Страница 137: ... or twin color printing If you select the Always Use This Setting check box you can omit the setting of the Output Devices dialog box from the next time Equipment selected in the Selected Devices boxes must be registered in Printer Folder If you want to use equipment not registered in Printer Folder add it in Add Printer on the Others tab of printer driver P 82 Add Printer 5 Click OK to close the ...

Страница 138: ......

Страница 139: ...Pages 77 Domain Name 89 Draw as Outline 75 125 Draw Borders Around Pages 47 117 Drawer Settings 87 Drawers 17 86 Duplicate 56 122 E Each Color 67 ECO setting 94 Edit 96 Edit Templates 96 Effect tab 35 71 123 Enter the user credentials manually 25 89 Export 80 External LCF 17 86 F Features 10 Finisher 17 86 Finishing tab 35 45 111 Folding 50 53 Font Name 74 124 Font Size 74 124 Functions 10 H Halft...

Страница 140: ... 131 Private Print 36 99 Private Print Restriction 89 Profile 28 37 69 Proof Print 36 101 Pure Black 65 Pure Gray 65 R Rendering Intent 69 Resolution 62 64 Restore Defaults 37 53 66 67 68 70 75 76 87 88 92 94 RGB Source Profile 69 Rotate 180 Degrees 73 S Saturation 68 Save Current Settings as 64 Scheduled Print 35 98 Selected Device 94 Server Name 79 90 Server Name List 90 Settings 37 Short Edge 4...

Страница 141: ...FC 3050CS 3050CP DP 3850S 3850P 5250P OME14006900 ...

Страница 142: ...NAGAWA KU TOKYO 141 8562 JAPAN MULTIFUNCTIONAL DIGITAL COLOR SYSTEMS PRINTER Printing Guide 2014 TOSHIBA TEC CORPORATION All rights reserved Patent http www toshibatec co jp en patent R140720P1000 TTEC Ver00 F 2014 08 ...

Отзывы: