4
2
3
1
G005783
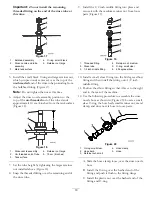
Figure 6
1.
Supply tee mounting
bracket
3.
Bolt
2.
Control valve bracket
4.
Mounting frame
7. Secure the supply tee bracket and control valve
bracket to the mounting frame using the bolts you
removed in 5 (Figure 6).
8. Secure the supply tee bracket and control valve
bracket using the screws you removed in step 2.
9. Secure the control valve to the bracket with two
Phillips screws.
10. Install the support bracket as shown in Figure 7,
using 4 flange-head bolts (1/4 x 3/4 inch) and 4
flange nuts (1/4 inch).
G005784
4
1
4
2
3
Figure 7
1.
Control valve bracket
3.
Flange-head bolt (1/4 x
3/4 inch)
2.
Support bracket
4.
Flange nut (1/4 inch)
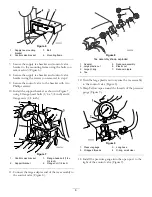
11. Connect the large adapter end of the tee assembly to
the control valve (Figure 8).
1
3
2
3
4
7
6
5
G005785
Figure 8
Tee assembly shown exploded
1.
Adapter
5.
Reducer assembly
2.
Large plastic nut
6.
Plastic nut
3.
Large O-ring
7.
Reducer nipple
4.
Tee
12. Turn the large plastic nut to secure the tee assembly
to the control valve (Figure 8).
13. Wrap Teflon tape around the threads of the pressure
gauge (Figure 9).
1
2
3
G005786
4
Figure 9
1.
Pressure gauge
3.
Long hose
2.
Wrapped threads
4.
O-ring, small clear
14. Install the pressure gauge into the open port to the
right of the control valve (Figure 9).
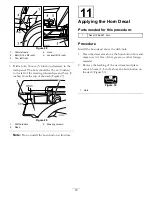
6

