1
Preparing the Machine
No Parts Required
Procedure
1. Move the sprayer onto a level surface, set the parking
brake, stop the pump, stop the engine, and remove
the ignition key.
2. Drain the contents of the tank to remove any
solution in lines. Refer to the
Operator’s Manual
for
more information.
Note:
Take caution while disconnecting any hoses
during the installation of this kit and have a catch
bucket ready for any solutions remaining in the hose.
Chemicals are hazardous and can cause
personal injury.
•
Read the directions on the chemical labels
before handling the chemicals and follow
all manufacturer recommendations and
precautions.
•
Keep chemicals away from your skin.
Should contact occur, wash the affected area
thoroughly with soap and clean water.
•
Wear goggles and any other protective
equipment recommended by the chemical
manufacturer.
2
Installing the Hose Hooks
Parts needed for this procedure:
1
Hose hook, single bend
1
Spray gun bracket
2
Carriage bolt (5/16 x 3/4 inch)
2
Locknut (5/16 inch)
Procedure
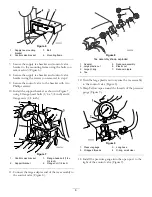
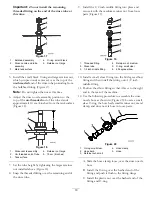
1. Remove the fasteners securing the right side of the
front tank strap (Figure 2).
3
1
2
G005779
Figure 2
1.
Front tank strap
3.
Spray gun bracket
2.
Hose hook
2. Install the hose hook and spray gun bracket as shown
in Figure 2, using 2 carriage bolts (5/16 x 3/4 inch)
and locknuts (5/16 inch).
3. Secure the tank strap using the fasteners you
removed previously.
4

