3
Installing the Control Valve
Parts needed for this procedure:
1
Control valve
1
Control valve bracket
2
Phillips screw
1
Support bracket (for Multi-Pro Sprayers)
4
Flange-head bolt (1/4 x 3/4 inch)
4
Flange nut (1/4 inch)
1
Tee assembly
1
Pressure gauge
1
Barbed fitting (1/2 inch)
1
Retainer fork, large
Procedure
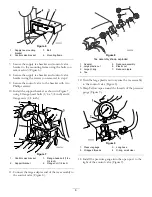
1. Remove hose large retainer fork to disconnect the
boom supply hose from the supply tee (Figure 3).
G005780
2
1
3
4
5
Figure 3
1.
Supply tee
4.
Tube fitting
2.
Hose retainer
5.
Boom supply hose
3.
Pressure gauge tube
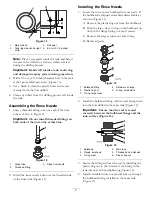
2. Remove the four screws securing the supply tee to
the mounting bracket (Figure 4). Remove the supply
tee and hoses.
2
2
1
G005781
Figure 4
1.
Supply tee mounting
bracket
2.
Screws
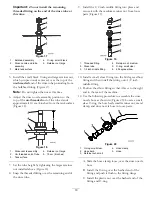
3. Install the new control valve into the open port
on the supply tee and secure it with a new retainer
(Figure 5).
G005782
2
4
1
3
Figure 5
1.
Control Valve
3.
Boom hose
2.
Retainer fork, new
4.
Retainer fork, existing
4. Connect the boom hose you disconnected in step 1
to the open port on the control valve and secure it
with the retainer you removed in 1 (Figure 5).
5. Remove the 2 bolts securing the supply tee mounting
bracket to the vehicle. Retain the fasteners.
6. Install the control valve bracket between the supply
tee bracket and the vehicle (Figure 6).
5

