


Installing the Gear Box Assembly
1. Safely prevent the reel from rotating by blocking the cutting reel with a piece
of wood near one of the reel spiders.
IMPORTANT
The groomer gear box for this machine is installed on the left side
of the cutting unit. Groomer gear boxes installed on the left side
of the cutting unit use a left hand thread. Turn the input shaft
counter-clockwise to install the gear box.
2. Insert a long-handled pry bar through the front of the cutting unit. The pry
bar should pass between the top of the reel shaft and the backs of the reel
blades so that the reel will not move.
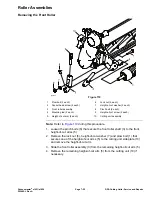
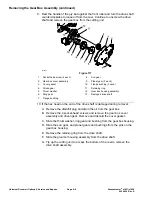
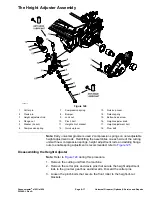
g330866
Figure 120
1.
5/16–18 X 5/8 inch square head set screw 4.
Reel shaft
2.
Input shaft assembly
5.
Weld side of reel support plate
3.
Groomer gear box assembly
6.
Pry bar
3. Move the pry bar against the weld side of the reel support plate closest to the
gear box assembly and rest the handle of the pry bar against the front roller.
4. Position the gear box assembly against the cutting unit and turn the drive
shaft assembly clockwise until it is seated against the reel.
IMPORTANT
You must use a 6-point socket with a heavy wall to install the gear
box to the reel. Do not use an impact wrench. Groomer gear boxes
installed on the right side of the cutting unit use a standard right
hand thread; turn the drive shaft clockwise to install the gear box.
5. Tighten the drive shaft assembly from
135 to 150 N∙m (100 to 110 ft-lb)
.
6. Remove the square head set screw from the end of the drive shaft.
7. Install the clevis pin and a new cotter pin to secure the height adjustment rod
to the front of the groomer gear box.
8. Apply a retaining compound (Loctite 609 or equivalent) to the lip of the drive
housing and install the drive shield.
Universal Groomer (Optional): Service and Repairs
Page 8–10
Greensmaster
®
e1021/e1026
20246SL Rev A
Содержание 04831
Страница 4: ...NOTES NOTES Page 4 Greensmaster e1021 e1026 20246SL Rev A ...
Страница 6: ...g340650 Figure 1 Model 04831 shown Preface Page 6 Greensmaster e1021 e1026 20246SL Rev A ...
Страница 14: ...Safety Safety and Instructional Decals Page 1 6 Greensmaster e1021 e1026 20246SL Rev A ...
Страница 46: ...Troubleshooting Battery Charger Error and Fault Codes Page 3 14 Greensmaster e1021 e1026 20246SL Rev A ...
Страница 136: ...Electrical System Service and Repairs Page 5 56 Greensmaster e1021 e1026 20246SL Rev A ...
Страница 162: ...Controls Wheels and Accessories Service and Repairs Page 6 26 Greensmaster e1021 e1026 20246SL Rev A ...
Страница 210: ...Universal Groomer Optional Service and Repairs Page 8 20 Greensmaster e1021 e1026 20246SL Rev A ...
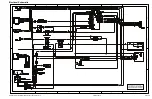
Страница 213: ...Greensmaster e1021 e1026 Drawing 122 1647 Rev A Sheet 1 of 1 20246SL Rev A Page A 3 Electrical Schematic g361655 ...
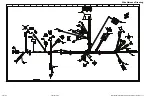
Страница 214: ...Page A 4 20246SL Rev A Greensmaster e1021 e1026 Drawing 122 1734 Rev D Sheet 1 of 2 Wire Harness Drawing CV g361656 ...
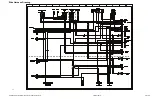
Страница 215: ...Greensmaster e1021 e1026 Drawing 122 1734 Rev D Sheet 2 of 2 20246SL Rev A Page A 5 Wire Harness Drawing g361657 ...
Страница 216: ......


