Checking the Operation of Throttle and Clutch Bail Potentiometers
Check the operation of throttle and clutch bail potentiometers with the InfoCenter.
With the key switch in the RUN position and the InfoCenter in the diagnostics
menu, choose the Throttle and ensure that the displayed voltage changes as the
speed wheel is rotated. Further potentiometer testing is necessary only if the
displayed voltage does not change when using the InfoCenter.
Testing the Throttle and Clutch Bail Potentiometers
1. Park the machine on a level surface and make sure that the clutch bail in the
NEUTRAL position. Turn the key switch to the OFF position and remove
the key from the key switch.
2. Disconnect the battery pack; refer to
Connecting the Lithium Battery Pack
(page 5–3)
.
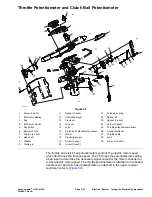
3. Remove the handle cover from the handle to get access to the throttle and
clutch bail potentiometers.
4. Disconnect the machine wire harness connector from the potentiometer to be
tested, and remove the potentiometer from the machine (
Note:
Before taking the small resistance readings with a digital multimeter,
short the multimeter test leads together. The meter displays a small
resistance value (usually 0.5 ohms or less). This resistance is because of the
internal resistance of the multimeter and test leads. Subtract this value from
the measured value of the component that you are testing.
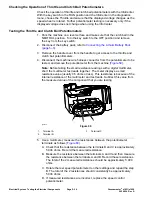
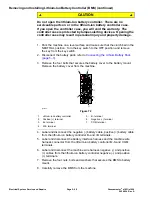
g202576
Figure 60
1.
Terminal A
3.
Terminal C
2.
Terminal B
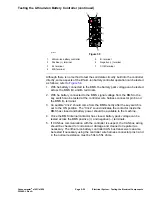
5. Use a multimeter, measure the resistances between the potentiometer
terminals as follows (
A. Check that the resistance between the terminals B and C is approximately
5,000 ohms. Record the measured resistance.
B. Measure the resistance between the terminals A and C and then measure
the resistance between the terminals A and B. Record these resistances.
The total of the 2 measured resistances should be approximately 5,000
ohms.
C. Rotate the reel speed potentiometer to other settings and repeat the step
B. The total of the 2 resistances should consistently be approximately
5,000 ohms.
D. If measured resistances are incorrect, replace the speed control
potentiometer.
Electrical System: Testing the Electrical Components
Page 5–34
Greensmaster
®
e1021/e1026
20246SL Rev A
Содержание 04831
Страница 4: ...NOTES NOTES Page 4 Greensmaster e1021 e1026 20246SL Rev A ...
Страница 6: ...g340650 Figure 1 Model 04831 shown Preface Page 6 Greensmaster e1021 e1026 20246SL Rev A ...
Страница 14: ...Safety Safety and Instructional Decals Page 1 6 Greensmaster e1021 e1026 20246SL Rev A ...
Страница 46: ...Troubleshooting Battery Charger Error and Fault Codes Page 3 14 Greensmaster e1021 e1026 20246SL Rev A ...
Страница 136: ...Electrical System Service and Repairs Page 5 56 Greensmaster e1021 e1026 20246SL Rev A ...
Страница 162: ...Controls Wheels and Accessories Service and Repairs Page 6 26 Greensmaster e1021 e1026 20246SL Rev A ...
Страница 210: ...Universal Groomer Optional Service and Repairs Page 8 20 Greensmaster e1021 e1026 20246SL Rev A ...
Страница 213: ...Greensmaster e1021 e1026 Drawing 122 1647 Rev A Sheet 1 of 1 20246SL Rev A Page A 3 Electrical Schematic g361655 ...
Страница 214: ...Page A 4 20246SL Rev A Greensmaster e1021 e1026 Drawing 122 1734 Rev D Sheet 1 of 2 Wire Harness Drawing CV g361656 ...
Страница 215: ...Greensmaster e1021 e1026 Drawing 122 1734 Rev D Sheet 2 of 2 20246SL Rev A Page A 5 Wire Harness Drawing g361657 ...
Страница 216: ......


