THOMSON DLP-ITC250-SLIM Скачать руководство пользователя страница 24

EN

24

Chapter 5

Other information

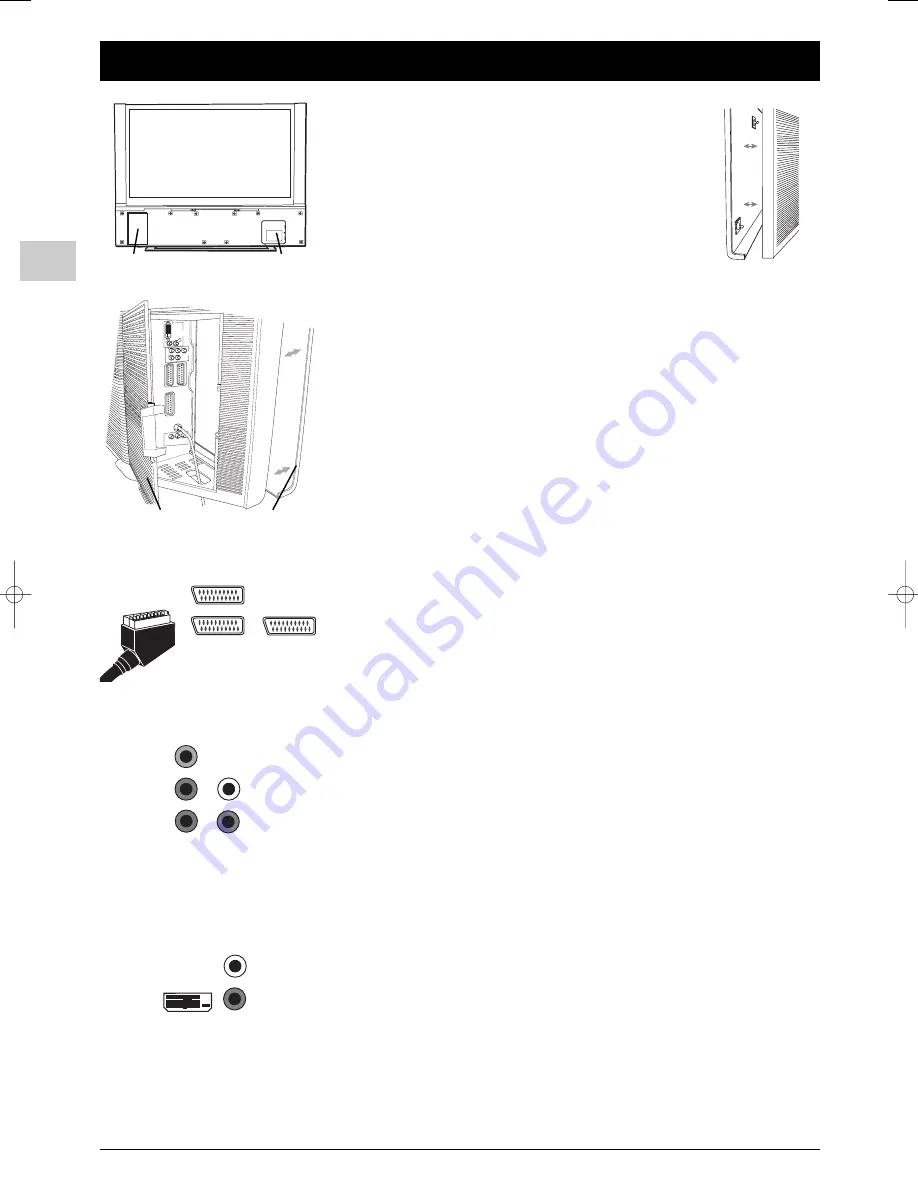
Removing the front panel piece

The front panel piece is removable to allow access to the socket
panel and lamp door (for the lamp replacement, please refer to the
separate leaflet).

To remove the front panel piece, grasp one end of the panel and pull
out until the tab pops out of the hole. Continue to slide your fingers
down the panel as the tabs pop out of place, until it is unattached.

Reattach the front panel piece by lining up the tabs with the holes,
starting at the bottom.Then push the tabs back into place.

Sockets

Accessing the socket panel

The socket panel is located inside the front panel of the TV.You can access these sockets:

- either from the front of the set by removing the front panel piece as described above, if

the set is hung using a wall mount assembly (available separately),

- or from the back by removing the socket panel door.

Locate the socket panel door on the back of the TV on the right bottom side.To remove
the door, pull the tab towards the left, and then pull the door open. Reattach the socket
panel door by fitting the tabs on the left into the slots and then close the door until it
snaps into place.

Connect the cables to the sockets by putting the cables through the hole, as shown to the
left.Then the cables can be placed on the shelf at the back of the TV.

AV1 and AV2 SCART sockets (input-output) inside the front
panel

These sockets can be used to connect a range of equipment, including video recorders,

camcorders (VHS, S-VHS, 8 mm or Hi 8), decoders, satellite receivers, DVD players, games
consoles or devices producing an RGB signal.

AV3 SCART socket (input) inside the front panel

This socket can be used to connect equipment, such as video recorders or camcorders
(VHS, S-VHS, 8 mm or Hi 8).

AV4 CINCH audio and video component (synchroscan)

sockets (input) inside the front panel

These can be used to connect a DVD player.The component sockets automatically detect
the type of component signal received: interlaced component (Y/Pr/Pb) or progressive
component (Y/Cr/Cb).The supported formats are:
480i, 60Hz

576i, 50 Hz

1080i, 60 Hz

720p, 50 Hz

480p, 60 Hz

576p, 50 Hz

1080i, 50 Hz (31.25 kHz)

720p, 60 Hz

1080i, 50 Hz (28.125 kHz)

AV5 CINCH audio and DVI sockets (input) inside the

front panel

These sockets can be used to connect a PC with a compatible graphics card, certain DVD
players or a compatible high-definition digital satellite decoder.The DVI socket automatically
detects whether a signal is received when you select the AV5 programme.The supported
formats are:
640 x 480p, 60 Hz, 16:9

1280 x 720p, 60Hz, 16:9

720 x 480p, 59,94 Hz, 16:9

1280 x 720p, 50Hz, 16:9

720 x 576p, 50 Hz, 16:9 (31.25 kHz)

1920 x 1080i, 60 Hz, 16:9 (33.75 kHz)

1080i, 50 Hz (28.125 kHz)

1920 x 1080i, 50 Hz, 16:9 (31.25 kHz)

AV3

AV2

AV1

R

L

Y

Pb

Pr

R

L

Socket panel

access door

Lamp door

SUB-WFR

R

L

AUDIO OUTPUTS

TV ANT

AV
1

AV
3

AV
2

DVI-HDTV

COMPONENT INPUTS

AV
4

Front panel piece

Socket panel access door

at the back of the set

itc250s-en  27/08/04  18:01  Page 24

Содержание DLP-ITC250-SLIM

Страница 1: ...time 15 Setting the time 15 Programming the sleep timer 15 Programming the wake up timer 15 Parental control 16 Accessing the Parental control menu 16 Locking the buttons on the front of the TV set 16...

Страница 2: ...isconnected if necessary Unplug the TV set immediately if you notice it giving off a burning smell or smoke You must never under any circumstances open the TV set yourself as you run the risk of an el...

Страница 3: ...set has a lamp life of a few thousand hours in normal operating conditions If you notice the following changes The time the TV set takes to come on gets noticeably longer The picture s brightness decr...

Страница 4: ...annel AV programme PR PR To change channels 0 9 To select a channel by its number In the case of channel numbers with two digits press the two digits quickly or press 0 to display then enter the chann...

Страница 5: ...emote control to use with the amplifier refer to page 4 2 Move the remote control away from the appliances Press the button and while holding it down press the relevant mode button DVD in this example...

Страница 6: ...button turns off and then back on Note If you press an invalid button on the TV remote the appliance buttons flash several times to alert you You ll have to repeat step 3 4 Press and hold the button...

Страница 7: ...HF cable can be used for connecting an external aerial or other equipment fitted with a modulator video recorder satellite receiver etc We recommend that you do not connect other equipment video recor...

Страница 8: ...or reception quality Simply follow the instructions at the bottom of the screen Use a TV programme magazine to identify the channels Organising channels Select the Select programme option Using the PR...

Страница 9: ...automatically otherwise change the name suggested or enter a name To do so go to the name with only its initial letter in yellow Choose the character to be changed using the buttons Scroll through the...

Страница 10: ...l bar Use the buttons to adjust the volume Displaying status information In TV mode press the yellow button INFO on the remote control to display the number and name of the channel you are watching th...

Страница 11: ...number of each programme The last page lists units connected to the AV sockets The list appears on the page featuring the channel or AV programme which you are currently watching The channel or AV pro...

Страница 12: ...gs You can configure the sound environment according to the loudspeakers you connect to the TV set Select the Sound settings option from the Sound menu and press OK to confirm The options are the foll...

Страница 13: ...OK to confirm The Picture menu appears with the following options Advanced use this option provides access to the Advanced use menu see further below Picture preset use the buttons to select the appro...

Страница 14: ...d detection then enhancement of picture quality Note The Advanced option is selected by default Press EXIT to close the menu To return to the Picture menu select Return and press OK to confirm Lamp Po...

Страница 15: ...to 4 hours in 5 minute intervals by using the buttons Set the time to 00 00 to disable this function When the sleep timer is on a message appears one minute before the television set goes into standby...

Страница 16: ...or AV programme 1 Select the Programme lock option from the Parental control menu and press OK The relevant menu appears 2 Under the Programme option use the buttons numeric or PR PR buttons to select...

Страница 17: ...frame in a corner of the screen Split screen the screen is divided vertically in two and the PIP is displayed on the right side Sound comes from the main programme on the left When you enable the PIP...

Страница 18: ...nds until Done appears Front panel light this function is used to activate and control the brightness of the lighting for the buttons on the front of the TV set Use the buttons to select one of the si...

Страница 19: ...input use the buttons to select from the list the type of video signal transmitted by the equipment connected to the AV1 socket Note Select RGB if no picture is displayed when you connect a games con...

Страница 20: ...in green In this mode pressing the buttons will allow you to step through all the available subpages You can select a specific subpage number by pressing 0 to enter subpage direct access mode The disp...

Страница 21: ...t access The yellow and blue buttons on the remote control allow you to access directly those pages whose numbers are displayed in yellow and blue at the bottom of the screen Fastext Fastext displays...

Страница 22: ...navigator to carry out the following tasks Defining search criteria such as day and period time slot 1 Use the button to select the navigator 2 Select one of the criteria using the buttons and press...

Страница 23: ...ions for use are the same as those given in the paragraph Recording a programme on the previous page Memo can be used to store a programme from the recording list in the memo list 1 Select the program...

Страница 24: ...ide the front panel These sockets can be used to connect a range of equipment including video recorders camcorders VHS S VHS 8 mm or Hi 8 decoders satellite receivers DVD players games consoles or dev...

Страница 25: ...ocket Subwoofer connect the subwoofer to the SUB WFR socket Connecting an amplifier You can connect an amplifier and 2 speakers to replace your television s side speakers Connect your television s lef...

Страница 26: ...in the television to the video recorder They will be arranged in the same order on both items of equipment Refer to the instructions for your video recorder to find out how this is done Setting a pro...

Отзывы: