38
1. Se non si usa la spina in dotazione, nel portare
l'alimentazione collegare prima il filo giallo/verde e
poi i fili marrone e blu.
2. Se si scollega l'alimentazione, togliere prima i fili
marrone e blu e poi il filo giallo/verde.
1. If the standard plug is not useful, while connecting
electrically the indoor unit, please take first
green/yellow cable and then blu and brown ones.
2. When disconnecting power supply, please take first
blu and brown away and then the gree/yellow one.
Cavi elettrici dell'unità interna
L’unità interna di alcuni modelli è dotata di cavi elettrici pre-
cablati , numerati e pronti per la connessione con l’unità
esterna. Ove non previsti bisogna accedere alla morsettiera di
collegamento tramite apposito portellino oppure sganciando la
struttura frontale.
Indoor unit wirings
Indoor unit of some models has a set of pre-cabled, numbered
wirings ready to fit to outdoor unit. Where not forecast should
get access to the cables terminal block through the relevant
panel or opening the indoor unit front structure.
9. INSTALLAZIONE
9. INSTALLATION
9.5. Installazione dell’unità interna
9.5. Indoor unit installation
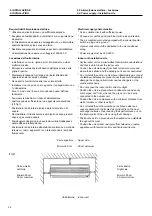
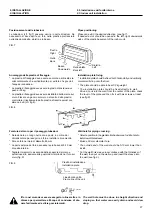
Installazione di un tubo per il drenaggio
* Installare le tubazioni con riferimento al foro nel muro e unirvi
il tubo di drenaggio come indicato in fig.10.
* Quando lo si unisce, il tubo di drenaggio deve essere fissato
sotto le tubazioni del refrigerante.
Note:
1. Il tubo di drenaggio non deve essere installato prima che
siano connessi i circuiti dell'unità interna.
2. Non riavvolgere le tubazioni sulla medesima sezione.
3. Quando unite il tubo di drenaggio accertatevi che l'acqua di
condensa possa scorrere facilmente.
Per controllare lo scarico:
* Versare un bicchiere di acqua nell’evaporatore.
* Verificare che l’acqua scorra attraverso il tubo flessibile di
scarico del gruppo interno senza perdite e che fuoriesca dal-
l’uscita dello scarico.
4. Non togliere i tappi dalle tubazioni prima del collegamento.
Drain pipe installation
* Install the pipe units according to the position of the wall hole,
bind the drain hose to the pipes of the indoor unit (see fig.10).
* When binding the drain hose must set below the refrigerant
pipes.
Notes:
1. The drain hose should not be installed before the indoor unit
pipes are conneced.
2.Do not rebend pipes on the same section.
3. When binding the hose make sure that the water can flow freely.
To check the drainage:
* Puor a glass of water on the evaporator.
* Ensure the water flows through the drain hose of the indoor
unit without any leakage and goes out the drain exit.
4. Never turn the nuts off from the pipe ends before linking the
pipe units.
Tubo di drenaggio
Drain pipe
Unire
Bind
FIG.10
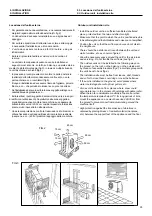
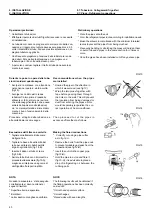
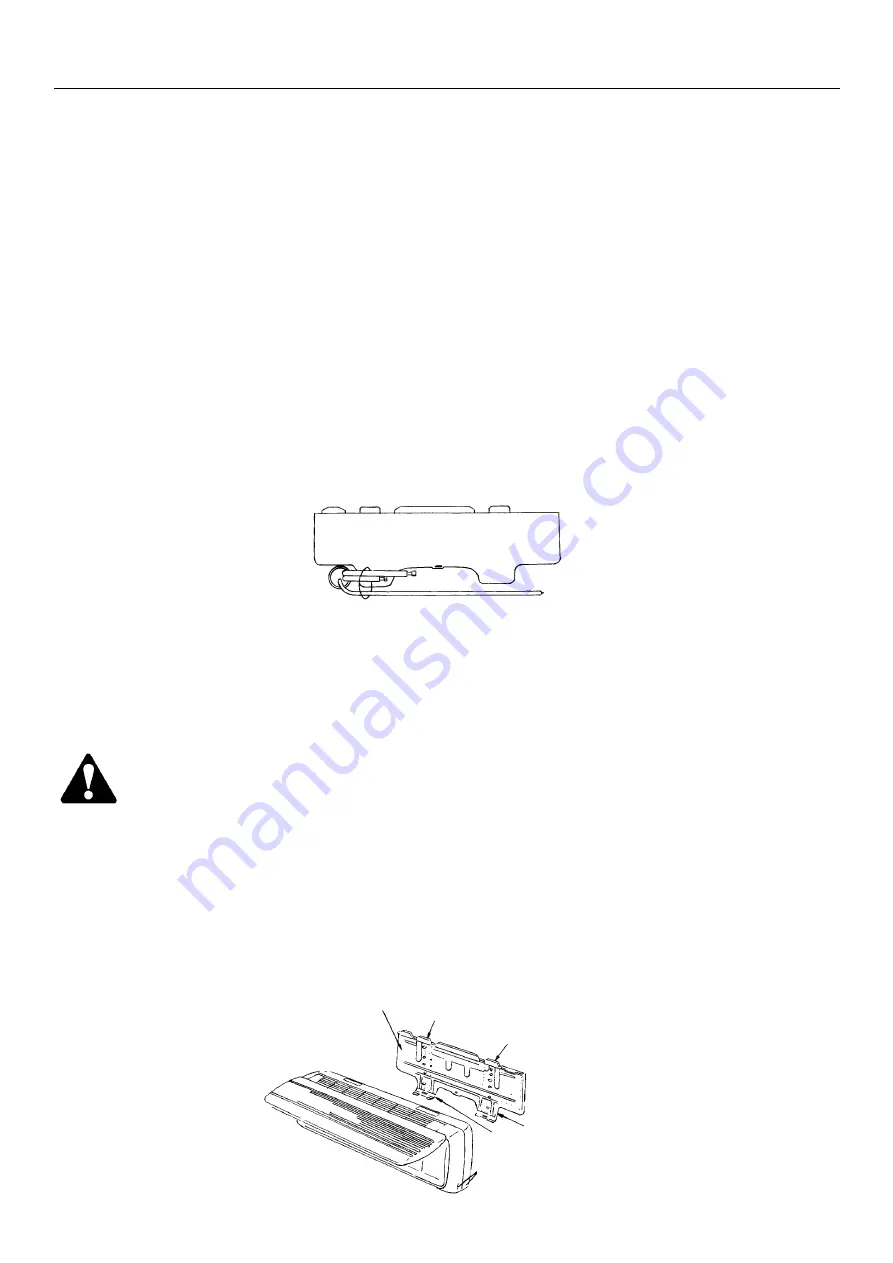
Installazione dell'unità interna
* Far passare i cavi di alimentazione e di controllo tra unità
interna ed esterna attraverso il foro nel muro.
* Dopo aver fatto passare anche le tubazioni del refrigerante e
il tubo di drenaggio attraverso il foro nel muro, appendere
l'unità interna agli agganci sulla piastra di fissaggio e accer-
tarsi che sia ben fissata e a livello (cfr. fig.11).
Indoor unit installation
* Put the power and control wirings between indoor and outdoor
units through the wall hole.
* After having passed the pipes and drain hose through the
wall hole, hang the indoor unit onto the installation plate by
means of the hooks at the top and bottom of the plate. Make
sure it is levelled and firm (see fig.11)
piastra di installazione
installation plate
agganci superiori
upper hooks
agganci inferiori
lower hooks
copertura laterale del mobiletto
cabinet side cover
FIG.11


