151
131
46
34
35
AIRTRONICS
ALL
FUTABA
FUTABA
S3401, S9402, S9404, S9450
HiTech
ALL
JR
JR
Z4750, Z8450
KO
PS-702, PS-703, PS-1001, PS-1003
KO
PS-901BH, PS-902
MULTIPLEX
ALL
NARROW
23
WIDE
NES-507, NES-513, NES-517, NES-901, NES-4000,
NES-4131, NES-4721, NES-4735, NES-9021, DS-
23
23
23
23
WIDE
WIDE
NARROW
NARROW
SERVO TYPE
OFFSET
NARROW
NARROW
NARROW
23
24
25
REQUIRED
SERVO ARM
S131, S131SH, S148, 23001, S3003, 25101, S9101,
S9201, S9304, S9401, S9403
25
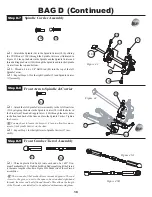
BAG C (Continued)
Step C-5
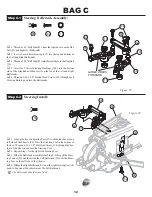
Figure 32
WIDE
NARROW
Table 31A
Table 31B
14
q
1. Use Figure 31A and Table 31B to determine how the Servo
Mounting Posts (34) and (35) should be attached to the servo
(not
included),
either
in the "wide" or "narrow" position.
q
2. Place a #4 Washer (151) over each of the four 4-40 x 3/8" Cap
Head Screws (131) and attach the Servo Mounts to the servo by
threading a Screw with Washer through the servo mounting ears into
the upper and lower holes in each Mount.
Do not tighten the screws
yet!
Just snug them up so that the Mounts are held in place, but can
still be moved from side to side with a little resistance.
q
3. As shown in Figure 32, you will use the bottom side of the
Chassis to determine the exact spacing needed for your brand servo.
With the Scerws still loose, push the pins on the Servo Mounts into
the holes in the bottom of the Chassis (46). Slide the Mounts until the
Screws are centered on the servo, and tighten as indicated in Figure
32.
The servo should be as close to centered between the two
Mounts, and as low to the Chassis as possible.
151
131
Servo Mounting Post Install:


