BAG C (Continued)
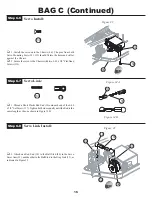
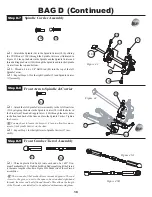
Figure 33
Figure 35
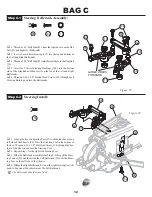
Figure 34B
Figure 34A
15
q
1. Thread a Short Plastic Rod End (10) onto each end of the 4-40
x 5/8" Set Screw (137). Tighten both sides equally until the Rod is the
same length as the one shown in Figure 34B.
q
1. Attach one Rod End (10) to the Ball Stud (80) in the Servo
Saver Arm (39), and the other to the Ball Stud in the Drag Link (32), as
indicated in Figure 35.
Step C-6
Servo Install:
q
1. Install the servo onto the Chassis (46). The pins from both
Servo Mounting Posts (34), (35) should fit into the holes and sit flat
against the Chassis.
q
2. Secure the servo to the Chassis with two 4-40 x 3/8" Flat Head
Screws (134).
Step C-7
137
10
137
10
Step C-8
Servo Link Install:
134
10
80
32
137
39
81
46
34
134
Servo Link:

